
Instructions / Assembly


Operating Instructions and Parts Manual
10
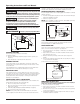
ELECTRICAL PRECAUTIONS - Before servicing a pump, ALWAYS shut off the main power breaker and then unplug the pump. Make sure you are NOT
standing in water and are wearing insulated protective sole shoes. Under flooded conditions, contact your local electric company or qualifi ed licensed
electrician for disconnecting electrical service prior to pump removal.
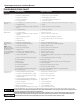
TROUBLESHOOTING CHART
Symptoms Possible Cause(s) Suggested Remedies
Pump will not
start or run
1. Power off
2. Blown fuse or tripped breaker
3. Faulty pressure switch
4. Motor overload tripped
5. Low supply voltage
1. Turn power on or call power company
2. Replace fuse or reset circuit breaker
3. Replace 30/50 pressure switch
4. Let cool. Overload will automatically reset
5. Contact an electrician
Motor hums but
won't run
1. Line voltage does not match selector switch
2. Inadequate wiring
3. Damaged or misalignment causing rotatin parts to
bind
4. Low supply voltage
1. Check line voltage and voltage selector switch (see Figure 7 on page 8)
2. Rewire
3. Replace or take to service shop for repaire
4. Contact an electrician
Overload trips 1. Low supply voltage
2. Damaged or misalignment causing rotatin parts
to bind
3. High surrounding temperature
4. Rapid cycling
5. Inadequate wiring
1. Contact an electrician
2. Replace or take to motor replare shop
3. Provide a shaded, well-ventilated area for pump
4. See pump starts and stops too often section below
5. Rewire
Pump runs but
delivers little to no
water.
NOTE: check to
make sure pump is
primed before looking
for other causes.
Unscrew priming plug
and see if water is in
priming hole.
1. Water level below pump intake
2. Discharge not vented while priming
3. Leak in suction piping
4. Well screen or inlet clogged
5. Clogged nozzle
6. Air volume control disphragm ruptured
7. Foot valve may be clogged or stuck closed
8. Pump not fully primed
9. Water level below maximum lift specification
10. Undersized piping
11. Gaseous well
12. Distorted venturi
13. Incorrect jet for application
14. Undersized pump
15. Pump cavitates, sounds like pumping gravel
16. Low supply voltage
1. Lower suction pipe further into wall
2. Open faucet to allow air to vent while priming pump
3. Repair or replace to fix leak
4. Clean or relace to remove obstruction
5. Clear obstruction from nozzle
6. Replace air volume control
7. Clean or replace as needed
8. Continue priming, pausing every 5 minutes to cool pump body. Refill pump
as needed
9. Select applicable pump and/or jet assembly
10. Replace as needed
11. Install baffle on pump intake to prevent gas from entering system
12. Inspect and replace
13.Purchase a jet matched to your system
14. Increase horsepower of pump
15. Increase suction plumbing diameter or decrease pipe friction
16. Contact an electrician
Pump starts and
stops too ofen
1. Water-logged tank (Conventional Tank)
2. Air volume control tubing kinked or clogged
3. Air volume control tubing connected to wrong
opening on pump
4. Incorrect tank pressure (pre-charged tank)
5. Ruptured disphragm/bladder (pre-charged tank)
6. Leak in house piping
7. Foot valve or check valve stuck open
8. Motor overload tripping
9. Improperly adjusted or damage pressure switch
1. Replace tank or air volume control
2. Clean or replace as needed
3. Move to correct pump opening
4. Add or release air as needed
5. Replace tank
6. Locate and repair leak
7. Remove and replace
8. See overload trips section
9. Replace 30/50 pressure switch
PRÉCAUTIONS ÉLECTRIQUES - Avant tout entretien ou réparation de pompe, TOUJOURS couper le courant au disjoncteur, puis débrancher la pompe.
S'assurer de ne PAS rester debout dans l'eau, et porter des chaussures à semelles de protection isolées. En cas d'inondation, vérifier auprès de la
société locale d'électricité ou d'un électricien agréé qualifié pour couper le service électrique avant le retrait de la pompe.