
Owner`s manual


8
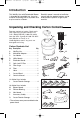
Positioning Detachable Blower
(Power Head Assembly)
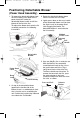
Release
Button
Press and Pull
1. To remove the detachable blower from
the lid assembly, press down on the
power head latch under the
detachable blower handle and lift the
blower off the lid of the Vac.
To replace the blower back onto the lid
assembly, proceed to the following
instructions.
Power Head
Latch
Detachable
Blower
Power Head
Latch
Drum
Latch
Lid Assembly
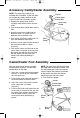
3. Rotate the detachable blower down
until the travel of the unit stops.
4. Lightly press down on the carry handle
of the detachable blower until you hear
the slight “snap” of the power head
latch engaging the blower. The
detachable blower is now latched to
the lid assembly.
5. Your new Wet/Dry Vac is ready for use.
With the Wet/Dry Vac completely
assembled and ready for use, insert
the push button end of the “Tug-a-
Long” hose into the inlet of the Vac.
The hose should snap into place. To
remove the hose from the Vac, press
the release button in the hose
assembly and pull the hose out of the
Vac inlet, as shown.
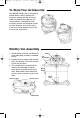
Molded
Plastic Lead
Pull
Handle
Indented
Area
2. On top of the detachable blower
(opposite the handle side of the
blower); there is a molded plastic lead
that is used to assist assembling the
unit.
Position the lead into the indented
area above the “Pull Handle”.
SP6728-1 16 Gallon 3/19/10 10:58 AM Page 8