SP6779-4 Ridgid WD1680 ES 1/29/14 11:27 AM Page 1 OWNER’S MANUAL 16 U.S. GALLON/ 60 LITER PROFESSIONAL WET/DRY VAC WD16800 WD1680EX0 FOR QUESTIONS OR INFORMATION CONTACT US AT 1-800-4-RIDGID (1-800-474-3443) from the US and Canada 01-800-701-9811 from Mexico www.ridgidvacs.com ! WARNING: To reduce the risk of injury, the user must read and understand the owner’s manual before using this product. Thank you for buying a RIDGID product.
SP6779-4 Ridgid WD1680 ES 1/29/14 11:27 AM Page 2 Table of Contents Section Page Introduction . . . . . . . . . . . . . . . . . . . . . . 4 Unpacking and Checking Carton Contents . . . . . . . . . . . . . . . 4 Filter Removal and Installation . . . . . . . 5 Drum/Caster Foot Assembly . . . . . . . . . 6 Accessory Storage Holder. . . . . . . . . . . 7 Accessory Storage . . . . . . . . . . . . . . . . 7 Wet/Dry Vac Assembly . . . . . . . . . . . . . 8 Positioning Detachable Blower (Power Head Assembly). .
SP6779-4 Ridgid WD1680 ES 1/29/14 11:27 AM • To reduce the risk of injury from accidental starting, unplug power cord before changing or cleaning filter. • Do not unplug by pulling on cord. To unplug, grasp the plug, not the cord. • Do not use with damaged cord, plug or other parts. If your Vac is not working as it should, has missing parts, has been dropped, damaged, left outdoors, or dropped into water, contact RIDGID Customer Service.
SP6779-4 Ridgid WD1680 ES 1/29/14 11:27 AM Page 4 Introduction Read this owner’s manual to familiarize yourself with the product features and to understand the specific usage of your new Vac. This Wet/Dry Vac with Detachable Blower is intended for household use. It may be used for vacuuming wet or dry media and may be used as a blower. Unpacking and Checking Carton Contents Remove contents of carton. Check each item against the Carton Contents List.
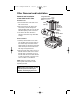
SP6779-4 Ridgid WD1680 ES 1/29/14 11:27 AM Page 5 Filter Removal and Installation Removal and Installation of the Qwik Lock™ Filter Integrated Filter Plate with Center Hole PUSH DOWN Filter Removal: 1. Hold the filter tabs of the Qwik Lock™ filter in each hand. Filter Tabs (2) PULL UP Rubber Gasket at Bottom of Filter 2. With one thumb on the Qwik Lock™ stud, which protrudes through the integrated filter plate, lift up on the filter tabs while pushing down on the stud. (cutaway view) 3.
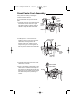
SP6779-4 Ridgid WD1680 ES 1/29/14 11:27 AM Page 6 Drum/Caster Foot Assembly If any parts are missing or damaged contact Customer Service. Do not assemble until you have all the parts. Drum 1. Insert the front and rear caster feet into the bottom of drum as shown. Light taps with a mallet or hammer may be needed to fully seat both caster feet. Rear Caster Foot Front Caster Foot Drain 2.
SP6779-4 Ridgid WD1680 ES 1/29/14 11:27 AM Page 7 Accessory Storage Holder Installing Accessory Storage Holder Removing Accessory Storage Holder 1. Position rods of accessory storage holder directly over accessory rod receptacles in dust drum. Push in both accessory storage holder clips and then pull straight up on rods of accessory storage holder. 2. Slide accessory storage holder into accessory rod receptacles until fully seated with holder clips locked.
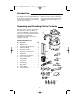
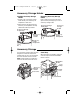
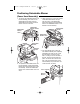
SP6779-4 Ridgid WD1680 ES 1/29/14 11:27 AM Page 8 Wet/Dry Vac Assembly 1. Locate the lid assembly and the drum assembly (assembled earlier). Lid Assembly with Detachable Blower 2. Position the lid assembly with the detachable blower handle of the unit located above the vacuum inlet on the dust drum. Drum Latch 3. To assemble the lid assembly to the drum assembly, lower the lid assembly onto the dust drum. Rotate both latches down until you hear them snap over the drum latch catches of the drum.
SP6779-4 Ridgid WD1680 ES 1/29/14 11:27 AM Page 9 Positioning Detachable Blower (Power Head Assembly) 1. To remove the detachable blower from the lid assembly, press down on the detachable blower latch under the detachable blower handle and lift the blower off the lid of the Vac. 3. Lightly press down on the carry handle of the detachable blower until you hear the “snap” of the detachable blower latch engaging the detachable blower. The detachable blower is now latched to the lid assembly.
SP6779-4 Ridgid WD1680 ES 1/29/14 11:27 AM Page 10 Operation WARNING: To reduce the risk of fire, explosion, or damage to Vac: Do not leave Vac running while unattended - you may fail to notice important signs indicating abnormal operation such as loss of suction, debris/liquid exiting the exhaust, or abnormal motor noises. Immediately stop using Vac if you notice these signs. Do not leave Vac plugged in when not in use. Do not continue running when float has cut off suction.
SP6779-4 Ridgid WD1680 ES 1/29/14 11:27 AM Page 11 Operation (continued) Emptying the Drum Vacuuming Dry Materials 1. The filter must always be in correct position at all times to avoid leaks and possible damage to Vac. ! WARNING: To reduce the risk of injury from accidental starting, unplug power cord before emptying the drum. 2.
SP6779-4 Ridgid WD1680 ES 1/29/14 11:27 AM Page 12 Operation (continued) 1. Familiarize yourself with the detachable blower portion of your Wet/Dry Vac. Moving the Wet/Dry Vac Should it become necessary to pick the Vac up to move it, the handles on the sides of the dust drum are used to lift. To maneuver the Vac, the handle above the inlet can be used. 2.
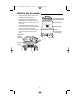
SP6779-4 Ridgid WD1680 ES 1/29/14 11:27 AM Page 13 Operation (continued) Using the Detachable Blower for “Blowing” Car Nozzle Two suggested methods of using the blower are: Male-Male Adapter 1. Insert the round end of the blower wand into the blowing port of the detachable blower and turn clockwise to lock. 3. Turn the blower “ON” by sliding the switch in the handle of the blower to the “I” position. Goggles Dusk Mask Blowing Port TURN CLOCKWISE TO LOCK Blower Wand - OR 2.
SP6779-4 Ridgid WD1680 ES 1/29/14 11:27 AM Page 14 Maintenance Detachable Blower Intake ! WARNING: To reduce the risk of injury from accidental starting, unplug power cord before changing or cleaning filter or foam pad. After using the detachable blower of your Wet/Dry Vac, examine the bottom of the blower for dust and debris. Check to see if the intake to the blower has debris stuck to the plastic vents and foam pad.
SP6779-4 Ridgid WD1680 ES 1/29/14 11:27 AM Page 15 Maintenance (continued) Filter Cleaning A Dry Filter NOTE: The filter is made of high quality paper designed to stop very small particles of dust. The filter can be used for dry debris or small amounts of liquid. Handle the filter carefully when removing or installing. Creases in the filter pleats may occur from installation but will not affect the performance of the filter. 1.
SP6779-4 Ridgid WD1680 ES 1/29/14 11:27 AM Page 16 Maintenance (continued) Cleaning and Disinfecting the Wet/Dry Vac Storage Before storing your Vac, the drum should be emptied and cleaned. The cord and hose should be stored as described in this manual. Accessories should be kept in the same area as the Vac so they can be readily available. The Vac should be stored indoors. To keep your Wet/Dry Vac looking its best, clean the outside with a cloth dampened with warm water and mild soap.
SP6779-4 Ridgid WD1680 ES 1/29/14 11:27 AM Notes 17 Page 17
SP6779-4 Ridgid WD1680 ES 1/29/14 11:27 AM Page 18 Repair Parts 16 Gallon Professional Wet/Dry Vac Model Number WD16800/WD1680EX0 RIDGID parts are available on-line at www.ridgidparts.com Always order by Part Number - Not by Key Number Key No. Part No.
SP6779-4 Ridgid WD1680 ES 1/29/14 11:27 AM Page 19 Repair Parts (continued) 16 Gallon Professional Wet/Dry Vac Model Number WD16800/WD1680EX0 RIDGID parts are available on-line at www.ridgidparts.com ! WARNING SERVICING OF DOUBLE-INSULATED WET/DRY VAC In a double-insulated Wet/Dry Vac, two systems of insulation are provided instead of grounding. No grounding means is provided on a double-insulated appliance, nor should a means for grounding be added.
SP6779-4 Ridgid WD1680 ES 1/29/14 11:27 AM Page 20 • What is covered RIDGID® Wet/Dry Vacs are warranted to be free of defects in workmanship and material. • How long coverage lasts This warranty lasts for the lifetime of the RIDGID® Wet/Dry Vac. • How to obtain service To obtain the benefit of this warranty, deliver via prepaid transportation the complete product to RIDGE TOOL COMPANY, Elyria, Ohio, or any authorized RIDGID® INDEPENDENT SERVICE CENTER.
SP6779-4 Ridgid WD1680 ES 1/29/14 11:27 AM Page 21 MANUAL DEL USUARIO ASPIRADORA PARA MOJADO/SECO PROFESIONAL DE 16 GALONES/60 LITROS WD16800 WD1680EX0 ¿PREGUNTAS O COMENTARIOS? COMUNÍQUESE CON NOSOTROS EN 1-800-4-RIDGID (1-800-474-3443) desde los EE.UU. y Canadá 01-800-701-9811 desde México www.ridgidvacs.com ! ADVERTENCIA: Para reducir el riesgo de lesiones, el usuario debe leer y entender el manual del usuario antes de utilizar este producto. Gracias por comprar un producto RIDGID.
SP6779-4 Ridgid WD1680 ES 1/29/14 11:27 AM Page 22 Indice Sección Página Introducción . . . . . . . . . . . . . . . . . . . . . . . . . . . . . 24 Desempaquetado y comprobación del contenido de la caja de cartón . . . . . . . . . . 24 Remoción e instalación del filtro . . . . . . . . . . . . . 25 Ensamblaje del tambor y los pies de ruedecilla . . 26 Soporte de almacenamiento de accesorios . . . . . 27 Almacenamiento de accesorios . . . . . . . . . . . . . .
SP6779-4 Ridgid WD1680 ES 1/29/14 11:27 AM • No tire de la aspiradora usando el cordón ni la lleve por el cordón, ni use el cordón como asa, ni cierre una puerta sobre el cordón, ni tire del cordón alrededor de bordes o esquinas afilados. No pase la aspiradora en marcha sobre el cordón. Mantenga el cordón alejado de las superficies calientes. • No maneje el enchufe, el interruptor o la aspiradora con las manos mojadas.
SP6779-4 Ridgid WD1680 ES 1/29/14 11:27 AM Page 24 Introducción Esta aspiradora para mojado/seco con soplador desmontable está diseñada para uso doméstico solamente. Se puede utilizar para recoger materiales mojados o secos y se puede usar como soplador. Lea este manual del usuario para familiarizarse con las características del producto y para entender la utilización específica de su nueva aspiradora.
SP6779-4 Ridgid WD1680 ES 1/29/14 11:27 AM Page 25 Remoción e instalación del filtro Remoción e instalación del filtro Qwik Lock™ Placa de filtro Integrated Filter integrada con agujero Plate with Center central Hole Remoción del filtro: 1. Sostenga las lengüetas del filtro Qwik Lock™ en cada mano. 2. Con un dedo pulgar en el vástago Qwik Lock™, que sobresale a través de la placa del filtro integrada, levante las lengüetas del filtro a la vez que empuja hacia abajo sobre el vástago. 3.
SP6779-4 Ridgid WD1680 ES 1/29/14 11:27 AM Page 26 Ensamblaje del tambor y los pies de ruedecilla Si cualquiera de las piezas falta o está dañada, póngase en contacto con Servicio al Cliente. No monte la aspiradora hasta que tenga todas las piezas. 1. Introduzca los pies de ruedecilla delanteros y traseros en la parte inferior del tambor, de la manera que se muestra en la ilustración.
SP6779-4 Ridgid WD1680 ES 1/29/14 11:27 AM Page 27 Soporte de almacenamiento de accesorios Instalación del soporte de almacenamiento de accesorios Remoción del soporte de almacenamiento de accesorios 1. Posicione las varillas del soporte de almacenamiento de accesorios directamente sobre los receptáculos para las varillas del soporte de accesorios, ubicados en el tambor de polvo. 2.
SP6779-4 Ridgid WD1680 ES 1/29/14 11:27 AM Page 28 Ensamblaje de la aspiradora para mojado/seco 1. Localice el ensamblaje de la tapa y el ensamblaje del tambor (ensamblados antes). Ensamblaje de Lid Assembly with la tapa con soplador Detachable Blower desmontable 2. Posicione el ensamblaje de la tapa con el asa del soplador desmontable de la unidad ubicada encima de la entrada de la aspiradora sobre el tambor de polvo. Pestillo del tambor Drum Latch 3.
SP6779-4 Ridgid WD1680 ES 1/29/14 11:27 AM Page 29 Posicionamiento del soplador desmontable (ensamblaje del cabezal del motor) 1. Para quitar el soplador desmontable del ensamblaje de la tapa, presione hacia abajo sobre el pestillo del cabezal del motor debajo del asa del soplador desmontable y levante el soplador para separarlo de la tapa de la aspiradora. Pestillo Detachable del soplador Blower desmontable Latch 3.
SP6779-4 Ridgid WD1680 ES 1/29/14 11:27 AM Page 30 Funcionamiento ! ADVERTENCIA: Para reducir el riesgo de incendio, explosión o daños a la aspiradora: • No deje la aspiradora en marcha mientras esté desatendida. Usted podría no notar señales importantes que indiquen un funcionamiento anormal, tal como pérdida de succión, residuos o líquido que salen por el escape o ruidos anormales del motor. Deje de usar la aspiradora inmediatamente si observa estas señales.
SP6779-4 Ridgid WD1680 ES 1/29/14 11:27 AM Page 31 Funcionamiento (continuación) Vaciado del tambor Recogida de materiales secos con la aspiradora ! ADVERTENCIA: Para reducir el riesgo de lesiones debidas a un arranque accidental, desenchufe el cordón de energía antes de vaciar el tambor. 1. El filtro debe estar siempre en posición correcta, en todo momento, para evitar fugas y posibles daños a la aspiradora. 2.
SP6779-4 Ridgid WD1680 ES 1/29/14 11:27 AM Page 32 Funcionamiento (continuación) Traslado de la aspiradora para mojado/seco 1. Familiarícese con la porción del soplador desmontable de la aspiradora para mojado/seco. En caso de que sea necesario levantar la aspiradora para trasladarla, las asas ubicadas en los lados del tambor para polvo se usan para levantar la aspiradora. Para maniobrar la aspiradora, se debe usar el asa de empuje que está sobre la entrada de la unidad. 2.
SP6779-4 Ridgid WD1680 ES 1/29/14 11:27 AM Page 33 Funcionamiento (continuación) Utilización del soplador desmontable para “soplar” Boquilla Car Nozzle para auto Dos métodos sugeridos para utilizar el soplador son: 1. Inserte el extremo redondo del tubo extensor del soplador en el orificio de soplado del soplador desmontable y gírelo en el sentido de las agujas del reloj para bloquearlo. Adaptador Male-Male macho-macho Adapter 3.
SP6779-4 Ridgid WD1680 ES 1/29/14 11:27 AM Page 34 Mantenimiento Entrada del soplador desmontable ! ADVERTENCIA: Para reducir el riesgo de lesiones debidas a un arranque accidental, desenchufe el cordón de energía antes de cambiar o limpiar el filtro o la almohadilla de espuma. Después de usar el soplador desmontable de la aspiradora para mojado/seco, examine el fondo del soplador para ver si hay polvo y residuos.
SP6779-4 Ridgid WD1680 ES 1/29/14 11:27 AM Page 35 Mantenimiento (continuación) Filtro Limpieza de un filtro seco NOTA: Este filtro está hecho de papel de alta calidad diseñado para detener partículas de polvo muy pequeñas. El filtro se puede usar para recoger material seco o pequeñas cantidades de líquido. Maneje el filtro cuidadosamente al quitarlo para limpiarlo o al instalarlo.
SP6779-4 Ridgid WD1680 ES 1/29/14 11:27 AM Page 36 Mantenimiento (continuación) Limpieza y desinfección de la aspiradora para mojado/seco Almacenamiento 1. Vacíe de residuos el tambor. Antes de almacenar la aspiradora, se debe vaciar y limpiar el tambor para polvo. El cordón y la manguera se deben almacenar de la manera que se describe en este manual. Los accesorios se deben mantener en la misma área que la aspiradora para que estén al alcance de la mano cuando se necesiten.
SP6779-4 Ridgid WD1680 ES 1/29/14 11:27 AM Notas 37 Page 37
SP6779-4 Ridgid WD1680 ES 1/29/14 11:27 AM Page 38 Piezas de repuesto Aspiradora para mojado/seco profesional de 16 galones Número de modelo WD16800/WD1680EX0 Las piezas RIDGID se encuentran disponibles en línea conectándose a www.ridgidparts.com Pida siempre por número de pieza —no por número de clave No. de clave No.
SP6779-4 Ridgid WD1680 ES 1/29/14 11:27 AM Page 39 Piezas de repuesto (continuación) Aspiradora para mojado/seco profesional de 16 galones Número de modelo WD16800/WD1680EX0 Las piezas RIDGID se encuentran disponibles en línea conectándose a www.ridgidparts.com ! ADVERTENCIA SERVICIO DE AJUSTES Y REPARACIONES DE UNA ASPIRADORA PARA MOJADO/SECO CON AISLAMIENTO DOBLE En una aspiradora para mojado/seco con aislamiento doble se proporcionan dos sistemas de aislamiento en vez de conexión a tierra.
SP6779-4 Ridgid WD1680 ES 1/29/14 11:27 AM Page 40 • Qué está cubierto Se garantiza que las aspiradoras para mojado/seco RIDGID® están libres de defectos de fabricación y de materiales. • Cuánto dura la cobertura Esta garantía dura toda la vida de las aspiradoras para mojado/seco RIDGID®.