
User Manual
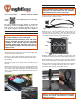

1-Start with the Car Clips on the (4) attachment straps
(Fig 8).
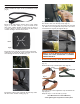
1-Run a strap’s loop through the backside of a Car Clip
(Fig 17).
3-Hold the straps with the Car Clips facing towards the
vehicle (Fig 10). Thread the straps up through slot A and
down through slot B of the buckles (Fig 11).
5-Tighten the straps evenly (Fig 13 and Fig 14) and shut
the vehicle’s doors over the clips/straps (Fig 15).
Re-Connect The Car Clips To The Attachment Straps
Fig 15
2-Thread the strap’s end through its loop (Fig 18).
3-Pull the strap’s end to tighten the strap around the Car
Clip (Fig 19).
Fig 14
Attach The Carrier - WITHOUT A Roof Rack
2-Line up the side buckles with the doors of the vehicle
(Fig 9). If a 4-door vehicle, (1) strap will attach to the
door frame weather molding in each of the (4) doors. If
a 2-door vehicle, (2) straps will attach to the door frame
weather molding in each of the (2) doors.
1 Year Manufacturer’s Limited Warranty
www.rightlinegear.com/product-warranty.html
4-Repeat steps 1-3 for the other (3) straps.
Fig 10
4-Open the vehicle’s doors and hook the Car Clips under
the door frame weather molding (Fig 12).
Fig 13
Fig 12
6-Tie off the strap ends so they don’t ap in the wind (Fig
16). Make sure to re-tighten the straps after a few miles
and check them regularly throughout the trip.
Fig 19
Fig 18
Fig 16
Fig 8
Fig 9
Side Buckles
Loop
NOTE: IF A STRAP MAKES NOISE WHILE DRIVING,
LOOSEN THE STRAP, RE-POSITION IT SLIGHTLY,
AND RE-TIGHTEN IT.
Strap End
Fig 17
Car Clip
Loop
Fig 11
A
B
Front