
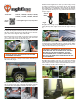
User Guide

WARNING: KEEP ALL FLAME AND HEAT
SOURCES AWAY FROM THIS TENT FABRIC.
THIS TENT MEETS THE FLAMMABILITY REQUIRE-
MENTS OF CPAI-84. THE FABRIC MAY BURN
IF LEFT IN CONTINUOUS CONTACT WITH ANY
FLAME SOURCE. THE APPLICATION OF ANY
FOREIGN SUBSTANCE TO THE TENT FABRIC
MAY RENDER THE FLAME RESISTANT PROPER-
TIES INEFFECTIVE.
CAUTION: DO NOT DRIVE WITH THE TENT SET UP.
DO NOT RUN THE TRUCK ENGINE WHEN ANYONE
IS INSIDE THE TENT. PLEASE OBSERVE THE CAUTION
TAG ON THE INSIDE OF THE TENT.
Take Down The Tent
1-Release the pole clips and take the poles out of the pole
pockets. Lower the tent and remove the poles from the
pole sleeves. Fold the poles and place them into the pole
bag.
2-Unclip the A, B, and C straps and loosen the tailgate
strap.
3-Tilt the tailgate up and release the orange straps.
4-Roll the tent, the rainy, and the pole bag together (Fig
22). Place the rolled up tent into the stuff sack (Fig 23).
3-Tie the (3) strings at the rear edge of the rainy to the
tent poles (Fig 20). Line up the seams of the rainy with the
tent poles underneath (Fig 21).
1-Position the rainy over the tent with the logo over the
tent’s door.
Set Up The Rainy
Fig 21Fig 20
Fig 18
Fig 22 Fig 23
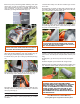
11-Attach the (4) pole clips to the gray-marked pole (Fig
16).
Fig 15 Fig 16
10-Raise each of the orange-marked poles by inserting
their ends into their matching color pole pockets (Fig 15).
Raise the gray-marked pole by the same method.
Fig 19
1 Year Manufacturer’s Limited Warranty
www.rightlinegear.com/product-warranty.html
Pole Clips
9-Run all (3) tent poles through their matching color pole
sleeves (Fig 13). The (2) front poles are marked with or-
ange tape and the rear pole is marked with gray tape
(Fig 13 and Fig 14). The gray-marked pole should run
under the (2) orange-marked poles (Fig 14).
Fig 13
Fig 14
Gray-
Marked
Pole
Pole
Sleeve
Orange
Tape
Orange-Marked
Pole
Orange-Marked
Pole
Orange
Marking
CAUTION: DO NOT USE EXCESSIVE FORCE WHEN
RAISING THE POLES. MAKE SURE THE POLE SLEEVES
SLIDE OVER THE POLES WITHOUT HANGING UP.
Fig 17
12-Position the inner aps on the top of the bed rails, un-
der the orange straps, and pull out the slack (Fig 17).
Inner Flap
2-Connect the (3) buckles on each side of the tent (Fig 18)
and adjust their straps. The rainy should cover the win-
dows on both sides of the tent (Fig 19).
13-Adjust all straps a nal time. Make sure that the inner
side ap seams run along the top outer edges of the bed
rails (Fig 8 and Fig 9).
The use of the rainy is optional, depending on weather
conditions.