
Installation Instructions

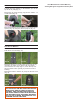

1-Lay the air mattress over a at area, free from rocks
and sticks (Fig 1). Make sure the mattress is completely
unfolded and its ocked side is facing up (Fig 2).
3-Insert the air pump’s charge plug into the vehicle’s 12
volt DC outlet (Fig 4).
4-Place the adaptor into the mattress’s easy inate valve’s
opening (Fig 5). The adaptor will push the valve open.
Power the air pump on (Fig 6).
Fig 1 Fig 2
5-Inate the mattress to the desired rmness, turn the air
pump off, and remove the adaptor from the opening. The
air pressure inside the mattress will push the valve closed.
Screw the cap over the easy inate valve’s opening (Fig
7).
Inate The Air Mattress
2-Attach the large adaptor to the ination port on the side
of the air pump (Fig 3).
Fig 3 Fig 4
Fig 7 Fig 8
Fig 9
7-Place the mattress between the wheel wells of the truck
bed (Fig 9) with its ocked side facing up and its valve
side facing the rear of the truck.
6-Use the mouth valve to inate the mattress if the air
pump is unavailable (Fig 8).
Truck Bed Air Mattress 110M10, 110M60
www.rightlinegear.com/setup.html
Set Up
Video:
QR
CODE
WARNING: THE AIR PUMP’S POWER SUPPLY MUST
BE A VEHICLE’S 12 VOLT DC OUTLET.
Flocked
Side
WARNING: DO NOT LEAVE THE PUMP UNATTENDED
WHILE OPERATING. DO NOT ALLOW THE PUMP TO
GET WET OR KEEP IT RUNNING FOR OVER 15 MIN-
UTES. DO NOT OBSTRUCT THE INFLATION AND DE-
FLATION PORTS. DO NOT ALLOW SMALL DEBRIS TO
BE SUCKED INTO THE INFLATION OR DEFLATION
PORTS.
Fig 5
Fig 6
NOTE: IT IS RECOMMENDED TO KEEP THE MATTRESS
INFLATED FOR SEVERAL HOURS BEFORE INITIAL
USE. THE MATTRESS’S MATERIAL WILL STRETCH DUR-
ING THIS TIME AND ADDITIONAL AIR WILL BE RE-
QUIRED TO RETURN THE MATTRESS TO ITS DESIRED
FIRMNESS. THE LOSS OF AIR BEFORE INITIAL USE IS
NORMAL AND DOES NOT MEAN THE MATTRESS IS
LEAKING.
8-Store your gear between the mattress and the bed walls
(Fig 10).
Fig 10