About the User Guide Page 1 Rio 800 User Guide About the User Guide The Rio 800 User Guide includes the following information: Introduction Using your Rio Using Rio menu options and settings Using the Rio software Understanding digital audio terms Frequently asked questions (FAQ) and troubleshooting Warranty Regulatory Customer care Index To learn more: • Refer to the Getting Started Guide for the basics on how to set up and start using your Rio.
About the User Guide Page 2 Legal notices Copyright © 2000-2001 SONICblue Incorporated. All Rights Reserved. SONICblue Incorporated does not assume any responsibility for errors or omissions in this document or make any commitment to update the information contained herein. Rio is a registered trademark of RioPort, Inc. in the United States and/or other countries and is used under license. The RealPlayer and the RealJukebox are included under license from RealNetworks, Inc. Copyright 1999.
Introduction Page 3 Introduction The Rio 800 provides the ultimate listening experience while you exercise, commute, or relax. Create and mix your favorite selections on your PC or Mac for playback on your Rio. Your player is similar in function to a portable cassette or CD player. However, it has no moving parts, so it delivers skip-free music under any conditions. Plus, the convenient rechargeable battery and voice recording option make the Rio 800 the premier digital audio player.
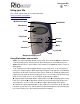
Using your Rio Page 4 Using your Rio This section explains what you need to know about: Using Rio buttons and controls Using the rechargeable backpack Multifunction port On/Hold/Off Microphone LCD Play/Pause Volume Select Forward Menu Reverse Record Stop Backpack charger port Using Rio buttons and controls • Select: The center navigation button. In play mode, press and hold Select for about two seconds to jump to a list of tracks you can pick from to play.
Using your Rio Page 5 • • 7: Reverse; the left navigation button. In play mode, press and release 7 to skip to the beginning of the track currently playing on your Rio. Press and hold 7 to fast-rewind through the current track. In menu mode, press 7 to navigate through menu options. Menu: Press the Menu button to display the Rio menu options. Press 4/;, 8, 7, and < to navigate through menu options. Press Select to choose a menu option.
Using your Rio Page 6 Using the rechargeable backpack Calibrating the battery ensures accurate battery level display. The first time you charge the battery backpack, it is important to calibrate it and give it a full charge overnight or until the calibration timer expires. You do not need to charge the battery before you calibrate it. Note: You do not have to calibrate the battery each time you charge it—only the first time. See the section on Battery Calibration for instructions and more information.
Using menu options and settings Page 7 Using menu options and settings When the Menu button is pressed, the LCD displays Rio menu options: • Audio: Preset and custom equalizer settings. • Player: Random and repeat play options, delete track, pick a track, bookmark, and playlist functions. • Prefs: Player settings including power saving (time to sleep), LCD display backlight and contrast, time and date, battery level and calibration, and recorder.
Using menu options and settings Page 8 Setting the Custom EQ 1 Press Menu. 2 Press the 7 or 8 buttons to navigate to Audio. 3 Press Select. 4 The EQ settings display. 5 Press the 4/;, <, 7 or 8 buttons to navigate to Custom. 6 Press Select. 7 Press the 4/; or < buttons to navigate between Bass and Treble. 8 Use the 7 or 8 buttons to increase or decrease the Bass or Treble value from 1 (low) to 9 (high). • To save the settings press Select.
Using menu options and settings Page 9 Using Player functions Player functions include: • Play options: Repeat or randomize tracks. • Delete tracks: Remove content from the Rio. • Pick a track: Select and play a track. • Bookmarks: Play or delete bookmarks. • Playlist: Select playlists, create new playlists, manage playlists or remove playlists from the Rio. Setting Repeat and Random play options 1 Press Menu. 2 Press the 7 or 8 buttons to navigate to Player. 3 Press Select.
Using menu options and settings Page 10 Deleting tracks from the Rio 1 Press Menu. 2 Press the 7 or 8 buttons to navigate to Player. 3 Press Select. 4 Press the navigation buttons to highlight Delete Tracks. 5 Press Select. A list of all tracks displays. 6 Press the 4/; or < buttons to navigate to the track you want to delete. 7 Press Select. • Highlight Yes on the Delete dialog, then press Select to delete the track.
Using menu options and settings Page 11 Adding bookmarks 1 Press 4/; during playback to pause. 2 Press Select to create a new bookmark. If you press and hold Select the Pick a track list displays. Playing or deleting bookmarks 1 Press Menu. 2 Press the 7 or 8 buttons to navigate to Player. 3 Press Select. 4 Press the navigation buttons to highlight Bookmarks. 5 Press the 4/; or < buttons to highlight Play Bookmark or Delete Bookmark. 6 Press Select.
Using menu options and settings Page 12 Working with Playlists Playlist options include: • Choose: Select a playlist from playlists stored on the Rio. • New: Build a new playlist. • Edit: Modify an existing playlist. • Remove: Remove a playlist from the Rio. 1 Press Menu. 2 Press the 7 or 8 buttons to navigate to Player. 3 Press Select. 4 Navigate to Playlist. 5 Press Select. 6 Press the 7, 8, 4/; or < buttons highlight Choose, New, Edit or Remove playlist options. 7 Press Select.
Using menu options and settings Page 13 Modifying a playlist 1 Select the Edit playlist option. 2 Press the 4/; or < buttons to navigate to the playlist. 3 Press Select. 4 The playlist editor displays tracks and their playlist order numbers in the left column. 5 • To add or remove tracks from the playlist, highlight a track and press Select to tag or untag the track with a number in the left column. This number is the order in which the track plays in the playlist.
Using menu options and settings Page 14 Setting Preferences Preferences include these Rio settings: • Power saving (time to sleep). • Time and date. • Display backlight and contrast. • Battery level display and calibration. • Recorder. Adjusting the power saving setting You can adjust the time to sleep (suspend) setting from one to nine minutes. To turn off the power saving feature, set the time to sleep setting to 0 (zero). 1 Press Menu. 2 Press the 7 or 8 buttons to navigate to Prefs.
Using menu options and settings Page 15 Adjusting LCD display backlight and contrast 1 Press Menu. 2 Press the 7 or 8 buttons to navigate to Prefs. 3 Press Select. 4 Press the navigation buttons to highlight Display. 5 Press Select. 6 Press the 4/; or < buttons to navigate between Backlight and Contrast. 7 Press the 7 or 8 buttons to adjust the Backlight or Contrast settings. Backlight settings include: • timed 1, 2, 5, or 10 seconds. • always on. • always off.
Using menu options and settings Page 16 Displaying battery information 1 Press Menu. 2 Press the 7 or 8 buttons to navigate to Prefs. 3 Press Select. 4 Press the navigation buttons to highlight Battery. 5 Press Select. 6 Press the navigation buttons to highlight Power level. 7 Press Select to display battery information: 8 • Battery type: Rechargeable. • Battery charge level: The battery’s charge state percentage. • Run time estimation: The battery’s remaining play time.
Using menu options and settings Page 17 Setting recorder sampling rate and volume Record rate means the sampling rate for recordings in kHz. A higher record rate yields better quality recordings with larger file size. Analog gain refers to the volume of voice recordings. 1 Press Menu. 2 Press the 7 or 8 buttons to navigate to Prefs. 3 Press Select. 4 Press the navigation buttons to highlight Recorder. 5 Press Select. 6 Press the 4/; or < buttons to navigate between Record Rate and Analog Gain.
Using menu options and settings Page 18 Displaying About information 1 Press Menu. 2 Press the 7 or 8 buttons to navigate to About. 3 Press Select. The following information displays: 4 • Player personalization message defined through the software or Rio model number. • Firmware version the Rio is using. • Total internal memory amount installed and a bar graph display of the amount used. • Total external memory installed and a bar graph display of the amount used.
Using menu options and settings Page 19 Recording and playing voice Recording your voice Note: The recorder automatically turns off the backlight when in use to prevent background noise from the backlight from interfering with your recording. 1 To record your voice you can either: • Press the Rec button on the Rio, or • Press Menu, press the navigation buttons to highlight Record, then press Select. 2 Highlight New Recording and press Select to start recording. 3 Press < to stop recording.
Using the Rio software Page 20 Using the Rio software Using RealJukebox RealJukebox audio management software is included on the software CD. Use RealJukebox to: • Organize digital audio tracks on your computer. • Organize tracks on your Rio. • Record (encode) your audio CDs. • Search for tracks on your computer or on the Internet. • Create a custom CD-ROM—if you have CD burning hardware and your computer supports it.
Using the Rio software Page 21 Copying tracks to your Rio 1 Plug the USB cable into the multifunction port on top of your Rio. 2 Plug the other end of the cable into the USB port on your computer. 3 Slide the power switch on top of your Rio to On. 4 Click the All Tracks button on the Real Jukebox software. 5 Click the desired track(s). 6 Click the right mouse button and select Copy to Device or click Copy to > Device in the right column on the window. Click OK on the dialog box.
Using the Rio software Page 22 Using SoundJam MP (Mac only) SoundJam MP player and encoder converts music into compressed digital quality MP3’s from CD, MP2, AIFF, QuickTime™, SMD, Sound Designer, and WAV formats. Master Playlist Use the Master Playlist editor to: • Search your audio collection stored on your Mac. • Build and manage custom playlists. Main Window Use the SoundJam MP Main Window to: • Listen to audio on your Mac. • Play music files from your playlist or CD-ROM.
Using the Rio software Page 23 Converter Use the Converter window to: • Encode audio CDs. • Save tracks into MP3 format to be transferred to and played on your Rio. Connector The Connector window displays when you plug your Rio into your Mac with the USB cable. Use the Connector window to: • Manage the content on your Rio. • Export audio to your Rio. Choose the track by selecting “Add...” or drag the desired track to the view window.
Digital audio terms Page 24 Digital audio terms AAC Advanced Audio Coding (AAC) is one of the audio compression formats defined by the MPEG-2 specification. AAC used to be called NBC (Non-Backward-Compatible), because it is not compatible with the MPEG-1 audio formats. AAC may eventually replace MP3 since it offers better sound quality and greater file compression.
Digital audio terms Page 25 DRM, security Digital Rights Management (DRM) technologies protect copyright ownership of digital information. DRM became an issue with the rise of MP3 technology and Internet distribution of music. DRM platforms serve as a security “wrapper” around digital audio supporting Internet distribution while at the same time protecting and managing rights related to that digital information. The security mechanism in the Rio supports several secure file formats.
Digital audio terms Page 26 MP3 MPEG-1, Layer 3 Audio (MP3) is a compressed digital audio file format. This format allows for near CD quality sound, but at a fraction of the size of normal audio files. MP3 conversion of an audio track from CD-ROM reduces the file size by approximately a 12:1 ratio with virtually no loss in quality. This digital sound encoding and compression process was developed by the Fraunhofer Institut fur Integrierte Schaltungen and Thomson Multimedia.
FAQ and troubleshooting Page 27 FAQ and troubleshooting How do you put music on the Rio? The Rio interfaces with your computer through the USB port. You can get digital audio from numerous Internet sites or encode your own digital audio tracks from your audio CDs using the CD-ROM drive on your computer. Use the software included with the Rio to get audio from the Internet, encode tracks from your audio CDs, or download tracks to your Rio.
FAQ and troubleshooting Page 28 The Rio is connected to the USB, why doesn’t the computer recognize it? First, make sure the Rio software is running and check to make sure the USB cable is fully connected to both the Rio and to the computer. Then, turn the Rio off and back on. Is the Random menu function truly random? No. The Random function uses an algorithm called pseudo-random which is common to all computers.
FAQ and troubleshooting Page 29 Upgrading the Rio firmware (Mac) Important: Do not close the program, turn off the Rio or unplug the USB cable during the upgrade. 1 Connect the Rio to the computer with the USB cable. 2 Slide the Rio power switch to On. 3 Double-click the SoundJam icon. The Rio Connector window displays. 4 Click the Settings... button on the Rio Connector window. The Rio Settings window displays. 5 Click the Upgrade Firmware button on the Rio Settings window.
FAQ and troubleshooting Page 30 How can I get the best sound quality when encoding from a CD? If you use a significant amount of your computer system’s resources with other applications, encoding songs from a CD may result in poor quality recordings. If the song(s) you encode contain abnormalities, such as pops or skips, close down other applications which are running and encode those songs again. The condition of the audio CD—scratches and so on— may effect the quality of the recording as well.
One Year Limited Warranty Page 31 One Year Limited Warranty Our warranty to you SONICblue Incorporated warrants that your product will be free from defects in materials and workmanship for a period of one year from the date of original retail purchase. If you discover a defect covered by this warranty, we will repair or replace the product at our option using new or remanufactured components. SONICblue Incorporated’s liability is limited solely to the repair or replacement of the defective product.
One Year Limited Warranty Page 32 is created and Return Authorization provided. This fee includes all labor, parts needing replacement, and return shipping. You must deliver the product to SONICblue Incorporated in order to obtain out of warranty service. You must pay for shipping to SONICblue Incorporated. It is recommended that you use a shipping service providing you with tracking capability, because we will not be responsible for items lost in the mail.
Regulatory Information Page 33 Regulatory Information Federal Communications Commission (FCC) The device has been tested and found to comply with limits for a Class B computing device according to the specifications in FCC rules Part 15. Operation is subject to the following two conditions: 1 This device may not cause harmful interference, and 2 This device must accept any interference received, including interference that may cause undesired operation.
Regulatory Information Page 34 2841 Mission College Blvd. Santa Clara, CA 95054 USA Hereby declare under our sole responsibility that the following product(s) conform to the requirements of the European Parliament Council Directive 1999/5/EC dated 9th March 1999.
Customer Care Page 35 Customer Care Technical support Hours of Operation Monday-Friday 5am-7pm PT Saturday 8am-4pm PST Email customersupport@riohome.com Telephone (541) 967-2450 TDD (541) 967-2451 Fax (541) 967-2401 Web site www.riohome.com Solution Library Customer service Hours of Operation Monday-Friday 6am-5pm PT Email customersupport@riohome.
Customer Care Page 36 New Product Support In addition to the services mentioned above, all retail purchasers of Rio products receive person-to-person telephone support for the first 90 days of ownership. To extend support after the expiration of New Product Support, we offer an affordable, feebased, Extended Service Option. Please see the Web site for details. Extended Service Option To extend support after the expiration of New Product Support, we offer an affordable, feebased, Extended Service Option.
Index Page 37 Index E A encode (defined) 25 equalizer built in 7 custom 8 EU declaration of conformity 33 AAC 24 ADPCM 24 analog gain 17 AudibleManager software 21 audio file size 24 audio functions 7 B backlight 15 backpack 6 battery calibration 16 battery power level 16 bitrate 24 bookmark add 11 play or delete 11 C calibrate 16 CDDB 25 CE declaration 33 charge backpack 6 clock display 18 set 14 codec (defined) 24 codecs AAC 24 ADPCM 24 MP3 26 WMA 26 common questions 27 contrast 15 customer care 35
Index Page 38 remove 13 power saving 14 R randomize tracks 9 RealJukebox software 20 rechargeable battery 6 record button 5 record rate 17 recorder volume 17 recording voice 19 regulatory information 33 repeat tracks 9 reverse button 5 Rio software 20 S sampling rate 17 SDMI 26 select button 4 skins 26 SoundJam MP software 22 stop button 4 T technical support 35 time and date display 18 set 14 time to sleep setting 14 troubleshooting 27 U USB 26 V voice recording 19 W warranty 31 WMA 26