
User Manual

3
the suspension system. As more air pressure is added to the air springs, they will support more weight. You will be
able to compensate for a heavy load by adding air pressure to the air springs, thereby reducing sway and handling
problems associated with a heavily loaded vehicle.
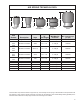
TABLE “A”
ALL TORQUE SPECIFICATIONS
Using a torque wrench, torque the threaded fasteners to the following specications:
Fasteners used on studs and blind holes in air springs 15 – 20 ft lbs
Hex nuts installed on axle straps 10 – 15 ft lbs
Hex nuts installed on 3/8" hex bolts 28 – 32 ft lbs
Hex nuts and bolts used to secure brackets to frame 28 – 32 ft lbs
Hex nuts installed on U-bolts 15 – 20 ft lbs
Hex bolts securing tapered sleeve style air spring to lower bracket 10 – 12 ft lbs
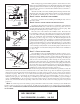
PREVAILING-TORQUE LOCK NUTS
In order to assure trouble-free operation, your air spring kit includes a variety of self-locking threaded fasteners.
Your kit may include prevailing-torque lock nuts. Prevailing-torque lock nuts may be more difcult to install, but will
not come loose under normal suspension operation.
THREAD LOCKING COMPOUND
The hex bolts used to secure the air spring to the brackets may have a locking compound applied to the threads.
Lock washers are not required when using a fastener with pre-applied thread locking compound. When installing
fasteners with thread locking compound, follow the torque recommendations listed in table.
HELICAL LOCK WASHERS
Your air helper spring kit may include helical lock washers. In order to properly use the lock washer, tighten the
nut/bolt fastener just enough to atten the lock washer. Overtightening the fastener may damage the nut or bolt.
When using helical lock washers, follow the torque recommendations listed in Table “A”.
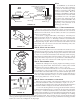
AIR FITTINGS
Your kit will include one of two types of push-to-connect air ttings: ttings with a thread locking compound pre-
applied to the threads or ttings with a Nylon collar in place of the thread locking compound.
The pre-applied thread sealant, thread the air tting into the air spring and tighten the tting securely to engage
the pre-applied thread sealant.
The Nylon collar, thread the air tting into the threaded hole on the air spring so that the Nylon collar makes contact
with the top of the air spring and then tighten 1/2 turn. No thread sealant is required.
Both types of air ttings allow easy connection between the air tting and the air line tubing. To install the air line
in the ttings, cut the tubing as square as possible using a sharp utility knife or razor blade. Push the air line into
the tting as far as possible. If the tubing must be removed from the tting, rst release the air pressure from the
air spring. Push the collar towards the body of the tting and then pull the tubing out.
PRESSURE DIFFERENTIAL BETWEEN AIR SPRINGS
It is not uncommon to have different pressures between the air springs after the vehicle has been brought to a level
condition. If the vehicle is within the manufacturer's recommended gross vehicle weight and you have not achieved
a level condition after inating the air springs to 100 psi, there may be a problem with your stock suspension. The
leaf springs may have become fatigued over time or a leaf spring may be fractured. There may be an obstruction
in the air system, not allowing the air pressure to reach the air helper springs.
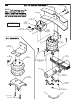
AIR SPRING ALIGNMENT AND HEIGHT
Upon completion of the installation, the air springs should be inspected for proper alignment. Although the air
helper springs can function with some misalignment, it is preferred that the air springs be mounted so that they
are aligned with as little top to bottom offset as possible.
Check the distance between the upper bracket and lower bracket (design height). The dimensions shown on Page
5 are a guide to assist in determining the ideal operating height for your air helper springs.