
User Manual
4
INFLATING THE AIR SPRINGS
With the air helper springs installed on your vehicle and the vehicle sitting on a level surface, visually verify that
the vehicle is in a level state. If the vehicle is not level (front-to-back or from side-to-side) it can be brought to a
level position by inating the air springs. Each air spring has a separate ination valve. To level the vehicle from
front-to-back, add air pressure to both air springs in equal amounts. To level the vehicle from side-to-side, add
more air pressure to the air spring on the lower side of the vehicle. When inating the air springs, add air pressure
in small quantities, checking the pressure frequently. The air spring requires much less air volume than a tire, and
therefore, will inate and deate quickly.
WARNING: DO NOT EXCEED THE MAXIMUM PRESSURE AS INDICATED IN THE INSTALLATION MANUAL
.
LEVELING THE VEHICLE
Check the level of your vehicle visually. If it is not level, either from front to back or from side to side, level it by
inating your air springs. (If your vehicle is equipped with a cab control unit or automatic control system refer to
the directions for that device.) There is one ination valve for each air spring. To level from front to back, add air
pressure to both air springs equally. For side to side, add air pressure to the air springs on the side of the vehicle
that is low. When adding air pressure to the air springs, remember that they have a much smaller volume of air that
a tire so they will inate much quicker. Add air pressure in short bursts until the vehicle is level. (NEVER EXCEED
100psi IN EACH AIR SPRING.)
MAINTENANCE
It is considered normal for air helper springs to lose some air pressure over time. Normal pressure loss should not
exceed 3 – 4 psi per week when the air springs are inated to 50 psi. If the pressure loss is greater than 3 – 4 psi
per week, there may be a leak in the system. Each time you check the pressure in the air springs, you will lose 1 – 3
psi. The air pressure should be checked at regular intervals.
It is recommended that the air pressure be checked according to the following guidelines:
At least monthly intervals during the continuous operation of the vehicle (see above)
When the vehicle is removed from long-term storage
If the air springs are used to assist in leveling an RV or camper on uneven ground, ensure that the vehicle is
returned to a level ride height before departing.
The brackets used to secure the air helper spring to the vehicle should be inspected periodically for damage and
for loose fasteners. Ensure that the air line tubing is clear of any sharp edges and routed away from the exhaust
system. The brackets and air line tubing should be inspected every 6 months. Ensure that the threaded fasteners
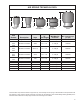
are torqued to the specications listed on Page 3.
Accumulated sand, gravel, or other road debris on the air springs or brackets should be rinsed away with a garden
hose each time the vehicle is washed.
If it is necessary to lift the vehicle by the frame, rst release the air pressure from the air springs. This will allow the air
springs to extend to their maximum length without being damaged. The uninated air springs are capable of supporting
the weight of the axle when the vehicle is lifted by the frame. After servicing of the vehicle is complete, lower the vehicle
to the ground and reinate the air helper springs to the desired pressure. NOTE: On Sport-Rite kits the air helper springs
must be aired up to 50 psi and then release the air until the air helper springs are to the desired pressure.
ONLINE AUCTION PURCHASES
Firestone will not replace missing components from any kit purchased through an online auction.