
Instructions / Assembly
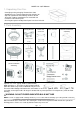


MODEL NO.: QCF-DB52061
Page
11
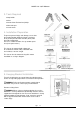
12. Testing Your Fan.
It is recommended that you test the fan before finalizing installation. Restore
power from circuit box and light switch (if applicable). Test the fan speeds from
the Remote controller. Start at the OFF position (no blade movement) and
continue testing the LOW, MED and HI speeds. Every time you press any key the
red LED witness light will turn ON at the top of the controller.
If the red LED witness light does not turn on when pressing any key, replace the 9
Volts battery.
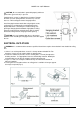
The Remote controller will only operate both the Motor housing and Light kit
lights simultaneously.
If the remote receiver is NOT installed in your fan, you will be able to operate the
Motor housing and Light kit lights independently from the Pull chains. The first
pull will turn on only the UPPER lights in the lighting housing. The second pull will
turn on only the LOWER lights in the light kit. The third pull will turn on ALL of the
lights (upper and lower), and the fourth pull will turn all of the lights OFF again.
The reverse fan switch may only be operated by the switch located in Switch
housing, not from the Remote controller. Set the reverse switch to recirculate air,
depending on the season.
TROUBLE SHOOTING
FAN DOES NOT START
1. Check all fuses or circuit breakers.
2. Turn off electrical power and check all wire connections to the Receiver, fan and in switch
housing.
3. Make sure pull chain switch is on, and reverse slide switch is up or down, not in
the middle.
4. Make sure you have set the Dip switches on the Remote and Receiver to the same numbers.
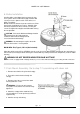
5. Unscrew the canopy and check all wire connectors, if the wire
connectors are loose, tighten it firmly.
FAN FOUND NOISY
1. Always take a few days" break in" time for any new fan at medium or high speed.
Try to diagnose the exact location of the noise by listening carefully from several
sides (blades, motor, light kit, etc). Fan noise can come from a light kit.
2. Make sure all screws in the fan assembly and light kit are tight and properly
threaded. If not, back out and re tighten. Tighten these screws at least twice a year
because they may loosen slowly over time and cause clicking noise.
3. Make sure the light kit is securely fastened to the fan.
4. Make sure mounting bracket is installed securely to the outlet box.
5. Make sure wire nuts in switch housing or canopy are not rattling against each
other or against wall of housing. Wrap with electrical tape if necessary.
6. Use of standard light dimmer or unapproved wall control will always cause
harmonic distortions, or a humming noise. Many fan motors do not work quietly
with solid-state variable controls. If a quiet wall control is desired, use only
approved wall controls.
7. Make sure all the Motor housing access plates screws are tightened.