
Instructions / Assembly


Parts Included
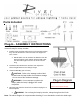
Plug-In - ASSEMBLY INSTRUCTIONS
Your lamp is ready to be installed as a Plug-In lamp, the Cord with
Switch and Plug are already installed!
1. Install the two provided wall anchors on the desired location,
they must be anchored to a structure that can support 25
Lbs. or more.
a. NOTE: Make sure to measure the distance from the
desired location to the nearest electrical wall outlet,
the wire total length is 15 feet, the chain is 9 feet
long.
2. Thread the two Hooks to the Anchors, then adjust the
chain’s length based on the ceiling’s height.
3. Install the BULB(s) (Not included)
CAUTION - Refer to the wattage caution label
located near the lamp holder for maximum wattage
- do not exceed the maximum wattage.
WARNING - Do not attempt to replace the
bulb(s) while the lamp is plugged into a wall
receptacle
4. Hang the lamp from the Chain to the Hooks and plug it to a
wall receptacle.
a. WARNING - Do not hang the lamp by the wire, always hang from the Chain.
Note: The above diagram is a representative drawing, it is not intended to match the shade style.
E12 Type B, 40W X 5 (Not included)
E12 CFL 7W X 5 (Not included)