
Instructions / Assembly


Hardwired - ASSEMBLY INSTRUCTIONS
“Professional Installation recommended”
1. CAUTION - Before starting the installation,
disconnect the power by turning off the circuit breaker or
by removing the fuse at the fuse box. Turning the power
off using the light switch is not sufficient to prevent
electrical shock.
2. Your lamp is assembled with the Cord, Switch and Plug
out of the box, once the desired new HARDWIRED
location is selected measure to measure the hanging
distance from the ceiling.
3. With pliers open the Chain link to the desired length, then
cut the wire at least 12 inches longer than the chain. This
will ensure it will be long enough to make the connections
to your electrical installation.
4. Fasten the Crossbar to the outlet box securely.
5. Pass the Cord through the Canopy Loop and Canopy
Plate.
6. Make the electrical connections (two people
recommended): the lamp has three encased wires, look
carefully to identify the Green and White ribbed wires,
then continue as follows using the provided Wire
connectors:
WARNING – Failure to connect the wires
following the below instructions will result on bodily harm
and a fire hazard!
a. Connect the lamp Green ribbed wire to the Cross
bar green Ground Screw along with your
installation ground wire.
b. Then connect the lamp White ribbed wire to the
Negative wire in your installation.
c. Finally connect the last wire from your lamp to the
Positive/Live wire in your installation.
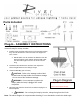
7. Using the C Clamp connect the Chain to the Canopy Loop.
8. Lastly secure the Canopy Plate to the Cross bar firmly
using the provided screws.
Note: The above diagram is a representative drawing, it is not intended to match the shade style.
CARE INSTRUCTIONS - Use only a soft cloth; do not use any chemicals or abrasive cleaners.
E12 Type B, 40W X 5 (Not included)
E12 CFL 7W X 5 (Not included)
MADE IN CHINA