
Instructions / Assembly

MODEL NO.: 20063
7
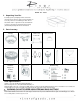
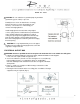
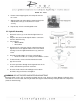
8. Assembly with Down Rod
1. Remove pin and clip from down rod. Slide the down rod
through the canopy and the down rod cover as shown in
figure
2. Thread the electrical wires through the down rod and pull
the extra wire slack through the down rod
Tip: Apply a small piece of electrical tape to the ends of the
electrical wires to keep them together when threading them
through the down rod
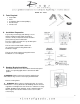
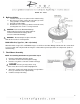
3. Loosen the yoke set screw. Place the down rod into the
motor housing yoke and re-insert the previously removed
pin and clip. Tighten yoke screw securely
4. With the hanging bracket fully secured to the outlet box,
you are now ready to hang your fan. Grab the fan securely
with two (2) hands. Place the down rod ball into the
hanging bracket and rotate until the ball sits securely in
the hanging bracket tab
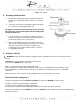
9. Ceiling Fan Wiring
WARNING: Failure to disconnect power supply prior to the installation may result in serious injury and fire
hazard
Important: Be sure outlet box is properly grounded or that
a ground wire (GREEN or bare) is present.
Make sure all electrical connections comply with Local
Codes or Ordinances and the National Electrical Code. If you are unfamiliar with electrical wiring, or if the
house/building wires are different colors than those referred to in the instructions, please use a qualified
electrician.
When down rod is secured in place on the hanging bracket, electrical wiring can be made.
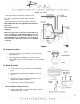
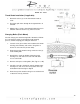
Wiring Instructions (Diagram 1)
Using wire nut provided, connect BLACK and BLUE wires from fan to BLACK wire from ceiling.
The wires should be spread apart with the grounded
conductor and the equipment grounding conductor on
one side of the outlet box and the ungrounded conductor on the other side of the outlet box.
Using wire nut provided, connect WHITE wire from fan to WHITE wire from ceiling. Connect the installing ground
wire (Green or bare)