
Instructions / Assembly

MODEL NO.: 20063
9
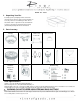
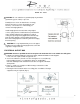
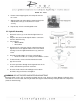
6. Remove motor shipping pads, discard pads and save
the screws
7. Align the blade arm holes with the motor housing holes
and attach the two (2) screws/washers. Fasten
securely
8. Repeat Step 7 for the remaining blade arms
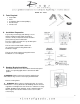
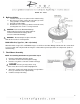
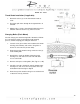
11. Light Kit Assembly
1. Remove the three (3) screws from the light kit and set
aside
2. Plug the connector from the light kit into the connectors
from the switch housing
3. Correct wiring
o White to White
o Blue to Blue
4. Gently push the connectors into the switch housing and
align the holes in the light kit with the holes in the switch
housing. Secure the light kit with the three (3) removed
screws
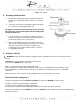
5. Install the provided bulbs (See Page 3 for bulb type)
o Ensure the bulbs are securely fastened into the sockets
6. To attach shade, remove the finial from the threaded
pipe and set aside
7. Insert the pull chains through the designated holes in the
shade, and attach the pull chain extensions
8. Insert the shade onto the threaded pipe and re-attach
the finial, being careful not to overtighten
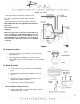
WARNING: DO NOT EXCEED INDICATED BULB WATTAGE
Alternative bulbs usage: CFL or Incandescent bulbs may be used. Ensure the Max. Wattage indicated on the
socket labels is not exceeded, and verify the bulbs do not get in contact with any metal part of the fan components
(shade or motor housing)