
Instructions / Assembly

MODEL
N
O.
:Q
CF‐DB
52061
PAGE
10
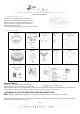
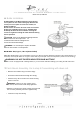
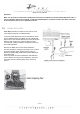
11. Light Kit Assembly.
1.
Remove the three screws from the Light kit.
2.
Plug the connectors from the Light kit to the connectors
from the Switch housing.
Please note the correct wiring is:
•White to White
• Blue to Blue
3.
Gently push the connectors into switch housing and
align the holes in the Light kit with holes in the Switch
housing. Secure the light kit with the 3 screws that were
previously removed.
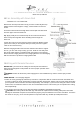
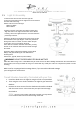
Attach the Shade to the Light kit using the Finial you will
find installed on the Light kit pipe. Insert the pull chains
through the holes on shade, and then attach the pull
chain Fobs. Do not over tighten the finial.
Since this fan includes a Remote Controller you may
decide not to install the Pull chains and Fob through
the shade.
Important: When replacing the bulb(s), please allow
bulb(s) and glass shade(s) to cool down before
touching them.
Install: E12, Type B, 40W x 2 (Not Included)
WARNING: DO NOT EXCEED INDICATED BULB WATTAGE
Alternative bulbs usage: CFL or LED Bulbs may be used. Ensure the Max. Wattage indicated on the socket labels is
not exceeded, and verify the bulbs do not get in contact with any metal part of the fan components (shade or motor
housing)
NOTE: Your fan is equipped with a wattage limiter, if you exceed the indicated wattage
your ceiling fan will not function.
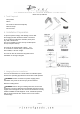
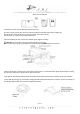
Tiered Shades Assembly if included with your Fan
1. Install the Shade A on the Light kit using the finial or nut provided.
2. Then using the nut or Final installed on the Light kit pipe attach the
Shade A.
3. Remove the three screws from the Shade A and install the Shade B
with the same screws. A the same time pass pull chains through
the Shade B.
Note: Since this fan includes a Remote Controller you may decide
not to install the Pull chains and Fob through the shade.