
Manual
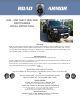

STEP 2 - Uninstalling OEM Bumper
• Park on level surface and disconnect battery.
Picture: 1
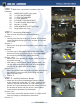
• Looking from the top of the grill, remove all the plastic
rivets that hold the top grill cover in place and set the
cover aside.
Picture: 2
• Remove the front grill and the rubber cover shown with
the arrow.
Picture:3
• From the top of the bumper remove the four 15mm
bolts.At this time if you have factory fog lights unplug
the connectors on the back side of the bulbs.
Picture: 4 A-B
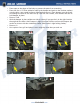
• Remove the front bumper. If equiped with front factory
two hooks remove.
• With either a cut off wheel, torch, plasma cutter, etc..
cut the welds that the arrows point to in the pictures
and remove the upper part of the frame.
Picture: 5 A-D
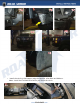
• After cutting the frame horns take a grinder and remove
and excessive welds and slag that may be left then
paint to prevent rust.
• Picture: 6
STEP 3 - Installing Road Armor Bumper
• Mount the driver and the passenger bumper brakets
to the frame horns using the 1/2” bolts, washers, lock
washers, and the nuts welded on a tab. Make sure to
put the 3/8” space between the inside frame horn and
the bracket as shown with the arrow. Leave brakets
loose to allow ajustment for the bumper.
Picture: 5 A-C
• At this time you install optional winch /or lights at this
time accordung to manufactures instuctions.
Picture: 11
1
4B
4A
3
2
STEP 1: Make sure you have all necessary tools and
hardware.
(6) SINGLE BOLT PLATES (mfg. part)
(6) ½” PUSH ON RETAINERS
(6) ½” GR8 FLAT WASHERS
(6) ½” LOCK WASHERS
(4) 3/8 SOCKET CAP WINCH BOLTS
(4) 7/16 ALLEN HEAD WINCH BOLTS
(6) Hex Nut ½-13 GR8
(4) ALLEN HEAD BOLT & NUT (for logo)
(1) Large Road Armor Logo