
Manual


STEP 1 : Make sure you have all necessary
tools and hardware.
Hardware Kit Includes : ( all Grade 8 )
( 4 ) 1/2” x 1 1/2” Single Bolt Plates
( 4 ) 1/2” x 2” Single Bolt Plates
( 2 ) Double Bolt Plates
( 16 ) 1/2” Flat Washers
( 14 ) 1/2” Lock Washers
( 14 ) 1/2” Hex Nuts
( 8 ) 1/2” Retaining Washers
( 2 ) 3/4”-10 x 6.5” Bolts
( 4 ) 3/4” Flat Washers
( 2 ) 3/4” Lock Washers
( 2 ) 3/4 Hex Nuts
( 1 ) 1/4”-20 x 3/4” Bolt
( 2 ) 1/4” Flat Washers
( 1 ) 1/4” Lock Washer
( 1 ) 1/4” Hex Nut
( 4 ) Plastic Inserts
( 8 ) Allen Head Bolt - Winch Hardware
( 1 ) Package of Road Armor Logo Hardware
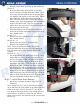
Step 2 : Uninstall OEM Bumper
• Park on level surface and disconnect positive bat-
tery terminal.
• Disconnect Fog lights.
• Unbolt hood latch and remove the two outside
bolts.
Picture 2
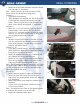
Note: If you have a EcoBoost, unbolt and remove
intercooler cross member.
Pictures 3
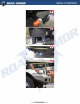
• Unbolt the 2 bolts per side that hold the bumper
to the frame using a 21mm or 13/16” Socket and
ratchet. Remove bumper by tilting back toward
the truck and pulling out.
Picture 4
• From the inside of the wheel well, unbolt the 2
bolts per side that hold the fender fl are to the
top bumper piece using a 10mm socket. In ad-
dition remove the plastic fasteners around the
inside lip of the fender fl are. You can use a small
wrench or needle nose pliers if you do not have
the proper tool to remove these. The one under
the door is a tough one.
Picture 5
1
1
2
2
3
3
4
4
5
5