
Manual

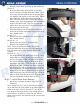

• Remove fender fl are by lifting up and pulling out.
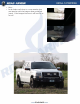
Picture 6
• After the fl ares have been pulled off you will
need to remove the clips from the fender. To do
this, use a pick and push in one of the tabs, pull
out slightly, and repeat on the other side. Install
back clips onto fender fl are after trimming
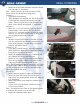
• Note: With the next steps of unbolting the top
bumper, start with the passenger side and repeat
steps to the driver side. This is so you can see
where the bolts are located, since the driver side
has extra parts in the way.
• From the inside of the wheel well remove the 4
bolts that hold the top bumper piece in place us-
ing a 10mm socket.
Picture 7 - 9
• Remove the bolts underneath the head lights us-
ing a 10mm wrench.
Picture 10 - 11
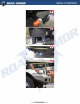
• Repeat last two steps to the driver side.
• Remove top bumper piece.
Note: There are plastic retaining clips below
the head lights that help hold the top bumper on.
You will need to pull them down to remove the
bumper.
Pictures 12 - 13
• The fender fl ares will need to be cut next. Hold
fender fl ares in place, position by using the in-
serts in the inner fender, and mark them where
the end of the body line is as illustrated by a
green line in picture 7. This line will be on the
inside of the fl are. Uninstall the fl ares and mask
off the area you will be cutting to prevent acci-
dental scratches. We recommend using a cut off
wheel to cut the fl ares. If painted do not pull off
tape until plastic has cooled down. Use touch up
paint to help avoid the paint from chipping. (We
are not responsible if paint starts to chip.)
Step 3 : Install Road Armor Bumper
6
6
7
7
8
8
9
9
10
10
• Install the top frame brackets using the 3/4”
hardware.
Note : Install the 3/4” bolt so the threads are fac-
ing in and that the lock washer is up against the hex
head of the bolt (refer to picture 15), not on the
nut. Reason is because there is not enough room in
the EcoBoost. In addition, check the bolt slots to
make sure you have the brackets on the correct side.
Picture 14