
Manual

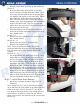

• Install the lower frame brackets using the double
bolt tab and 1/2” hardware.
Note : Install the bolt tab from the inside of the
frame rail so the threads are facing down.
Picture 15
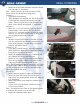
• Tighten all the hardware.
• Once brackets are installed you will need to drill
a half inch hole through the brackets and the
frame. There is a pilot hole in the brackets for a
guide. Once drilled use supplied .5” hardware.
Picture 16
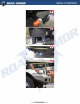
• Insert the 1 1/2” bolt tabs into the top slots on
bumper and 2” bolt tabs for the bottom slots.
Use the 1/2” retaining washers to hold the bolts
in place. You can use a deep socket to help push
the retaining washers onto the bolt.
Picture 17
• Measure across from bracket to bracket to each
bolt slot and match the distance measured to the
bolts on the bumper. This will help to align the
bolts for and easier install.
Picture 18 - 19
• If you have a winch install it now with supplied
allen head bolts. Make sure to install the fairlead
bolts before you mount the winch.
• Install the bumper using the 1/2” hardware and
only tighten one nut per side for now.
• Square up the bumper to the body by measuring
from the top bumper surface to a point on the
body on both sides as well as side to side.
Note : Try to maintain a gap no less then 5/16” from
the body to the bumper. Reason is because the body
will hit the bumper from body fl ex and vibrations
while driving down the road.
Picture 20
• Once bumper is squared, tighten all hardware.
• Install the hood latch onto the bracket that’s
right above the passengerside frame rail using the
1/4” hardware.
• Install Road Armor Logo using the stainless steel
hardware.
• If your truck is the EcoBoost, install the inter-
cooler cross member.
Note : You might need to lube up the rubber mounts
in order for the mount to go on smoothly
• Install the trimmed fender fl ares.
11
11
12
12
13
13
14
14
15
15