
Owner manual


STEP 1 : Make sure you have all necessary tools and hard-
ware.
Hardware Kit Includes : ( all Grade 8 )
(8) Single Bolt Plates
(8) ½” Push On Retainers
(4) ½-13” x 4.5 Bolts
(16) ½” Flat Washers
(12) ½” Lock Washers
(12) ½”-13 Hex Nut
(4) 3/8” Socket Head Cap Screw (For Winch)
(4) 7/16” Socket Head Cap Screw (For Winch)
STEP 2:
• Park on a level surface
• Remove license plate
• Disconnect battery
• Mask the front of the body to avoid scratches or
chips in paint when uninstalling/installing the bum-
pers.
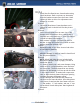
STEP 3:
• Using an 18mm socket remove the two nuts on the
bolt plate that hold the bumper mounts to frame.
Do not remove the double bolt plate until it is time
to remove bumper from truck. Also remove the four
clips on the rubber liner just above the lower grill
on the bumper. These can be easily pulled off by
hand.
Picture 2
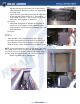
• Remove the bolt plates which the nuts were re-
moved from during the last step. Once they are
removed the bumper can be removed from truck.
• NOTE: IF YOUR TRUCK IS A DIESEL LOOK AT PAGE 5
ON HOW TO UNINSTALL THE OEM BUMPER.
• Remove two bolts and nuts that hold lower bracket
mount to truck. The bracket mounts will not be
used with your Road Armor Bumper but the hard-
ware will be used. Do not discard bolts and nuts.
Picture 3
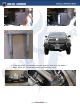
• Once the bumper and lower frame mount is re-
moved the frame should look like the picture below.
If the frame looks like the picture you are ready to
install frame brackets
Picture 4
1
3
2
A