
Owner manual
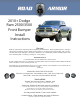


STEP 4:
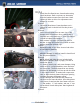
• Install the rst Road Armor frame bracket using
stock hardware. Refer to picture to determine
how the bracket mounts onto the frame. Hand
tighten all bolts to allow for adjustment once
bumper is on truck.
Picture 5
• Once both Road Armor frame brackets are in-
stalled on truck it should look like the picture
below.
Picture 6
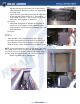
• Insert one bolt plate into an outer slot of the
bumper weld in brackets. Once a bolt plate is
inserted into a slot push one ½” push on retainer
to hold bolt plate onto bumper.
Push retainer clip until it is ush with weld in
bracket. A deep well socket can be used to assist
pushing down the retainer clip.
Picture 7
Repeat this step for all outer slots on both sides
of the bumper assembly.
When the bumper is ready to install it should look
like the picture below.
Picture 8
NOTE: Winch and lights are not included with
Road Armor Bumper. Refer to page () on how to
mount the winch.
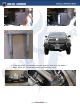
• It’s time to install your road armor bumper. Using
either a lift or a couple buddies, move the bum-
per into place. The bolt plates that are already
placed into the bumper will line up with the slots
in the frame bracket. If needed use a tape mea-
sure to align the bolt plates with proper spacing
to make mounting the bumper easier.
• Lift the bumper and slide the bolt plates into
the slots in the frame brackets. Once bolt plates
slide into to frame bracket slots fasten with one
½” at washer, ½” lock washer, and one ½” nut
on each bolt in each bolt plate. Hand tighten all
hardware.
Picture 9
6
5
7
4