
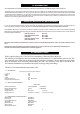
Technical data

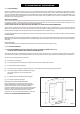
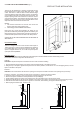

5.2.2 PRE-CAST FLUE OF MINIMUM SIZE (Fig. 4)
This fire can be installed into a properly constructed pre-cast
flue conforming to B.S. 1289 : 1975 or B.S. 1289 : Part 1 : 1986
or B.S. 1289 : Part 2 : 1989 of at least 3 metres effective height
and having flueways of at least 198mm by 67mm or equivalent
cross-sectional area with no dimension less than 63mm. The
fireplace opening width must be between a maximum 457mm
and a minimum 406mm. The fireplace opening height must be
between a maximum of 572mm and a minimum 550mm and a
depth of at least 120mm above the hearth level.
NOTES:
1. The minimum dimensions for the flat area around the
opening are 610 mm high x 505mm wide.
2. The flue spigot restrictor MUST NOT be fitted.
Ensure that any mortar fangs between the blocks do not
protrude into the flueways and if raking blocks are used they are
fitted according to the manufacturers instructions and mortar is
not allowed to drop down and accumulate in the raked portions.
CHECK THE FLUE FOR GOOD DRAUGHT AS DETAILED IN
SECTION 5.2.1.
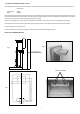
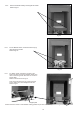
Pre-cast Flue Depths
This fire is designed to fit into a Pre-cast Flue with a depth of
150mm (see fig 4). In order to achieve that dimension the fitting
of a marble back and (or) the spacer might be required. The
spacer is supplied with the fire, to re-order the spacer please
quote part number Sp988806.
PRE-CAST FLUE INSTALLATION
6
Fig. 4
1
0
5
M
IN
Marble
130
mm
Marble
Spacer
110
mm
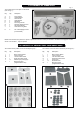
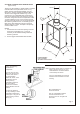
Fitting the spacer
If the fire is to be installed using the cable fixing method the spacer should be fitted to the fire in the following manner.
This must be carried out in conjunction with section 6.3.1.
Cable fix:-
This method requires the Spacer to be fitted to the rear of the fire before installing.
1. Hook the brackets at the bottom of the spacer under the sides flanges of the firebox of the fire.
2. Swing the top of the spacer against the top of the fire and hold in position, fix with two No. 8 x 1/2” self tapping screws, into the
captive nuts fitted in the spacer.
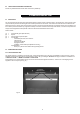
Screw fix:-
If the fire is to be screw fixed to the face of the opening, then the spacer is fitted to the face of the opening first (not the fire).
1.Remove, and retain, the captive nuts from the top of the spacer - observe how they are fitted.
2. Locate the spacer centrally in front of the opening and mark through the top two holes.
3. Remove the spacer and drill the marked positions to accept wallplugs.
4. Fit the wallplugs and fix the spacer using wood screws. Re-fit the captive nuts in the top of the spacer.
5. Engage the side flanges of the fire into the brackets on the bottom of the spacer, and temporarily fit the top two fixing screws.
6. Push the fire back and maintain pressure against it’s ‘wall’ seals, whilst marking through the bottom fixing holes.
7. Drill and plug the bottom holes, and fit the fire.