
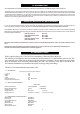
Technical data

9
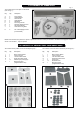
6.0 INSTALLATION OF FIRE
Fig 10.
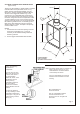
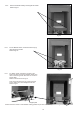
6.1 UNPACKING
The fire is packed with the rear brick board already fitted in position. When unpacking refer to the check list to ensure that all of the
components are present and undamaged. Remove the top fitment from the carton - this contains accessories for the ‘Pebble version’. .
Remove the spacer . Lift the carton surround clear of the fire. Remove the Fender & Ashpan (not ‘Pebble version’) and coal packs. The
trim is held in place at the bottom by magnets and the top of the trim is hooked over the top of the firebox, to remove it first pull the trim
away from the magnets then lift it upwards. Lift the fire clear of the bottom fitment of the carton.
Pack Contents: -
(1) 1 Fire Assembly (Complete with trim)
(2) 1 Spacer
(3) 1 Ceramic fuel components pack
(4) 1 a) Coal effect
Fender/Ashpan Pack, also contains:-
i) Screw Pack
ii) Owners Handbook
iii) Spigot restrictor
iv) Battery- PP3 in blister pack (Slider control only)
b) Pebble effect
Items i) to iv) above are located in the top packing fitment.
6.2 PREPARATION OF FIRE
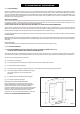
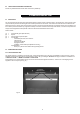
6.2.1 SPIGOT RESTRICTOR
The spigot restrictor is supplied in the fender pack and should be fitted only in the case of installation to a brick chimney, 178mm
diameter stone/lined flue of at least 3 metres effective height, with good draught. DO NOT fit the spigot restrictor if installation is to
a PRE-CAST FLUE or a METAL FLUE BOX / 5 INCH FLUE.
Fit the restrictor, the formed section facing into the fire and the flat back against the firebox, with two No. 8 self tapping screws
supplied in the screw pack (see Fig 10).
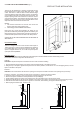
5.3 SHELF HEIGHT AND SIDE CLEARANCES
The fire may be fitted beneath a shelf. See ‘User section’ (PAGE 18).
2 SPIGOT
RESTRICTOR
FIXING SCREWS