
Owner's Manual


10
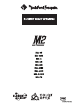
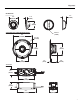
Flush Mount Clamp
Use tip of small flat screwdriver to
remove tweeter
Panel
Optional Horn Loading Mounting Flange
Flange
O-ring
Tweeter
Retainer
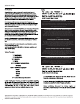
Flush Mount Clamp
Use tip of small flat screwdriver to
remove tweeter
Panel
Optional Horn Loading Mounting Flange
Flange
O-ring
Tweeter
Retainer
Installation
Mounting
(M2-TS
ONLY)
Flush Mount Option
Determine where the tweeter will
be
mounted. Ensure
an
area
large enough for the tweeter
to
mount evenly.
Be
sure
that
the mounting location
is
deep enough for the
tweeter
to
fit;
if
mounting
in
a door, operate all functions
(windows, locks, etc.) through their entire operating
range
to
ensure there
is
no obstruction.
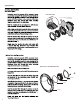
Mark the location for the mounting hole. Drill the hole
with a standard 1.75 inch (45mm) hole
saw.
With a single center screw secure the inner cup from the
front
of
the door panel
to
the outer cup from back
of
the
door panel. Tighten the screw until balanced pressure
is
applied
to
both
faces
of
the mounting surface.
Feed
the speaker wires through the cutout.
Be
sure
to
observe proper polarity when connecting the wires. The
speaker's lead wires are indicated with a
WHITE
wire"+"
and a
BLACK
wire"
-
".
Simply snap the tweeter into place and secure with
a snap-on trim ring. Removal
is
easy
if
needed. The
protective grille on the tweeter
is
non-removable and
an
integral part
of
the design.
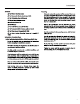
Optional Horn Loading Mounting
Determine where the tweeter will
be
mounted. Ensure
an
area
large enough for the speaker
to
mount evenly.
Be
sure
that
the mounting location
is
deep enough for the
speaker
to
fit
;
if
mounting in a door, operate all functions
(windows, locks, etc.) through their entire operating
range
to
ensure there
is
no obstruction.
Mark the location for the mounting hole.
Cut
or
use
a hole saw
to
drill a 3-5/8" (91mm) hole for the
flange
to
fit.
Once
you have the hole cut, insert the flange and mark
the locations for the mounting screws. Predrill your
mounting screw holes.
Assemble the horn flange, o-ring, tweeter and retaining
ring together.
Pay
close attention
to
the alignment tab on
both the tweeter and flange. These need
to
be
lined up
for proper tweeter orientation in the flange.
Feed
the speaker wires through the cutout.
Be
sure
to
observe proper polarity when connecting the wires. The
speaker's lead wires are indicated with a
WHITE
wire "+"
and a
BLACK
wire
"-
".
Secure the flange with the included stainless steel
mounting hardware.