Owner’s Manual ° Play the Piano ˙ Play various sounds page 6 This piano contains a wide variety of tones (sounds). You can freely select and perform using these tones. For a list of the sounds, refer to “Tone List.” (p. 26) ˙ Play two layered tones (Dual Play) page 7 You can layer two tones on a single key. ˙ Play different tones with your left and right hands (Split Play) page 7 You can divide the keyboard into left and right zones, and select a different tone for each zone.
° Read This First Basic Operations On this piano, you can use the buttons of the operating panel to make various function settings. The “K” “J,” “-” “+,” “Enter (Func) ,” and “Exit” indications shown in the screen indicate the buttons used to operate the various functions.
° Contents Read This First . . . . . . . . . . . . . . . . . . . . . . . . . . . . . . . . . . . . . . . . . . . . . Basic Operations. . . . . . . . . . . . . . . . . . . . . . . . . . . . . . . . . . . . Placing the FP-60 on a Stand . . . . . . . . . . . . . . . . . . . . . . . . . 2 2 2 Main Specifications. . . . . . . . . . . . . . . . . . . . . . . . . . . . . . . . . . . . . . . . 3 Panel Descriptions. . . . . . . . . . . . . . . . . . . . . . . . . . . . . . . . . . . . . . . . . Rear Panel. . .
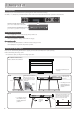
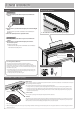
° Panel Descriptions Attaching the Music Rest [L] button Turning the FP-60 On 1. Move the [Volume] slider all the way down to minimize the volume. Minimize the volume 2. Hold down the [L] button until the display shows “Roland Digital 3. Piano.” The power turns on, and the tone buttons and other buttons illuminate. Move the [Volume] slider to adjust the volume. 1. Insert the music rest into the slit on the top of the piano. Turning Off the Power 1.
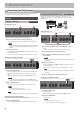
Panel Descriptions ˙ Rear Panel Connect pedals and USB flash drive. Pedals Audio player Amplified speakers DP-10 (Sold separately: KPD-90, RPU-3, EV-5) 4 1 5 2 6 7 3 Computer 1 USB flash drive Place the AC adaptor so the side with the indicator (see illustration) faces upwards and the side with textual information faces downwards. The indicator will light when you plug the AC adaptor into an AC outlet.
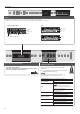
° Basic operations Operation Guide Select a setting item Press the [K] [J] buttons. Edit a value Restore the default value Cancel an operation Press the [-] [+] buttons. Press the [-] [+] buttons simultaneously. Press the [Exit] button. Selecting a Tone (Single) In addition to piano sounds, the piano lets you enjoy performing with many other sounds. These sounds are called “Tones.” There are six groups of tones; each tone button selects a group.
Operation Guide Playing Different Tones with the Right and Left Hands (Split) You can play different tones in the areas at the left and right of a specified key. For example, you can use your left hand to play a bass tone and use your right hand to play a piano tone. This feature is called “Split Play,” and the point at which the keyboard is divided is called the “Split Point.
Operation Guide Display The display shows information such as the tone name, song name, tempo, and time signature. The “K” “J,” and “-,” “+” indications shown in the screen indicate the buttons used to operate the various functions.
Operation Guide Selecting a Song Select a song to play back. 1. Press the [SONG] button to access the Song screen. Category Tempo Time signature Category list Category Explanation USB Memory Songs saved on a USB flash drive Internal Memory Songs saved in internal memory Song Title Composer Singing Winds Melancolie City Lights The Nutcracker “Waltz of the Flowers” (Jazz Arrangement) * Song name Measure 2. Press the [K] [J] buttons to select a category. 3. Press [–] [+] buttons to select a song. 4.
° Advanced Operation ˙ Recording Your Performance This piano lets you play back a recorded song so that you can check your own performance or practice along with a recorded song. Recording Audio to USB Flash Drive Recording If you want to record your piano performance and listen to it on your computer or audio player, or to create a CD, you can record it as audio to a USB flash drive. Recording a New Song Audio recording SMF recording Getting ready to record 2 3 Getting ready to record 5 4 1.
Advanced Operation Listening to the recorded performance After you record, the newly recorded song is selected. 1. Press the [s] button. Playback starts from the beginning of your recorded performance. Deleting a Saved Song (Delete Song) Here’s how to delete a song that you saved on an internal memory or USB flash drive. MEMO If you want to delete all songs that have been saved to internal memory or USB flash drive, initialize the memory (p. 16).
Advanced Operation Renaming a Song (Rename Song) Copying a Saved Song (Copy Song) Here’s how to rename a previously-saved song. Songs that have been saved in internal memory can be copied to USB flash drive. Alternatively, songs stored on a USB flash drive can be copied to internal memory. 1. Press the [Function] button, and then use the [K] [J] buttons to select “Rename Song.” * Audio files cannot be copied. * If a USB flash drive is not connected, you won’t be able to perform this operation. 2.
Advanced Operation ˙ Personalizing Your Piano Sound (Piano Designer) Items that you can edit in Piano Designer What is Piano Designer? Parameter This unit allows you to personalize your piano sound by adjusting various factors that affect the sound, such as the piano’s strings and the resonance produced using the pedals. This function is called “Piano Designer.
Advanced Operation ˙ Saving Performance Settings (Registration) What Is a Registration? Saving Current Settings into a Registration Tone settings and performance settings such as Dual Play or Split Play can be saved as a “registration” and recalled whenever you like. Here’s how to save the performance settings to a registration. The FP-60 has six registration buttons ([1]–[6]), and you can save five different registrations under each button. This means that you can save as many as 30 registrations.
Advanced Operation Saving a Registration Set (Registration Set Export) Here’s how the registration set that’s saved in the FP-60 can be saved to a USB flash drive. * If you’re saving to a USB flash drive, connect your USB flash drive to the USB MEMORY port before proceeding. 1. Press the [Function] button, and then use the [K] [J] buttons to select “Reg. Set Export.” 2. Press the [Function] (Enter) button. The Reg. Set Export screen appears. 3. Renaming the registration set.
Advanced Operation ˙ Convenient Functions Reformatting Memory (Format Media) Restoring the Factory Settings (Factory Reset) You can completely erase all data that were saved in internal memory or on a USB flash drive. Here’s how to restore all registrations and internally saved settings to the factory-set condition. This function is called “Factory Reset.” NOTE 55 All data saved in internal memory or on the USB flash drive will be erased when you initialize the media.
˙ Using the Bluetooth® Functionality Provision of Bluetooth functionality Please be aware that depending on the country in which you purchased the piano, Bluetooth functionality might not be included. If Bluetooth functionality is included The Bluetooth logo appears when you turn on the power. Here’s What You Can Do Bluetooth functionality wirelessly connects this piano to a mobile device such as your smartphone or tablet (subsequently referred to as the "mobile device"), allowing you to do the following.
Advanced Operation Listening to Music Through the Piano’s Speakers Here’s how to make settings so that music data saved on your mobile device can be wirelessly played back through the piano’s speakers. * If your mobile device is already paired with the piano, there is no need to perform pairing again. Refer to “Connecting an Already-Paired Mobile Device” (p. 18). Making Initial Settings (Pairing) As an example, we explain how to make settings for an iPad.
Advanced Operation Using the Piano with an App Here’s how to make settings so that you can use the piano with an app that’s installed on your mobile device. Example Apps That Can Be Used with the Piano App name Supported Explanation OS iOS Android You can view musical scores of the internal songs, automatically add an accompaniment by detecting chords when you play the keyboard, or play note-guessing games to train your ear. iOS Android You can use the “Piano Designer” function (p.
Advanced Operation Using the Pedals to Turn Pages on a Music Score App On the mobile device, tap “Pair.” Here’s how to use the piano’s pedals to turn the pages of a music score shown on your mobile device (e.g., in a music score viewing app such as “piaScore”). Making Initial Settings (Pairing) As an example, we explain how to make settings for an iPad. If you’re using an Android device, refer to the owner’s manual of the mobile device you’re using. 1.
Advanced Operation Troubles with Bluetooth functionality Problem Items to check/Action Page Could the Bluetooth function be turned “Off”? Turn the Bluetooth function “On.
Advanced Operation ˙ Various Settings (Function Mode) How to Use Function Mode 1. Press the [Function] button, and then use the [K] [J] buttons to select the setting you want to change. * Depending on the item you select, an additional screen may be displayed. 2. Press the [–] [+] buttons to adjust the value. 3. Press the [Exit] button several times to exit the Function mode. * The FP-60 settings return to their factory defaults when you turn off the power.
Advanced Operation Indication [K] [J] buttons Parameter [-] [+] buttons Bluetooth Turn/MIDI Refer to “Using the Piano with an App” (p. 19). Bluetooth ID Refer to “If you have more than one piano” (p. 18). Input/Bluetooth Vol. Explanation Adjusting the Volume of an Audio Playback Device or Bluetooth Audio (Input/Bluetooth Vol.) You can adjust the volume of the audio playback when an audio playback device is connected to the Input Stereo jack or via Bluetooth.
Advanced Operation Indication [K] [J] buttons Parameter [-] [+] buttons Reg. Pedal Shift Reg. Set Export Reg. Set Import You can assign a pedal to successively switch registrations. Each time you press the pedal, you will switch to the next registration. Off The functions assigned to the Pedal Soft jack and Pedal Sostenuto jack will be available for use. Left Pedal The pedal connected to the Pedal Soft jack can be used only for switching registrations.
° Troubleshooting Problem Even though you’re using headphones to mute the sound, a thumping sound is heard when you play the keyboard Items to Check Action Page The keyboard of this piano is designed to simulate the mechanism of an acoustic piano. Even on an acoustic piano, a thumping sound is actually being produced when you press a key. Such sounds do not indicate a malfunction.
° Error Messages Indication Meaning Error 2 An error occurred during writing. The USB flash drive may be corrupted. Insert other USB flash drive and try again. Alternatively, you can initialize the USB flash drive (p. 16). The internal memory might be damaged. Format the internal memory (p. 16). No USB flash drive is inserted. Insert the USB flash drive and try again. Error 10 The internal memory might be damaged. Format the internal memory (p. 16).
° Saved Settings Parameter Split Point Right Shift Left Shift Tone 1 Shift Tone 2 Shift Transpose Ambience Rotary Speed Modulation Speed Key Touch Damper Pedal Part Center Pedal Part Center Pedal Left Pedal Part Left Pedal Reg. Pedal Shift MIDI Transmit Ch. Reg. Transmit Ch. Reg. PC Reg. Bank MSB Reg. Bank LSB Headphones 3D Ambience Hammer Response Metronome Master Tuning Temperament Temperament Key Input/Bluetooth Vol.
° USING THE UNIT SAFELY WARNING Concerning the Auto Off function The power to this unit will be turned off automatically after a predetermined amount of time has passed since it was last used for playing music, or its buttons or controls were operated (Auto Off function). If you do not want the power to be turned off automatically, disengage the Auto Off function (p. 24). Use only the stand that is recommended This unit should be used only with a stand that is recommended by Roland.