EXR-5_3_GBEF Page 1 Thursday, October 30, 2003 2:00 PM r EXR-5/EXR-3 Interactive Arranger Owner’s Manual Manual del Usuario Mode d’emploi Thank you for choosing a Roland EXR-5/EXR-3 Interactive Arranger, a novel keyboard with a superior Roland sound source, an intuitive user interface, a USB port, V-LINK compatibility and a host of other useful functions.
EXR-5_3_GBEF Page 2 Thursday, October 30, 2003 2:00 PM r EXR-5/EXR-3 Features Superior sound source The EXR-5/EXR-3’s sounds are based on full-length (uncompressed) waveforms, which is unique in this price range. This produces vibrant, realistic sounds quite unlike anything you would expect from a budget-friendly arranger keyboard. The EXR-5/EXR-3’s tone generator is 64-voice polyphonic.
EXR-5_3_GBEF Page 3 Thursday, October 30, 2003 2:00 PM EXR-5/EXR-3 Excellent Arranger The EXR-5/EXR-3 comes loaded with 103 all-new Music Styles prepared by Roland’s legendary Style foundry. As usual, several patterns are available (INTRO, ORIGINAL, VARIATION, FILL and ENDING), with additional options via the BAND ORCHESTRATOR buttons. Arranger excelente El EXR-5/EXR-3 se entrega cargado con 103 Estilos Musicales totalmente nuevos preparados por la legendaria fundición de estilos de Roland.
EXR-5_3_GBEF Page 4 Thursday, October 30, 2003 2:00 PM r EXR-5/EXR-3 Used for instructions intended to alert the user to the risk of death or severe injury should the unit be used improperly. Used for instructions intended to alert the user to the risk of injury or material damage should the unit be used improperly. * Material damage refers other adverse effects respect to the home furnishings, as well animals or pets.
EXR-5_3_GBEF Page 5 Thursday, October 30, 2003 2:00 PM EXR-5/EXR-3 ATENCIÓN • Before using this instrument, make sure to read the instructions below, and the Owner’s Manual. ...................................................................................................................................... • Do not open or perform any internal modifications on the unit. ......................................................................................................................................
EXR-5_3_GBEF Page 6 Thursday, October 30, 2003 2:00 PM r EXR-5/EXR-3 • This instrument, either alone or in combination with an amplifier and headphones or speakers, may be capable of producing sound levels that could cause permanent hearing loss. Do not operate for a long period of time at a high volume level, or at a level that is uncomfortable. If you experience any hearing loss or ringing in the ears, you should immediately stop using the unit, and consult an audiologist. ..............................
EXR-5_3_GBEF Page 7 Thursday, October 30, 2003 2:00 PM EXR-5/EXR-3 • Try to prevent cords and cables from becoming entangled. Also, all cords and cables should be placed out of the reach of children. ...................................................................................................................................... • Never climb on top of, nor place heavy objects on the unit. ................................................................................................................
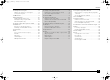
EXR-5_3_GBEF Page 8 Thursday, October 30, 2003 2:00 PM r EXR-5/EXR-3 Contents 1. Important notes . . . . . . . . . . . . . . . . . . . . . . . . . . . . . . . . . . 10 2. Panel descriptions . . . . . . . . . . . . . . . . . . . . . . . . . . . . . . . . 14 3. First steps . . . . . . . . . . . . . . . . . . . . . . . . . . . . . . . . . . . . . . . 21 Setting up . . . . . . . . . . . . . . . . . . . . . . . . . . . . . . . . . . . . . .21 Demo songs . . . . . . . . . . . . . . . . . . . . . . . . . . . . .
EXR-5_3_GBEF Page 9 Thursday, October 30, 2003 2:00 PM EXR-5/EXR-3 12. Working with User Programs . . . . . . . . . . . . . . . . . . . . . . . 94 Writing your settings to a User Program . . . . . . . . . . . 94 Selecting a User Program. . . . . . . . . . . . . . . . . . . . . . . . . . . . . . 96 13. MIDI functions . . . . . . . . . . . . . . . . . . . . . . . . . . . . . . . . . . . 97 14. Data management . . . . . . . . . . . . . . . . . . . . . . . . . . . . . . .103 Working with the Flash memory . .
EXR-5_3_GBEF Page 10 Thursday, October 30, 2003 2:00 PM r EXR-5/EXR-3 ] ] 1. Important notes In addition to the items listed under “Using the unit safely” (p. 4), please read and observe the following: 1. Notas importantes Además de los puntos indicados en la sección “Utilizar la unidad de forma segura” (p.
EXR-5_3_GBEF Page 11 Thursday, October 30, 2003 2:00 PM EXR-5/EXR-3 Maintenance Mantenimiento Entretien • For everyday cleaning wipe the EXR-5/EXR-3 with a soft, dry cloth or one that has been slightly dampened with water. To remove stubborn dirt, use a mild, non-abrasive detergent. Afterwards, be sure to wipe the instrument thoroughly with a soft, dry cloth. • Never use benzene, thinner, alcohol or solvents of any kind, to avoid the possibility of discoloration and/or deformation.
EXR-5_3_GBEF Page 12 Thursday, October 30, 2003 2:00 PM r EXR-5/EXR-3 Before using floppy disks (handling the floppy disk drive) [EXR-5 only] Antes de utilizar disquetes (o de manejar la disquetera) [Sólo EXR-5] Avant d’utiliser des disquettes (maniement du lecteur de disquettes) [EXR-5 uniquement] • Install the unit on a solid, level surface in an area free from vibration.
EXR-5_3_GBEF Page 13 Thursday, October 30, 2003 2:00 PM EXR-5/EXR-3 • Floppy disks have a “WRITE” tab which can protect the disk from accidental erasure. It is recommended that the tab be kept in the PROTECT position, and moved to the WRITE position only when you wish to write new data onto the disk. • Los disquetes disponen de un pestillo “WRITE” que protege el disco contra un borrado accidental.
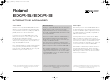
EXR-5_3_GBEF Page 14 Thursday, October 30, 2003 2:00 PM r EXR-5/EXR-3 2. Descripciones del panel 2. Panel descriptions F A B 14 U Q E G L H M V R W S O T X Y P Z C A [POWER ON] button Press this button to switch the EXR-5/EXR-3 on and off. B BENDER/MODULATION lever By performing left/right movements, you can bend your solo notes down (left) or up (right). Press this lever towards the rear of the instrument to add modulation (usually vibrato) to the notes you are playing.
EXR-5_3_GBEF Page 15 Thursday, October 30, 2003 2:00 PM EXR-5/EXR-3 F [KEYBOARD TOUCH] button Press this button to switch the keyboard’s velocity sensitivity on or off. When it is switched off, you can specify the fixed velocity value that should be used for all notes you play. G [METRONOME] button This button allows you switch the metronome on and off. Holding it for more than one second calls up a FUNCTION parameter you can set.
EXR-5_3_GBEF Page 16 Thursday, October 30, 2003 2:00 PM r EXR-5/EXR-3 L KEYBOARD CONTROL section Press the [SPLIT] button to play different sounds with your left and right hands. Press the [DUAL] button to play two sounds simultaneously. Press the [TRANSPOSE] button to transpose the keyboard (see p. 65). M BAND ORCHESTRATOR section Press one of these buttons to choose the desired orchestration for the selected Music Style. See page 45.
EXR-5_3_GBEF Page 17 Thursday, October 30, 2003 2:00 PM EXR-5/EXR-3 Q [MUSIC ASSISTANT] button This button allows you to work with pre-programmed registrations (additional User Programs). See p. 57. R [SONG] button This button allows you to select the EXR-5/EXR-3’s Song mode and to specify that the [INTRO], [ORIGINAL], etc., buttons should be used to operate the on-board Recorder. S [STYLE] button Press this button if you want to select Music Styles.
EXR-5_3_GBEF Page 18 Thursday, October 30, 2003 2:00 PM r EXR-5/EXR-3 V [FUNCTION] button This button provides access to the FUNCTION menu. You can use the FAMILY and SELECT [√][®] buttons to select the desired function. W [DISK] button [EXR-5 only] Press this button to access the Disk functions. They are used for loading data from floppy, saving data to disk, and managing floppy disks. See p. 112. Note: You can also save and load data via USB.
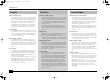
EXR-5_3_GBEF Page 19 Thursday, October 30, 2003 2:00 PM EXR-5/EXR-3 Rear panel Panel posterior A A OUTPUT R, L/MONO sockets These sockets allow you to connect the EXR-5/EXR-3 to your HiFi amplifier, a mixer, a cassette deck, a keyboard amplifier, etc. If the external amplifier is mono, be sure to connect it to the OUTPUT L/MONO socket. B PHONES 1/2 sockets [EXR-3 only] This is where you can connect two pairs of optional headphones (Roland RH-25 or RH-50).
EXR-5_3_GBEF Page 20 Thursday, October 30, 2003 2:00 PM r EXR-5/EXR-3 F USB port The USB port can be used for archiving purposes with a computer. 20 F Puerto USB El puerto USB se puede utilizar para propósitos de archivo con un ordenador. F Port USB Vous pouvez vous servir du port USB pour archiver des données sur un ordinateur.
EXR-5_3_GBEF Page 21 Thursday, October 30, 2003 2:00 PM EXR-5/EXR-3 3. First steps 3. Primeros pasos Setting up Configurar 3. Prise en main Mise sous tension VOLUME POWER ON The first thing you need to do is connect the supplied PSB-4U (EXR-5) or ACO (EXR-3) adapter to a suitable wall outlet. (1) Unpack the EXR-5/EXR-3 and place it on a stable surface. (2) Connect the small end of the adapter cable to the EXR-5/ EXR-3’s DC IN jack, and the other end to a suitable wall outlet.
EXR-5_3_GBEF Page 22 Thursday, October 30, 2003 2:00 PM r EXR-5/EXR-3 Canciones de demostración Demo songs Morceaux de démonstration STYLE TONE DemStyle 146 DemoSong 120 001 = = Your EXR-5/EXR-3 comes with 1 song demo, 8 Tone demos, various Style demos, and 1 Cover demo. • The song demo illustrates the possibilities of the EXR-5/ EXR-3 as a whole. • Tone demos show off the EXR-5/EXR-3’s amazing sound quality. • Style demos give you an impression of the quality of the onboard Music Styles.
EXR-5_3_GBEF Page 23 Thursday, October 30, 2003 2:00 PM EXR-5/EXR-3 Playback of a Style demo song Reproducción de una canción de demostración de Estilo Reproduire une démo de styles (1) Press the [STYLE] button. Playback of the Style demo song starts automatically. You can now press [START÷STOP] to stop playback of the currently selected Style demo song. If you press this button again, the next Style demo song will be played back. (2) Press [START÷STOP] to stop Style demo song playback.
EXR-5_3_GBEF Page 24 Thursday, October 30, 2003 2:00 PM r EXR-5/EXR-3 Playing without accompaniment Tocar sin acompañamiento Jeu sans accompagnement When you switch on the EXR-5/EXR-3, it select the PIANO SOLO mode. This means that you can use the EXR-5/EXR-3 like a digital piano, or a synthesizer. The accompaniment function (called “Arranger”) and [ONE¥TOUCH] button are not available in PIANO SOLO mode, while only the Main part is active.
EXR-5_3_GBEF Page 25 Thursday, October 30, 2003 2:00 PM EXR-5/EXR-3 (4) If necessary, you can hold down the [TONE] button and use BALANCE [ACCOMP] (softer) or [KEYBOARD] (louder) to change the Main part’s volume. Note: Unlike previous Roland arranger instruments, the EXR-5/ EXR-3 no longer distinguishes between “melodic” parts and a Manual Drums part. You can therefore also play a Drum Kit with the Main part. Note: You can also press the [START÷STOP] button to add a rhythm accompaniment to your playing.
EXR-5_3_GBEF Page 26 Thursday, October 30, 2003 2:00 PM r EXR-5/EXR-3 (4) To assign another sound to the Split part, hold down the [SPLIT] button and proceed like for the Main part (page 24). Alternatively, press and hold one of the eight TONE buttons (Main part) while pressing another TONE button (Split part). Note: You cannot assign Drum Kits to the Split part. Note: You can also add a monophonic bass part (“Auto Bass”) to the Split part. See “Auto Bass*: status and volume” (p. 88).
EXR-5_3_GBEF Page 27 Thursday, October 30, 2003 2:00 PM EXR-5/EXR-3 Using the metronome You can switch on the metronome when practising a new song. (1) Press the [METRONOME] button. The icon appears in the display and you hear the metronome sound. (2) Press and hold [METRONOME] to select the Metro TS function. (3) Use the [–]/[+] buttons to set another time signature. The possibilities are: 1/4, 2/4, 3/4, 4/4, 5/4, 6/4, 6/8, 9/8.
EXR-5_3_GBEF Page 28 Thursday, October 30, 2003 2:00 PM r EXR-5/EXR-3 4. Playing with accompaniment (Arranger) ARRANGER 4. Interpretar con acompañamiento (Arranger) 4. Jeu avec accompagnement (arrangeur) START / STOP BAND Let us now take advantage of the EXR-5/EXR-3’s accompaniment function. This function is called “Arranger”. Aprovechemos ahora las ventajas de la función de acompañamiento del EXR-5/EXR-3. Esta función se denomina “Arranger”.
EXR-5_3_GBEF Page 29 Thursday, October 30, 2003 2:00 PM EXR-5/EXR-3 (5) Press the following buttons to use other patterns of the currently selected Music Style: (5) Pulse los siguientes botones para utilizar otros patrones del Estilo Musical actualmente seleccionado: (5) Appuyez sur les boutons ci-dessous pour utiliser d’autres motifs (“Pattern”) du style musical en vigueur: ARRANGER M Button Function Botón Función Bouton Fonction INTRO Playback of an introduction.
EXR-5_3_GBEF Page 30 Thursday, October 30, 2003 2:00 PM r EXR-5/EXR-3 Cambiar el tempo Changing the tempo Changer le tempo TAP TEMPO NO YES SYNC START TEMPO / DATA (6) Use the TEMPO/DATA buttons to decrease ([–]) or increase ([+]) the tempo (if necessary). To return to the Music Style’s default tempo, simultaneously press [–] and [+]. You can also press the [TAP¥TEMPO] button several times at the desired tempo.
EXR-5_3_GBEF Page 31 Thursday, October 30, 2003 2:00 PM EXR-5/EXR-3 Selecting Music Styles Seleccionar estilos musicales The EXR-5 provides three memory areas for Music Styles (the EXR-3 has two): USER STL: (Memory 000) This is where a Music Style loaded from the Flash memory or floppy disk (MSA, MSD and MSE series, optional [EXR-5 only]) is temporarily stored. The data in this RAM memory are erased when you switch off the EXR-5/EXR-3. (The EXR-3 doesn’t have a floppy disk drive.
EXR-5_3_GBEF Page 32 Thursday, October 30, 2003 2:00 PM r EXR-5/EXR-3 (3) If you want to use a style on floppy disk [EXR-5 only], insert the disk into the drive. (4) Use FAMILY [√][®] to select the memory area that contains the desired Music Style (see above). The FAMILY buttons allow you to jump to the desired “family” (which also include the Flash and USER STL areas). The display now shows the name of the selected family.
EXR-5_3_GBEF Page 33 Thursday, October 30, 2003 2:00 PM EXR-5/EXR-3 If you press [+/YES] during Arranger playback, the new Style is used at the next downbeat (1st beat of the next measure). Otherwise, the EXR-5/EXR-3 displays its name and uses that Style when you press [START÷STOP]. Si pulsa [+/YES] durante la reproducción del Arranger, el nuevo Estilo se utiliza en el siguiente tiempo fuerte (primer tiempo del siguiente compás).
EXR-5_3_GBEF Page 34 Thursday, October 30, 2003 2:00 PM r EXR-5/EXR-3 5. Playing back songs The EXR-5/EXR-3 allows you to play back commercially available music data files (called Standard MIDI Files) or your own songs you saved to disk or to the EXR-5/EXR-3’s Flash memory. Your own songs are saved as Standard MIDI Format 0 files and can also be played back using any other SMF compatible sequencer (or software). 5.
EXR-5_3_GBEF Page 35 Thursday, October 30, 2003 2:00 PM EXR-5/EXR-3 FLASH: (Memories 101~199) This is the Flash area inside the EXR-5/EXR-3 that already contains several songs when the EXR-5/EXR-3 is shipped. You can expand the number of songs in this area by copying more songs from your computer (via USB). There are 99 Flash memory slots in all, but the actual number of songs you can save there depends on the data size of the songs.
EXR-5_3_GBEF Page 36 Thursday, October 30, 2003 2:00 PM r EXR-5/EXR-3 the SELECT [√][®] buttons. As a reminder: the FAMILY buttons are used for selecting groups, while the SELECT buttons allow you to select items within a group. If you prefer to use the numeric buttons, enter three figures (e.g. “001” for entry “1”). If you only enter two figures (or only one), the EXR-5/EXR-3 takes slightly longer to accept your entry.
EXR-5_3_GBEF Page 37 Thursday, October 30, 2003 2:00 PM EXR-5/EXR-3 Note: Please bear in mind that starting playback of the selected song on disk will erase the song in the USERSONG memory. Be sure to save it to disk before proceeding (see p. 114). (6) You can change the song tempo with the [–]/[+] buttons or [TAP¥TEMPO]. Doing so, however, means that the tempo will still change if the song you are playing back contains tempo change messages.
EXR-5_3_GBEF Page 38 Thursday, October 30, 2003 2:00 PM r EXR-5/EXR-3 Additional playback functions The [INTRO], [ORIGINAL], etc. buttons have two functions: one in Style mode (printed above the buttons), and another one in Song mode (printed below the buttons). Selecting the Song mode The ARRANGER & SONG CONTROLS buttons have two functions: they can be used for selecting Music Style patterns (when the ARRANGER icon is displayed), or for Song navigation (when the [SONG] button lights).
EXR-5_3_GBEF Page 39 Thursday, October 30, 2003 2:00 PM EXR-5/EXR-3 Loop playback (Repeat) Reproducción Loop (Repeat) Reproduction en boucle (Repeat) SYNC START INTRO MARKER A–B REPEAT A–B Another clever feature of the EXR-5/EXR-3’s Recorder is that you can program playback loops. You can do so during playback or while the Recorder is stopped. (1) Press [MARKER¥A–B] where you want the loop to begin (the A icon appears in the bottom right corner of the display).
EXR-5_3_GBEF Page 40 Thursday, October 30, 2003 2:00 PM r EXR-5/EXR-3 Live performance with song backing (Minus One) Your EXR-5/EXR-3 allows you to mute parts you wish to play yourself or don’t need in a given situation. This is called “Minus One” playback. (1) Press the [SONG] button if it doesn’t light. You can now select a Song, if you like (see p. 35). (2) Press the [MINUS¥ONE] button (the “MinusOne” message appears in the display).
EXR-5_3_GBEF Page 41 Thursday, October 30, 2003 2:00 PM EXR-5/EXR-3 What are tracks? ¿Qué son pistas? Que sont les pistes? The term “track” is used only for your convenience. We borrowed it from tape recorders that allow for recording several musical parts by the same person (one part after the other). In the case of the EXR-5/EXR-3, the term is only used to indicate that we are dealing with separate musical parts.
EXR-5_3_GBEF Page 42 Thursday, October 30, 2003 2:00 PM r EXR-5/EXR-3 (4) Press [|√] and [®÷ª] to start playback. (5) Press [®÷ª] again to stop playback. (6) Press [MINUS¥ONE] again (or one of the “big” DATA ENTRY buttons) to switch the function of the same name back off again. Note: The Minus One setting can be saved along with the selected song and its Cover settings. See page 103. (4) Pulse [|√] y [®÷ª] para iniciar la reproducción. (5) Pulse [®÷ª] de nuevo para detener la reproducción.
EXR-5_3_GBEF Page 43 Thursday, October 30, 2003 2:00 PM EXR-5/EXR-3 6. Changing the Music Style or song orchestration 6. Cambiar el Estilo musical o la orquestación de la canción 6. Changer l’orchestration d’un style ou d’un morceau Your EXR-5/EXR-3 is a novel arranger instrument and Standard MIDI File player with two functions for “customizing” the Styles or songs you play back via easy-to-use routines.
EXR-5_3_GBEF Page 44 Thursday, October 30, 2003 2:00 PM r EXR-5/EXR-3 The COVER buttons have the following meanings. You may notice that their function is akin to the EQ presets found on a ghetto blaster or similar device (except that they change the sounds themselves rather than the tone color). Button Function ACOUSTIC Adds an “unplugged” touch to the song or Music Style. POP ROCK Uses an orchestration that resembles the hits you hear on the radio.
EXR-5_3_GBEF Page 45 Thursday, October 30, 2003 2:00 PM EXR-5/EXR-3 Using the Band Orchestrator function Utilizar la función Band Orchestrator Utiliser la fonction Band Orchestrator BAND ORCHESTRATOR DRUM & BASS The Band Orchestrator function allows you to vary the accompaniment patterns played by the Arranger. You can leave out parts, thin out the drum part, etc. – in real-time (i.e. while you are playing). (1) Press the [ARRANGER÷BAND] button to select the Arranger mode.
EXR-5_3_GBEF Page 46 Thursday, October 30, 2003 2:00 PM r EXR-5/EXR-3 The corresponding icon appears in the display (only one of them can be displayed at any one time). Aparece el icono correspondiente en la pantalla (sólo uno de ellos se puede visualizar al mismo tiempo). L’icône correspondante apparaît à l’écran (une seule icône peut être affichée à la fois): Note: Immediately after switching on the EXR-5/EXR-3, the Orchestrator selects the “FULL BAND” level.
EXR-5_3_GBEF Page 47 Thursday, October 30, 2003 2:00 PM EXR-5/EXR-3 7. Recording your music Your EXR-5/EXR-3 contains a 16-track Recorder you can use for recording your own songs. Basic song recording 7. Grabar su música El EXR-5/EXR-3 dispone de un Grabador de 16 pistas que puede utilizar para grabar sus propias canciones. Grabación básica de canciones 7. Enregistrer votre jeu L’EXR-5/EXR-3 comporte un enregistreur (Recorder) 16 pistes qui vous permet d’enregistrer vos propres morceaux.
EXR-5_3_GBEF Page 48 Thursday, October 30, 2003 2:00 PM r EXR-5/EXR-3 (The [RECORD≈∏] and [1]~[16] icons flash.) You are now in ALL mode, which means that everything you and the EXR-5/ EXR-3’s Arranger play will be recorded. (Los iconos [RECORD≈∏] y [1]~[16] parpadean.) Ahora se encuentra en el modo ALL, lo que significa que todo lo que usted y el Arranger del EXR-5/EXR-3 toquen, se grabará. (Les icônes [RECORD≈∏] et [1]~[16] clignotent.) Vous vous trouvez en mode ALL.
EXR-5_3_GBEF Page 49 Thursday, October 30, 2003 2:00 PM EXR-5/EXR-3 Listening to your song (1) (2) (3) (4) Press the [SONG] button. Press [START÷STOP] to start playback. Press [START÷STOP] once again to stop playback. Press [|√] to return to the beginning of the song. Escuchar su canción (1) (2) (3) (4) Pulse el botón [SONG]. Pulse [START÷STOP] para iniciar la reproducción. Pulse [START÷STOP] de nuevo para detener la reproducción. Pulse [|√] para volver al principio de la canción.
EXR-5_3_GBEF Page 50 Thursday, October 30, 2003 2:00 PM r EXR-5/EXR-3 ●Memoria del grabador ●Recorder memory The EXR-5/EXR-3 provides one “live” song memory, which can contain one song at a time. After completing a song, you should save it (see p. 114). To keep you from accidentally erasing the song in the EXR-5/ EXR-3’s internal memory, the EXR-5/EXR-3 automatically selects Single after your first recording. Bear in mind that selecting “ALL” or “Keyboard” will erase the song in the USERSONG memory.
EXR-5_3_GBEF Page 51 Thursday, October 30, 2003 2:00 PM EXR-5/EXR-3 Here is what the tracks correspond to (after recording a song with Arranger backing): 1 2 3 4 5 6 7 8 Accomp 1 Arranger bass 9 10 11 12 13 14 15 16 Accomp 2 kMain Accomp 3 kDual* Accomp 4 Accomp 5 Accomp 6 Arranger drums kSplit* kAuto Bass* (see p. 88) Melody Intell. (see p.
EXR-5_3_GBEF Page 52 Thursday, October 30, 2003 2:00 PM r EXR-5/EXR-3 (4) Activate the metronome (if necessary), and set the desired tempo with the [TAP¥TEMPO] button or [–]/[+]. You can also record without metronome if you like. (4) Active el metrónomo (si fuera necesario), y ajuste el tempo deseado con el botón [TAP¥TEMPO] o [–]/[+]. También puede grabar sin el metrónomo si lo desea. Note: If you assign a Drum Kit to the Main part, your drum performance is recorded onto track 16.
EXR-5_3_GBEF Page 53 Thursday, October 30, 2003 2:00 PM EXR-5/EXR-3 Note: Even though the Main part can be used for recording all tracks in Single mode, the MFX only applies to track/MIDI channel 4. (5) Press [START÷STOP] to start recording. After a two-measure count-in (see p. 87), you will hear all parts that have already been recorded. Start playing (and recording) your new part. (6) Press [START÷STOP] to stop recording. (7) Return to step (3) to record additional parts.
EXR-5_3_GBEF Page 54 Thursday, October 30, 2003 2:00 PM r EXR-5/EXR-3 (3) (4) (5) (6) (7) (8) (9) The flashing track icon (only one) depends on the first track that already contains data. In the above example, track 1 contains data, which is why its icon flashes. Use the SELECT [√][®] or numeric buttons to select the track you wish to record to. You can only select one track at a time. Press [START÷STOP] to start playback of the (old) song data. The RECORD icon and the icon of the selected track flash.
EXR-5_3_GBEF Page 55 Thursday, October 30, 2003 2:00 PM EXR-5/EXR-3 • Press the [FUNCTION] button (it must light). • Pulse el botón [FUNCTION] (debe iluminarse). • Appuyez sur le bouton [FUNCTION] (il doit s’allumer). SELECT FUNCTION • Use FAMILY [√][®] to select “KB SET”. The EXR-5/EXR-3’s Function parameters are divided into 9 logical “families”. For the following, we need to select the group that contains the global keyboard settings. • Use SELECT [√][®] to select the “FSW” parameter.
EXR-5_3_GBEF Page 56 Thursday, October 30, 2003 2:00 PM r EXR-5/EXR-3 8. Additional Music Style functions Apart from the basic Music Style functions covered on page 28 and following, your EXR-5/EXR-3 also provides the following functions. Most of the following functions are only available ARRANGER after pressing the [ARRANGER÷BAND] button (the icon must be displayed). One Touch 8.
EXR-5_3_GBEF Page 57 Thursday, October 30, 2003 2:00 PM EXR-5/EXR-3 Using the Music Assistant Utilizar el Asistente Musical Travail avec le Music Assistant Another practical function for quickly making the right settings for a song you want to play is to take advantage of the EXR-5/ EXR-3’s novel MUSIC ASSISTANT function. It prepares everything for working with the Arranger (Style, Tones, effects, etc.). The Music Assistant is not available for song playback.
EXR-5_3_GBEF Page 58 Thursday, October 30, 2003 2:00 PM r EXR-5/EXR-3 Note: If necessary, you can now change the settings you do not like (e.g. select another sound for the Main part, etc.) and then save your new version to a User Program (see p. 94). Nota: Si fuera necesario, puede cambiar los ajustes que no le gusten (por ejemplo,. seleccionar otro sonido para la parte Main, etc.) y después guardar su nueva versión en un Programa de Usuario (consulte la página 94).
EXR-5_3_GBEF Page 59 Thursday, October 30, 2003 2:00 PM EXR-5/EXR-3 Bass Inversion (Bass Inv) Bass Inversion (Bass Inv) Bass Inversion (Bass Inv) Use this function to change the way in which the Arranger reads the chords you play. Utilice esta función para cambiar la forma en que el Arranger lee los acordes que toca. Cette fonction permet de changer la manière dont l’arrangeur interprète les accords que vous jouez.
EXR-5_3_GBEF Page 60 Thursday, October 30, 2003 2:00 PM r EXR-5/EXR-3 More Music Style functions Más funciones del Estilo Musical Here are yet other functions related to Music Styles. These can be set via the FUNCTION menu, or are covered elsewhere: • Balance between the Keyboard parts and the Music Style parts (see p. 33) • Volume of certain Music Style parts (see p. 88) • Arranger split point (see p. 85) • Hold function for the Arranger notes (see p. 89).
EXR-5_3_GBEF Page 61 Thursday, October 30, 2003 2:00 PM EXR-5/EXR-3 9. Keyboard part functions Selecting sounds for the Main, Split and Dual parts The EXR-5/EXR-3 contains about 470 melodic sounds you can use for playing melodies (others are more like sound effects). Those sounds need to be assigned to a Keyboard part, of which there are three: Main, Split and Dual (see also p. 24).
EXR-5_3_GBEF Page 62 Thursday, October 30, 2003 2:00 PM r EXR-5/EXR-3 (4) Use SELECT [√][®] to specify a sound within the selected family. The first press of SELECT [®] (or [√]) shows the name of the first Tone within the selected group. It is already selected, so if you need the first sound, there is actually no need to press SELECT [®]. You must use SELECT [√] or [®], however, to select another Tone within the same group.
EXR-5_3_GBEF Page 63 Thursday, October 30, 2003 2:00 PM EXR-5/EXR-3 Assigning another Tone to a TONE button To assign another sound to one of the 8 TONE buttons, first select it using the procedure described above, the press and hold the desired TONE button. The display briefly shows the message “Memrized”. Note: You can only assign Tones of the following families to the various buttons: [PIANO]: Piano, E.Piano, Keyboard, Chr Perc [ORGAN]: Organ, Accordion [GUITAR]: A. Guitar, E.
EXR-5_3_GBEF Page 64 Thursday, October 30, 2003 2:00 PM r EXR-5/EXR-3 Sonidos de percusión y efectos de sonido (“SFX”) Grupos de percusión IPopKik36 IPopCStk37st IPopSn38st IPopGstS39st IPopSn40st IPopTomLFl41 IPopHat1_42 IPopTomL43 IPopHat2_44 IPopTomMFl45 IPopHat3_46 IPopTomM47 IPopTomHFl48 IPopCyml2_52 IPopTomH50 The last 20 “sounds” (511~530) are so-called “Drum Kits”. When you select such a Kit, every key is assigned to a different sound.
EXR-5_3_GBEF Page 65 Thursday, October 30, 2003 2:00 PM EXR-5/EXR-3 If you want to use your left hand, assign a sound between “449” and “510” to the Split part. To play the effect with your right hand, assign it to the Main part. (3) Change the split point (page 85) in such a way that only a few keys are assigned to the percussion sound/sound effect (“C6” for right-hand effect playing, “C3” for lefthand effect playing).
EXR-5_3_GBEF Page 66 Thursday, October 30, 2003 2:00 PM r EXR-5/EXR-3 (2) Use the [–]/[+] and/or numeric buttons ([0]~[9]) to set the desired transposition interval. The setting range is –12~12 semitones. A “semitone” is one step between a white and a black key (or two adjacent white keys, i.e. between “E”/“F” and “B”/“C”). Press [+] or [–] repeatedly to transpose the keyboard up or down. You can also directly enter the desired interval by pressing the corresponding numeric key.
EXR-5_3_GBEF Page 67 Thursday, October 30, 2003 2:00 PM EXR-5/EXR-3 Octave settings Ajuste de octava NO Réglages d’octave YES TEMPO / DATA The EXR-5/EXR-3 allows you to transpose the Keyboard parts (Main, Split, Dual) up or down by 4 octaves. To change the octave transposition of a part, hold down [TONE] (Main part), [SPLIT] (Split part) or [DUAL] (Dual part), while pressing [–] (down) or [+] (up).
EXR-5_3_GBEF Page 68 Thursday, October 30, 2003 2:00 PM r EXR-5/EXR-3 10. Performance functions and effects 10. Funciones de interpretación y efectos 10.
EXR-5_3_GBEF Page 69 Thursday, October 30, 2003 2:00 PM EXR-5/EXR-3 “1” is very low (usually inaudible), while “127” corresponds to maximum striking force (loud, bright notes). The value is only used when the KEY TOUCH icon is not displayed (otherwise, all notes use the velocity values that correspond to the force with which you strike the keys). (5) Press another “big” button in the DATA ENTRY section to leave this function. Note: Some sounds use “velocity switching”.
EXR-5_3_GBEF Page 70 Thursday, October 30, 2003 2:00 PM r EXR-5/EXR-3 (3) In either case, you can release the lever if you no longer need the effect. (3) En ambos casos, puede soltar la palanca si ya no necesita el efecto. (3) Pour chacun de ces types d’effets, vous pouvez relâcher le levier quand vous n’avez plus besoin de l’effet. Note: If necessary, you can change the Pitch Bend interval. See “PB Range° (Pitch Bend Range)” (p. 85). Nota: Si es necesario, puede cambiar el intervalo de Pitch Bend.
EXR-5_3_GBEF Page 71 Thursday, October 30, 2003 2:00 PM EXR-5/EXR-3 Using effects Utilizar efectos Utilisation des effets The EXR-5/EXR-3 contains digital Reverb and Chorus effects processors. You can switch them on/off and select other types. You can also set the Send level (the amount of Reverb or Chorus) to be applied to the various Keyboard parts. Please bear in mind that the Chorus effect cannot be combined with the MFX (so you need to choose between Chorus or MFX for the Main part).
EXR-5_3_GBEF Page 72 Thursday, October 30, 2003 2:00 PM r EXR-5/EXR-3 Overdrv1~4: Overdrive creates a soft distortion similar to that produced by tube amplifiers. Several types of overdrive are available: (1) Small combo amp, (2) Combo amp, (3) Large double-stack amp (2 cabinets), (4) Large double-stack amp (3 cabinets). Distort1~4: This effect produces a more intense distortion than Overdrive. The numbers refer to different kinds of distortion.
EXR-5_3_GBEF Page 73 Thursday, October 30, 2003 2:00 PM EXR-5/EXR-3 3Tap Dly: The Triple Tap Delay produces three delay sounds; center, left and right. 4Tap Dly: Delay with four repetition lines. TmCtrDly: This effect controls the delay time in realtime. Reverb: A nice Reverb effect. GteRevNr: Gate Reverb is a special type of Reverb in which the reverberant sound is suddenly cut off (and does not gradually decrease). GteRevRv: A gated Reverb effect that sounds “backwards”.
EXR-5_3_GBEF Page 74 Thursday, October 30, 2003 2:00 PM r EXR-5/EXR-3 Cho/Dly: This effect connects a Chorus and a Delay in parallel. (“Parallel” means that the input signal is processed by two effects that do not interact.) FL/Delay: This effect connects a Flanger and a Delay in parallel. Cho/Flgr: This effect connects a Chorus and a Flanger in parallel. Cho/Dly: Este efecto conecta un Chorus y un Delay en paralelo. (“Paralelo” significa que dos efectos que no interactúan procesan la señal de entrada.
EXR-5_3_GBEF Page 75 Thursday, October 30, 2003 2:00 PM EXR-5/EXR-3 Reverb Reverb is an effect that gives you the impression of playing in a concert hall, a room or another acoustic environment that reflects the sounds that are being produced. When you switch on the EXR-5/EXR-3, all three Keyboard parts (Main, Dual, Split) as well as the Arranger and Song parts are processed by the internal Reverb effect.
EXR-5_3_GBEF Page 76 Thursday, October 30, 2003 2:00 PM r EXR-5/EXR-3 (4) Use the [–]/[+] buttons to select “Off” if you don’t need the Reverb processor. Otherwise, select one of the eight available types: (4) Utilice los botones [–]/[+] para seleccionar “Off” si no necesita el procesador de reverberación. De lo contrario, seleccione uno de los ocho tipos disponibles: (4) Utilisez les boutons [–]/[+] pour choisir “Off” si vous ne comptez pas travailler avec le processeur Reverb.
EXR-5_3_GBEF Page 77 Thursday, October 30, 2003 2:00 PM EXR-5/EXR-3 (7) Use [–]/[+] to select “0” if you don’t want the selected Keyboard part to be processed by the Reverb effect. Otherwise, set the desired value. If you selected an MFX type (see p. 71), the Rev MAIN parameter no longer affects the Main part directly, but rather the MFX signal. When the MFX is set to “Off” Main Reverb MFX “Off” Rev MAIN= Reverb for Main (Si [FUNCTION] no se ilumina, lleve a cabo primero los siguientes pasos (1) y (2).
EXR-5_3_GBEF Page 78 Thursday, October 30, 2003 2:00 PM r EXR-5/EXR-3 Chorus Chorus Chorus broadens the spatial image of the sound and creates a stereo impression. You can choose from 8 types. When you switch on the EXR-5/EXR-3, none of the three Keyboard parts (Main, Dual, Split) are processed by the internal Chorus effect. Note also that the Chorus effect doesn’t affect the Main part if the MFX is set to anything but “Off”.
EXR-5_3_GBEF Page 79 Thursday, October 30, 2003 2:00 PM EXR-5/EXR-3 ●Changing the amount of Chorus processing for the Keyboard parts To change the Chorus depth (i.e. how much Chorus is added to a part), proceed as follows: (6) If the [FUNCTION] button still lights, use SELECT [√][®] to select one of the following parameters.
EXR-5_3_GBEF Page 80 Thursday, October 30, 2003 2:00 PM r EXR-5/EXR-3 Note: This setting can be saved to a User Program (see p. 94). (9) Press another “big” button in the DATA ENTRY section to leave this function. Nota: Este ajuste puede guardarse en un Programa de Usuario (consulte la página 94). (9) Pulse otro botón “big” en la sección DATA ENTRY para salir de esta función. Remarque: Vous pouvez sauvegarder ce réglage dans un programme utilisateur (voyez p. 94).
EXR-5_3_GBEF Page 81 Thursday, October 30, 2003 2:00 PM EXR-5/EXR-3 (1) Connect the EXR-5/EXR-3’s MIDI OUT socket to the MIDI IN socket of the external video processor (or to a UM-1 interface). (2) .Press the [V-LINK] button (it lights blue). (3) Use the BENDER, the assigned buttons or “V-LINK” keys (highest octave) to manipulate the video pictures in sync with your music (see below). (4) Press [V-LINK] again to switch off this function (the button goes dark).
EXR-5_3_GBEF Page 82 Thursday, October 30, 2003 2:00 PM r EXR-5/EXR-3 • COVER buttons: VFX1~4, None (ACOUSTIC= None, POP= V-FX 1, ROCK= V-FX 2, DANCE= V-FX 3, ETHNIC= V-FX 4) Use these buttons to change the video effects. This function is not available if the receiving video processor is already set to “Off”. Note: VFX2 is not supported by the DV-7. Note: All V-LINK messages are transmitted on MIDI channels 13 and 14.
EXR-5_3_GBEF Page 83 Thursday, October 30, 2003 2:00 PM EXR-5/EXR-3 11. Function menu 11. Menú Function 11. Menu Function The EXR-5/EXR-3’s Function mode contains more advanced settings you may not need every day. They allow you to fine-tune your instrument’s response. It would therefore be a good idea to familiarize yourself with these parameters. Most settings (“*”) can be written to a User Program (see p. 94). Other parameters (“°”) are saved to the Flash memory when you leave the Function mode.
EXR-5_3_GBEF Page 84 Thursday, October 30, 2003 2:00 PM r EXR-5/EXR-3 ■ MIDI: Local, MidiTxRx, Sync Rx, Style PC, LyricsTx, NTARx14, PicthBnd, Modulatn, ProgChng, Velo Rx, Clock Tx, StartStp, SongPosP ■ UTILITY: InitFLASH, Resume ■ WriteSNG (see p. 103) ■ WriteSTL (see p. 104) ■ RemoveSNG (see p. 106) ■ Remove STL (see p. 107) (3) Use SELECT [√][®] to select the parameter you wish to edit (see below). Note: In FUNCTION mode, SELECT [√][®] do not allow you to jump from one family to the next.
EXR-5_3_GBEF Page 85 Thursday, October 30, 2003 2:00 PM EXR-5/EXR-3 ■ Transpos* ■Transpos* ■ Transpos* (–12~12, Default setting: 0) Use this parameter to transpose the EXR-5/EXR-3 in semitones. If you’re not sure what transposition is, see p. 65. This parameter can also be selected by pressing the [TRANSPOSE] button. (–12~12, Ajuste por defecto: 0) Utilice este parámetro para transponer el EXR-5/EXR-3 en semitonos. Si no está seguro de lo que es la transposición, consulte p. 65.
EXR-5_3_GBEF Page 86 Thursday, October 30, 2003 2:00 PM r EXR-5/EXR-3 ■ SpltHold* (Hold function for the Split part) ■SpltHold* (Función Hold para la parte Split) ■ SpltHold* (fonction Hold de la partie Split) (On/Off, Default setting: Off) The SpltHold function memorizes the chords you play while the Split part is on and holds the corresponding notes until you play another chord.
EXR-5_3_GBEF Page 87 Thursday, October 30, 2003 2:00 PM EXR-5/EXR-3 UsrPrgDw: Selects the previous User Program (i.e. “1” if “10” is currently active). Start/Stop: Starts and stops Arranger or Song playback. Same function as the [START÷STOP] button. Bass Inv: Switches the Bass Inversion function on and off (see p. 59). Punch I/O: The footswitch can be used to activate and switch off punch in/out recording (see p. 54).
EXR-5_3_GBEF Page 88 Thursday, October 30, 2003 2:00 PM r EXR-5/EXR-3 Note: When a Drum Kit is assigned to the Main part, the pitch of the drum/percussion sounds is not transposed. Instead, the keys are assigned to other drum/percussion sounds (“shifted”). Example: after setting “MAIN Oct” to “–1”, the bass drum can be played with the C3 key (rather than the C2), while other sounds are available to the left of the C3.
EXR-5_3_GBEF Page 89 Thursday, October 30, 2003 2:00 PM EXR-5/EXR-3 Note: The “Accomp” parameter does not have the same function as the BALANCE [ACCOMP] button. The button applies to all Arranger parts (thus also to the “AccDrums” and “AccBass” parameters). ARR SET parameters ■ ChordInt* (Arranger Chord intelligence) Nota: El parámetro “Accomp” no tiene la misma función que el botón BALANCE [ACCOMP].
EXR-5_3_GBEF Page 90 Thursday, October 30, 2003 2:00 PM r EXR-5/EXR-3 ■ EP Chord° (left-hand St. Strings + bass) ■EP Chord° (St. Strings con la mano izquierda + bajo) ■ EP Chord° (cordes stéréo + basse, main gauche) (On/Off, Default setting: On) The EP Chord function (for “Educational Purposes”) activates a stereo string sound and monophonic bass (if Auto Bass is set to “on”) whenever (a) the ARRANGER icon is displayed and (b) the Arranger is stopped.
EXR-5_3_GBEF Page 91 Thursday, October 30, 2003 2:00 PM EXR-5/EXR-3 ■ Tone MFX° ■Tone MFX° ■ Tone MFX° (On/Off, Default setting: On) This parameter allows you to link the selection of an MFX type to the Tone you assign to the Main part. That way, a Distortion/Overdrive effect will be selected for a rock guitar sound, Rotary for an organ, etc. (On/Off, Ajuste por defecto: On) Este parámetro le permite enlazar la selección de un tipo de MFX al Tono que asigne a la parte Main.
EXR-5_3_GBEF Page 92 Thursday, October 30, 2003 2:00 PM r EXR-5/EXR-3 ■ Pan DUAL* ■Pan DUAL* ■ Pan DUAL* (Rnd, R63~0~L63, Default setting: 0) This parameter allows you to set the stereo position of the Dual part (i.e. its placement between the left and right speakers). “Rnd” means that the stereo position changes randomly for each note you play. Values starting with “L” correspond to the left speaker. “0” refers to the center, and values starting with “R” correspond to the right speaker.
EXR-5_3_GBEF Page 93 Thursday, October 30, 2003 2:00 PM EXR-5/EXR-3 ■ Scl Mode* ■Scl Mode* ■ Scl Mode* (MN, ALL, Default setting: MN) This parameter allows you to specify which parts the Scale settings (see above) should apply to: only the Main part (“MN”) or all parts (“ALL”). In some cases, choosing “ALL” may produce a more satisfactory result.
EXR-5_3_GBEF Page 94 Thursday, October 30, 2003 2:00 PM r EXR-5/EXR-3 12. Working with User Programs The EXR-5/EXR-3 is equipped with 10 User Program memories that allow you to store almost all settings (or registrations) you make on the front panel and via the Function menu (see p. 83). Note: MIDI settings (see p. 97) are not saved to a User Program because the EXR-5/EXR-3 memorizes them automatically. 12.
EXR-5_3_GBEF Page 95 Thursday, October 30, 2003 2:00 PM EXR-5/EXR-3 Notes about writing User Programs Notas acerca de la escritura de Programas de Usuario Leaving the User Program environment Salir del entorno de Programa de Usuario Press any other “big” DATA ENTRY button to leave the User Program environment. Pulse cualquier otro botón “grande” DATA ENTRY para salir del entorno de Programa de Usuario.
EXR-5_3_GBEF Page 96 Thursday, October 30, 2003 2:00 PM r EXR-5/EXR-3 Selecting a User Program Seleccionar un Programa de Usuario Sélection d’un programme utilisateur Though the User Program memory you specified above is already selected, there will be times when you need to select another memory. In that case, here is what you need to do: Aunque la memoria del Programa de Usuario especificado anteriormente ya está seleccionada, algunas veces deberá seleccionar otra memoria.
EXR-5_3_GBEF Page 97 Thursday, October 30, 2003 2:00 PM EXR-5/EXR-3 13. MIDI functions 13. Funciones MIDI MIDI is short for “Musical Instrument Digital Interface”. The word refers to many things, the most obvious being a connector type that is used by musical instruments and other devices to exchange messages relating to the act of making music. Each time you play on the EXR-5/EXR-3’s keyboard or start the Arranger (or Song), your instrument transmits MIDI data to its MIDI OUT.
EXR-5_3_GBEF Page 98 Thursday, October 30, 2003 2:00 PM r EXR-5/EXR-3 Canales Channels MIDI can simultaneously transmit and receive messages on 16 channels, so that up to 16 instruments can be controlled. Nowadays, most instruments –like your EXR-5/EXR-3– are multitimbral, which means that they can play several musical parts with different sounds. Note: All EXR-5/EXR-3 parts are set to receive MIDI messages.
EXR-5_3_GBEF Page 99 Thursday, October 30, 2003 2:00 PM EXR-5/EXR-3 When set to “ON” (default), playing on the EXR-5/EXR-3’s keyboard or playing back a Recorder song will cause the corresponding notes to sound. If you select “OFF”, the corresponding MIDI messages are no longer sent to the internal tone generator – but they are still transmitted to the MIDI OUT port and hence to external MIDI instruments.
EXR-5_3_GBEF Page 100 Thursday, October 30, 2003 2:00 PM r EXR-5/EXR-3 Off In this case, the EXR-5/EXR-3 is not synchronized with other MIDI devices. It is thus impossible to start/stop it via MIDI. On En este caso, el EXR-5/EXR-3 no se sincroniza con otros dispositivos MIDI. Por lo tanto, será imposible ponerlo en marcha y pararlo mediante MIDI. Off Dans ce cas, l’EXR-5/EXR-3 n’est pas synchronisé avec d’autres appareils MIDI. Il est donc impossible de le faire démarrer/de l’arrêter via MIDI.
EXR-5_3_GBEF Page 101 Thursday, October 30, 2003 2:00 PM EXR-5/EXR-3 NTA notes can only be received (they are not transmitted). The notes you play on the EXR-5/EXR-3’s keyboard are indeed transmitted to the Arranger, from there to the Arranger parts, and used to play the accompaniment in the right key. Since all Music Style notes are transmitted via MIDI, there is no need to send the NTA notes separately. Las notas NTA sólo se pueden recibir (no se transmiten).
EXR-5_3_GBEF Page 102 Thursday, October 30, 2003 2:00 PM r EXR-5/EXR-3 ■ StartStp° (Start/Stop/Continue) ■StartStp° (Start/Stop/Continue) ■ StartStp° (Start/Stop/Continue) (On/Off, Default setting: On) This option allows you to specify whether or not the Arranger and Recorder send Start/Stop/ Continue messages when you start or stop them. Select “Off” when you wish to control the tone generator of a MIDI organ, etc., without starting or stopping its automatic accompaniment.
EXR-5_3_GBEF Page 103 Thursday, October 30, 2003 2:00 PM EXR-5/EXR-3 14. Data management Working with the Flash memory Let us first have a look at the remaining Function parameters. They allow you to save newly recorded songs and Styles loaded from a floppy disk [EXR-5 only] to the EXR-5/EXR-3’s Flash memory, and to remove such files. Saving songs to a Flash memory FUNCTION 14. Gestión de la información Trabajar con la memoria Flash Ante todo miremos los parámetros Function restantes (UTILITY).
EXR-5_3_GBEF Page 104 Thursday, October 30, 2003 2:00 PM r EXR-5/EXR-3 (4) Use the numeric buttons to assign a character to that position. The available characters are as shown on the previous page. Note: Each time you press another numeric button (for entering characters), the cursor advances automatically to the next position. This works like a mobile phone. (5) Repeat steps (3) and (4) to assign the desired characters to the remaining positions.
EXR-5_3_GBEF Page 105 Thursday, October 30, 2003 2:00 PM EXR-5/EXR-3 Note: If no vacant Flash memory remains or if the memory capacity is exhausted, the display shows the “Mem Full” message when you select this function. In that case, it will be impossible to save the Music Style. You can, however, delete another Style (“Remove”) and repeat step (2) and following. Note: The “No Style” message means that there are no Style data that could be saved.
EXR-5_3_GBEF Page 106 Thursday, October 30, 2003 2:00 PM r EXR-5/EXR-3 Removing songs from the Flash memory Eliminar canciones desde la memoria Flash Supprimer des morceaux de la mémoire Flash SELECT FUNCTION FAMILY Songs you no longer need can be deleted (which is called “Remov” here) to make room for new songs. (1) Press [FUNCTION]. (2) Use FAMILY [√][®] to select the “RemovSNG” parameter. Wait until the display shows the name of the first song memory (101), then proceed with the following step.
EXR-5_3_GBEF Page 107 Thursday, October 30, 2003 2:00 PM EXR-5/EXR-3 Removing Styles from the Flash memory [EXR-5 only] Eliminar estilos desde la memoria Flash [Sólo EXR-5] Styles you no longer need can be deleted (which is called “Remov” here) to make room for new Styles. (1) Press [FUNCTION]. (2) Use FAMILY [√][®] to select the “RemovSTL” parameter. Wait until the display shows the name of the first Style memory (101), then proceed with the following step.
EXR-5_3_GBEF Page 108 Thursday, October 30, 2003 2:00 PM r EXR-5/EXR-3 Archiving data using a computer (USB) Archivar información utilizando un ordenador (USB) Archiver des données avec un ordinateur (USB) The EXR-5/EXR-3’s USB port can be used for for exchanging files with a computer. As long as the icon is not displayed, the USB port is not used.
EXR-5_3_GBEF Page 109 Thursday, October 30, 2003 2:00 PM EXR-5/EXR-3 Note: Never switch off the EXR-5/EXR-3 while the “Writing” message is displayed, because doing so would damage all data in the EXR-5/EXR-3’s Flash area. (See “InitFLSH (Flash initialization)” (p. 93) if you need to repair the Flash area after an erroneous operation.) Note: The “Wait… Connection Proceding” message may appear when you press the [USB] button.
EXR-5_3_GBEF Page 110 Thursday, October 30, 2003 2:00 PM r EXR-5/EXR-3 Note: Never switch off the EXR-5/EXR-3 while the “Writing” message is displayed, because doing so would damage all data in the EXR-5/EXR-3’s Flash area. (See “InitFLSH (Flash initialization)” (p. 93) if you need to repair the Flash area after an erroneous operation.) Nota: No desactive nunca el EXR-5/EXR-3 mientras se visualize el mensaje “Writing”, porque de lo contrario dañaría toda la información del área Flash del EXR-5/EXR-3.
EXR-5_3_GBEF Page 111 Thursday, October 30, 2003 2:00 PM EXR-5/EXR-3 • Windows: Click on the removal icon on the task bar. Wait until a drop-down menu appears and select the entry that says something to the effect of “Stop USB disk EXR-5/ EXR-3_DRV”. You should now see a window that says something to the effect of “The USB device XX can now be safely removed from the system”. Click on the [OK] button. • Windows: Haga clic en el icono de desconexión de la barra de tareas.
EXR-5_3_GBEF Page 112 Thursday, October 30, 2003 2:00 PM r EXR-5/EXR-3 Disk functions [EXR-5 only] Funciones Disk [Sólo EXR-5] Fonctions Disk [EXR-5 uniquement] The EXR-5’s Disk functions allow you to save the Recorder Song in the USER SNG memory to disk, to save and load your files to and from disk, to delete files on a floppy disk, and format disks. Though you can use 2DD or 2HD floppies, 2HD disks have twice the capacity of 2DD disks, so use 2HDs whenever you can.
EXR-5_3_GBEF Page 113 Thursday, October 30, 2003 2:00 PM EXR-5/EXR-3 (4) Press the [YES÷+] button to load the selected file. Note: Press [NO÷–] if you do not want to load the selected file after all. If you pressed [YES÷+], the display now shows the message “Loading”. Once the data have been loaded, the “Complete” message briefly appears. (5) Press another “big” button in the DATA ENTRY section to leave this function. (4) Pulse el botón [YES÷+] para cargar el archivo seleccionado.
EXR-5_3_GBEF Page 114 Thursday, October 30, 2003 2:00 PM r EXR-5/EXR-3 (6) Press another “big” button in the DATA ENTRY section to leave this function. Note: See also “Possible error messages” above. Loading Music Styles from disk LOAD Stl allows you to load a Music Style on floppy disk into the EXR-5/EXR-3’s User memory. (1) Insert a disk into the drive. (2) Press [DISK] to select the Disk mode. (3) Select the “LOAD Stl” function using FAMILY [√][®].
EXR-5_3_GBEF Page 115 Thursday, October 30, 2003 2:00 PM EXR-5/EXR-3 (3) If necessary, use the SELECT [√][®] buttons to move the cursor to another character position (that character flashes). Note: Each time you press another numeric button (for entering characters), the cursor advances automatically to the next position. (4) Use the numeric buttons to assign a character to that position.
EXR-5_3_GBEF Page 116 Thursday, October 30, 2003 2:00 PM r EXR-5/EXR-3 Possible error messages Posibles mensajes de error Messages d’erreur éventuels No Disk You forgot to insert a floppy disk into the drive. No Disk Ha olvidado insertar un disquete en la unidad. No Disk Protect See above. Protect Consulte más arriba. Vous avez oublié d’insérer une disquette dans le lecteur. Disk Full The remaining disk capacity does not allow to save your data to this disk.
EXR-5_3_GBEF Page 117 Thursday, October 30, 2003 2:00 PM EXR-5/EXR-3 (5) Press the [YES÷+] button. To be on the safe side, the EXR-5 now asks you whether you really want to delete the file (“Sure?”). (6) Press [YES÷+] to delete the file, or [NO÷–] to abort the operation. If you pressed [YES÷+], the display now shows the message “Deleting”. Once the data have been deleted, the “Complete” message briefly appears. (7) Press another “big” button in the DATA ENTRY section to leave this function.
EXR-5_3_GBEF Page 118 Thursday, October 30, 2003 2:00 PM r EXR-5/EXR-3 Format Format Format Before being able to save files to a disk, you need to prepare a floppy disk. This is called “formatting”. If the floppy you are about to use is IBM PC formatted, there is no need to format it, though disk access is faster with disks formatted on the EXR-5. Otherwise proceed as follows: (1) Insert a disk into the drive. Every floppy contains a square tab that allows you to “close” a little window.
EXR-5_3_GBEF Page 119 Thursday, October 30, 2003 2:00 PM EXR-5/EXR-3 15. Using the outputs and an optional footswitch 15. Utilizar las salidas y un conmutador de pedal If you like, you can also record your performance (or a Recorder songs) to cassette, MD, etc. To this end, you need to connect the EXR-5/EXR-3’s OUTPUT sockets to the external device’s REC IN jacks. Si lo desea, también puede grabar su interpretación (o las canciones del Grabador) al cassette, MD, etc.
EXR-5_3_GBEF Page 120 Thursday, October 30, 2003 2:00 PM r EXR-5/EXR-3 16. Miscellaneous Functions for educational purposes The EXR-5/EXR-3 provides two functions that may come in handy for music teachers or for those who use the EXR-5/EXR-3 in class: 16. Miscelánea Funciones para fines educativos El EXR-5/EXR-3 dispone de dos funciones que pueden resultar de gran utilidad para profesores de música o aquellos que utilicen el EXR-5/EXR-3 en clase: 16.
EXR-5_3_GBEF Page 121 Thursday, October 30, 2003 2:00 PM EXR-5/EXR-3 Deactivating or activating the Arranger and Demo functions A third “educational” option is to switch off both the Demo and the Arranger functions in one go: (1) Switch off the EXR-5/EXR-3. (2) Hold down the [ACOUSTIC] and [START÷STOP] buttons while you switch the EXR-5/EXR-3 back on again. The display briefly shows “DISABLED”. It is now impossible to start/stop the Arranger or demo song playback.
EXR-5_3_GBEF Page 122 Thursday, October 30, 2003 2:00 PM r EXR-5/EXR-3 17. Specifications 17. Especificaciones 17.
EXR-5_3_GBEF Page 123 Thursday, October 30, 2003 2:00 PM EXR-5/EXR-3 Connections: USB: file transfer, MIDI IN, OUT Outputs: L/Mono, Right (1/4” phone jacks), Phones 1/2, DC IN (adapter) Others: EXR-5→ Output Power: 10W+10W with “Digital Bass Enhancer”, Stereo Speakers: x ø13cm, Bass Reflex EXR-3→ Output Power: 5W+5W with “Digital Bass Enhancer”, Stereo speakers: 2 x ø12cm Power supply: 12V/3.
Tone no.
Tone no.
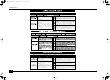
Name STNDARD1 STNDARD2 ROOM Hip Hop Drum'Bss TechHous R&B POWER TR808909 DANCE NewTR909 Jazz Kit BRUSH ORCHSTRA ETHNIC STNDARD3 ELECTRNC JAZZ KICK&SNR SFX Family DRUMS* DRUMS* DRUMS* DRUMS* DRUMS* DRUMS* DRUMS* DRUMS* DRUMS* DRUMS* DRUMS* DRUMS* DRUMS* DRUMS* DRUMS* DRUMS* DRUMS* DRUMS* DRUMS* DRUMS* Names in bold type: can be selected with the SELECT [√][®] buttons. Use the numeric buttons [0]~[9] for selecting the other Tones. Tone no.
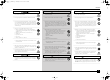
C7 96 95 93 91 89 88 86 C6 84 83 81 79 77 76 74 C5 72 71 69 67 65 64 62 C4 60 59 57 55 53 52 50 C3 48 47 45 43 41 40 38 C2 36 35 33 31 29 28 26 C1 24 23 21 19 17 16 14 C0 12 11 9 7 5 4 2 C–1 0 ------------ ------------ ----------------------- ----------------------- 94 92 90 87 85 82 80 78 75 73 70 68 66 63 61 58 56 54 51 49 46 44 42 39 37 34 32 30 27 25 22 Finger Snap Finger Snap Sticks Sticks Ride Cymbal China C
C7 96 95 93 91 89 88 86 C6 84 83 81 79 77 76 74 C5 72 71 69 67 65 64 62 C4 60 59 57 55 53 52 50 C3 48 47 45 43 41 40 38 C2 36 35 33 31 29 28 26 C1 24 23 21 19 17 16 14 C0 12 11 9 7 5 4 2 C–1 0 ------------ ------------ ----------------------- ----------------------- High-Q 27 94 92 90 87 85 82 80 78 75 73 70 68 66 63 61 58 56 54 51 49 46 44 42 39 37 34 32 30 Snare Roll Finger Snap Snare Roll Finger Snap 25 Stick
------------ ----------------------- G9 127 -----------126 ----------------------- ------------ 125 123 121 ----------------------- ------------ ------------ ------------ 118 ----------------------- 116 ------------ ----------------------- ------------ ----------------------- ------------ ------------ ----------------------- 114 111 109 106 ------------ 124 122 C9 120 119 117 115 113 112 110 C8 108 107 105 104 ----------------------- 103 -----------102 Woodblock
56 58 62 70 78 80 80 83 84 92 104 108 110 118 120 64 75 75 78 80 86 92 94 96 98 98 100 101 104 8Beat: 25 PianoBal 26 Soul Bal* 27 ClassBal 28 StoryBal 29 HappyBal 30 SimpleBl 31 AlClapBl* 32 LayBakBl 33 MorninBl 34 PoppinBl 35 UKLiteBl 36 Cute Pop 37 UpTempBl 38 SmilePop 39 German P* 16Beat: 40 Easy Pop 41 Soul Pop 42 WayURPop 43 NightPop 44 Cool Pop 45 Guitar P 46 LatinPop 47 LightPop 48 USGroove 49 FeelGood 50 Busy Pop* 51 Groovy P 52 VibeyPop 53 SunnyPop 4/4 4/4 4/4 4/4 4/4 4/4 4/4 4/4 4/4 4/4 4/4
C#M7 C#7 C#m C#m7 C#mM7 C#dim C#m7 ( 5 ) C#aug C#sus4 C#7sus4 CM7 C7 Cm Cm7 CmM7 Cdim Cm7 ( 5 ) Caug Csus4 C7sus4 ✭= Keys you need to press to hear this chord. ●= Constituent notes of this chord.
GM7 G7 Gm Gm7 GmM7 Gdim Gm7 ( 5 ) Gaug Gsus4 G7sus4 F#M7 F#7 F#m F#m7 F#mM7 F#dim F#m7 ( 5 ) F#aug F#sus4 F#7sus4 ✭= Keys you need to press to hear this chord. ●= Constituent notes of this chord.
0,32 1 5 6, 38 7 10 11 64 65 66 67 84 91 93 98, 99 100, 101 Mode 2: OMNI ON, MONO Mode 4: OMNI OFF, MONO *1 Mode 1: OMNI ON, POLY Mode 3: OMNI OFF, POLY Aux Messages O (120, 126, 127) O (121) O O (123-125) O X O O *1 O X is selectable *2 Recognized as M=1 even if M≠1 X X O X O X All Sounds Off Reset All Controllers Local On/Off All Notes Off Active Sense Reset *1 *1 X X X O O 0~127 O O O O O O O O O O O O O (Reverb) O (Chorus) O O O O O O X 0~127 0~127 Mode 3 Mode 3, 4 (M=1) 1~16 1~16, Of
EXR-5_3_GBEF Page 134 Thursday, October 30, 2003 2:00 PM r EXR-5/EXR-3 134
Information 140 & 142, Jalan Bukit Bintang 55100 Kuala Lumpur, MALAYSIA TEL: (03) 2144-3333 BENTLEY MUSIC SDN BHD MALAYSIA 1461-9, Seocho-Dong, Seocho Ku, Seoul, KOREA TEL: (02) 3486-8855 Cosmos Corporation KOREA J1. Cideng Timur No. 15J-150 Jakarta Pusat INDONESIA TEL: (021) 6324170 PT Citra IntiRama INDONESIA 409, Nirman Kendra Mahalaxmi Flats Compound Off. Dr. Edwin Moses Road, Mumbai-400011, INDIA TEL: (022) 2493 9051 Rivera Digitec (India) Pvt. Ltd.
EXR-5_3_GBEF Page 136 Thursday, October 30, 2003 2:00 PM r EXR-5/EXR-3 136