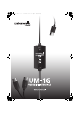
UM-1G_e.
UM-1G_e.book 2 ページ 2008年11月11日 火曜日 午後6時30分 201a, 202 Before using this unit, carefully read the sections entitled: “USING THE UNIT SAFELY” and “IMPORTANT NOTES” (p. 3; p. 5). These sections provide important information concerning the proper operation of the unit. Additionally, in order to feel assured that you have gained a good grasp of every feature provided by your new unit, Owner’s manual should be read in its entirety. The manual should be saved and kept on hand as a convenient reference.
UM-1G_e.book 3 ページ 2008年11月11日 火曜日 午後6時30分 USING THE UNIT SAFELY The symbol alerts the user to important instructions or warnings.The specific meaning of the symbol is determined by the design contained within the triangle. In the case of the symbol at left, it is used for general cautions, warnings, or alerts to danger. Used for instructions intended to alert the user to the risk of death or severe injury should the unit be used improperly.
UM-1G_e.book 4 ページ 2008年11月11日 火曜日 午後6時30分 013 104 • • In households with small children, an adult should provide supervision until the child is capable of following all the rules essential for the safe operation of the unit. ................................................................................................................... 014 • Protect the unit from strong impact. (Do not drop it!) ................................................................................................
UM-1G_e.book 5 ページ 2008年11月11日 火曜日 午後6時30分 IMPORTANT NOTES Power Supply Additional Precautions 307 553 • Before connecting this unit to other devices, turn off the power to all units. This will help prevent malfunctions and/or damage to speakers or other devices. • Use a reasonable amount of care when using the unit’s buttons, sliders, or other controls; and when using its jacks and connectors. Rough handling can lead to malfunctions.
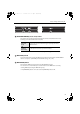
UM-1G_e.book 6 ページ 2008年11月11日 火曜日 午後6時30分 Contents USING THE UNIT SAFELY.............................................................................................................................. 3 IMPORTANT NOTES ....................................................................................................................................... 5 Contents of the Package ................................................................ 7 Names of Things and What They Do ..........................
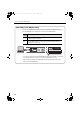
UM-1G_e.book 7 ページ 2008年11月11日 火曜日 午後6時30分 Contents of the Package The UM-1G includes the following items. When you open the package, first make sure that all items are included. If any are missing, contact the dealer where you purchased the UM-1G. USB MIDI Interface UM-1G CD-ROM “UM-1G CD-ROM” This contains drivers for use with the UM-1G. Owner’s Manual This is the manual you are reading. Please keep it on hand for reference.
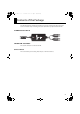
UM-1G_e.book 8 ページ 2008年11月11日 火曜日 午後6時30分 Names of Things and What They Do You must install the driver before you connect the UM-1G to your computer for the first time. Install the driver as described in “Getting Connected and Installing Drivers” (p. 11). 1 USB Cable Use this when connecting the UM-1G to your computer. 2 1 USB Indicator This will light when you’ve connected the UM-1G to your computer and your computer has detected the UM-1G.
UM-1G_e.book 9 ページ 2008年11月11日 火曜日 午後6時30分 Names of Things and What They Do fig.panel 7 7 8 9 [ADVANCED DRIVER] (mode select) Switch This switches the operating mode between Advanced mode and Standard driver mode. Normally, you should use Advanced mode (ON). ON (Advanced mode) This mode utilizes the UM-1G’s special, advanced MIDI driver. This advanced driver uses *FPT technology for rapid, high-performance MIDI transmissions.
UM-1G_e.book 10 ページ 2008年11月11日 火曜日 午後6時30分 Names of Things and What They Do [MIDI THRU] Switch ON/OFF setting You can use the [MIDI THRU] switch to specify the destination of MIDI messages sent from the MIDI keyboard or digital piano connected to the MIDI IN cable. Switch Setting MIDI Message Destination Device OFF MIDI messages flowing in through the UM-1G’s MIDI IN cable are routed to the computer (sequencer software).
UM-1G_e.book 11 ページ 2008年11月11日 火曜日 午後6時30分 Getting Connected and Installing Drivers What is a driver? A “driver” is software that transfers data between the UM-1G and application software running on your computer, when your computer and the UM-1G are connected. The driver sends data from your application to the UM-1G, and from the UM-1G to your application. The installation procedure will differ depending on your system.
UM-1G_e.book 12 ページ 2008年11月11日 火曜日 午後6時30分 Getting Connected and Installing Drivers 5. A confirmation screen regarding user account control will appear. Click [Continue]. 6. The screen will indicate “The UM-1G Driver will be installed on your computer.” Click [Next]. * If any other message appears, proceed as directed by the message. 7. To begin the installation, click [Next] once again. Installation will begin. If a dialog box related to Windows security appears, click [Install].
UM-1G_e.book 13 ページ 2008年11月11日 火曜日 午後6時30分 Getting Connected and Installing Drivers 9. Operation of the UM-1G Connect the UM-1G to your computer. Connect to the computer’s USB connector. [ADVANCED DRIVER] Switch ON 10. The message “Installing device driver software” will appear in the lower right corner of the screen, and the driver will be installed automatically. * It may take some time (ten seconds or more) until the message appears.
UM-1G_e.book 14 ページ 2008年11月11日 火曜日 午後6時30分 Getting Connected and Installing Drivers Windows XP Users Steps to be performed on the UM-1G itself are marked by a Operation of the UM-1G symbol. Do not connect the UM-1G to your computer until you are directed to do so. Installing the Driver 1. Start up Windows without the UM-1G connected. * Disconnect all USB cables other than those for a USB keyboard and/or USB mouse (if used). 2. Close all currently running software. 3.
UM-1G_e.book 15 ページ 2008年11月11日 火曜日 午後6時30分 Getting Connected and Installing Drivers 6. To begin the installation, click [Next]. If the Software Installation dialog box appears, click [Continue Anyway] to proceed with the installation. * If you are unable to proceed, click [OK] to halt the installation, and then change the settings as described in “Driver Signing Options Settings (Windows XP)” (p. 27). The screen will indicate “Ready to install the driver.
UM-1G_e.book 16 ページ 2008年11月11日 火曜日 午後6時30分 Getting Connected and Installing Drivers 1. The message “Found New Hardware” will appear in the lower right corner of the screen, and the Found New Hardware wizard will appear. * It may take between ten seconds to several minutes until the Found New Hardware wizard appears. If you are asked whether you want to connect to Windows Update, choose No and click [Next]. 2. Choose Install the software automatically (Recommended), and click [Next]. 3.
UM-1G_e.book 17 ページ 2008年11月11日 火曜日 午後6時30分 Getting Connected and Installing Drivers Input/output Device Settings for Your Application You’ll need to specify the MIDI device that you’ll be using with your application. (For details on how to make these settings, refer to the instruction manual that came with your application.) * If you’re unable to select the UM-1G device in the device settings of your application, it may be that a problem has occurred. Refer to “Troubleshooting” (p. 25).
UM-1G_e.book 18 ページ 2008年11月11日 火曜日 午後6時30分 Getting Connected and Installing Drivers Macintosh Users Steps to be performed on the UM-1G itself are marked by a Operation of the UM-1G symbol. Do not connect the UM-1G to your computer until you are directed to do so. Installing the Driver * If the Authenticate dialog box or Enter password dialog box appears during the installation, enter your password and click [OK]. * What you actually see on the screen may differ depending on your system. 1.
UM-1G_e.book 19 ページ 2008年11月11日 火曜日 午後6時30分 Getting Connected and Installing Drivers 9. The screen will indicate “Click Restart to finish installing the software.” Click [Restart] to restart your Macintosh. * It may take some time for your Macintosh to restart. This completes installation of the UM-1G driver. Next, make MIDI device settings. * You won’t be able to use the UM-1G unless you’ve made these settings. MIDI Device Settings 1.
UM-1G_e.book 20 ページ 2008年11月11日 火曜日 午後6時30分 Getting Connected and Installing Drivers 6. Click Add Device. New external device will appear. 4 Click MIDI Devices 6 Click Add Device 7 Click Show Info 7. Specify the Device Name of the new external device. 1. Click to select the newly added New external device, and then click [Show Info]. 2. In the Device Name field, enter UM-1G. 3. Click [Apply]. 8.
UM-1G_e.book 21 ページ 2008年11月11日 火曜日 午後6時30分 Getting Connected and Installing Drivers 9. Click [Test Setup]. 10. Click the UM-1G’s downward arrow. If the MIDI OUT indicator of the corresponding port on the UM-1G blinks, the settings have been made correctly. 9, 11 Click Test Setup 10 Click the icon 11. Click [Test Setup] and complete the confirmation. 12. Close the Audio MIDI Setup dialog box.
UM-1G_e.book 22 ページ 2008年11月11日 火曜日 午後6時30分 Basic Use This chapter describes different basic methods of connecting the UM-1G according to how the UM-1G is to be used.
UM-1G_e.book 23 ページ 2008年11月11日 火曜日 午後6時30分 Basic Use Transmitting MIDI Messages from the Sequencer Software to a MIDI Sound Module or Digital Piano If transmitting MIDI messages from the sequencer software to a MIDI sound module or digital piano, or if using a MIDI sound module’s or digital piano’s sound generator to play the sounds from the playback of sequencer software on the computer, make the following connections and settings.
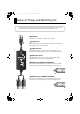
UM-1G_e.book 24 ページ 2008年11月11日 火曜日 午後6時30分 Basic Use Transmitting MIDI Messages from a MIDI Keyboard or Other Device to a MIDI Sound Module If you want to play a MIDI keyboard and send MIDI messages to a MIDI sound module, make the connections and settings shown below. There is no need to connect the UM-1G to a computer. fig.connect-thru_e Connect to the MIDI IN connector of the MIDI sound module.
UM-1G_e.book 25 ページ 2008年11月11日 火曜日 午後6時30分 Troubleshooting If you experience problems, read this chapter first. It contains tips for solving most problems. * For details on operating your Windows or Macintosh computer, refer to the owner’s manual of the computer and operating system you are using. Problems Related to USB Driver Installation Cannot Install the Driver Correctly Install the UM-1G driver once again as described in “Getting Connected and Installing Drivers” (→ Windows Vista: p.
UM-1G_e.book 26 ページ 2008年11月11日 火曜日 午後6時30分 Troubleshooting Does your computer or USB hub have sufficient power supply capacity? The UM-1G cannot be connected if insufficient power is supplied to it. Check whether one of the following cases apply. • If you are using the UM-1G with a notebook computer that is running on its battery, operation may be unreliable with some models of computer. If this is the case, connect the AC adaptor to your notebook computer.
UM-1G_e.book 27 ページ 2008年11月11日 火曜日 午後6時30分 Troubleshooting Driver Signing Options Settings (Windows XP) In some cases, you may be unable to install the driver because of the “Driver Signing Options” settings. Make settings as follows. 1. Open the Control Panel, click Performance and Maintenance, and then click the System icon. * If you’ve selected Classic view, double-click System. 2. Click the Hardware tab, and then click [Driver Signing]. The Driver Signing Options dialog box will open. 3.
UM-1G_e.book 28 ページ 2008年11月11日 火曜日 午後6時30分 Troubleshooting 2. Choose Install the software automatically (Recommended) and click [Next]. 3. If the Hardware Installation dialog box appears, click [Continue Anyway] to proceed with the installation. * If you are unable to continue, click [OK] to stop the installation, and refer to “Driver Signing Options Settings (Windows XP)” (p. 27) and then reinstall the driver. 4. When the screen indicates Completing the Found New Hardware Wizard, click [Finish]. 3.
UM-1G_e.book 29 ページ 2008年11月11日 火曜日 午後6時30分 Troubleshooting Problems When Using the UM-1G Can’t Select or Use the UM-1G Device Is the driver installed correctly? If you can’t use the UM-1G even though you’ve installed the driver, it is possible that the driver was not installed correctly. Uninstall the UM-1G driver as described in “Deleting the Driver” (p. 34), and then reinstall the driver as described in “Getting Connected and Installing Drivers” (p. 11).
UM-1G_e.book 30 ページ 2008年11月11日 火曜日 午後6時30分 Troubleshooting Sound is Interrupted During MIDI Playback Did you make “Performance” settings? (Windows) You may be able to solve this problem by setting the “Performance” of the System. Windows Vista users 1. Open the Control Panel, click System and Maintenance, and then click System. * If you’re using the Classic view, double-click the System icon. 2. In the tasks shown in the left of the window, click Advanced System Settings. 3.
UM-1G_e.book 31 ページ 2008年11月11日 火曜日 午後6時30分 Troubleshooting Are you running multiple software? Close software that you’re not using. Even if an software window is closed, it is still running if it appears in the taskbar. Be sure to exit unneeded software displayed. You may experience an improvement if you select the “Lighten the processing load on the computer” check box in the Driver Settings dialog box (Windows). Proceed as follows to change the setting.
UM-1G_e.book 32 ページ 2008年11月11日 火曜日 午後6時30分 Troubleshooting Could your computer have entered Standby (Suspend), Hibernate, or Sleep mode during playback or recording? If your computer entered Standby (Suspend), Hibernate, or Sleep mode during playback or recording, the UM-1G may stop working correctly. Close all software that’s using the UM-1G, disconnect the UM-1G’s USB cable, and then reconnect it. If this does not solve the problem, restart your computer.
UM-1G_e.book 33 ページ 2008年11月11日 火曜日 午後6時30分 Troubleshooting Your Sound Module Produces no Sound When You Press the [MIDI CHECK] Button Could the UM-1G’s [MIDI THRU] switch be turned ON? Set the [MIDI THRU] switch to OFF. Could you have made a mistake when connecting the MIDI cable’s IN and OUT connectors? Check the MIDI cable connections. Is the sound module set correctly? Check the settings and volume of your sound module.
UM-1G_e.book 34 ページ 2008年11月11日 火曜日 午後6時30分 Troubleshooting Deleting the Driver If you were unable to install the driver according to the procedure given, the UM-1G may not be recognized correctly by the computer. In this case, use the following procedure to delete the driver, and then follow the procedure to install the driver once again (p. 11). Windows users * The displayed content may differ depending on your system. 1. Start up Windows with the UM-1G disconnected.
UM-1G_e.book 35 ページ 2008年11月11日 火曜日 午後6時30分 Troubleshooting Macintosh users * The displayed content may differ depending on your system. 1. Start up Macintosh with the UM-1G disconnected. Disconnect all USB cables other than a USB keyboard or USB mouse. 2. Prepare the CD-ROM. Insert the CD-ROM into the CD-ROM drive of your Macintosh. 3. In the Driver folder of the CD-ROM, double-click UM1G_Uninstaller. 4. The display will indicate “This uninstalls UM-1G driver from this Macintosh.
UM-1G_e.book 36 ページ 2008年11月11日 火曜日 午後6時30分 Appendices About Standard Driver Mode Use this mode when using the standard MIDI driver provided with the operating system. Installation of the Standard Driver 1. With the UM-1G left unconnected, start up your computer. Disconnect all USB cables other than those for your keyboard and mouse, and restart your Macintosh. 2. Exit all currently running software (applications). 3. Set the UM-1G’s [ADVANCED DRIVER] switch to OFF. 4.
UM-1G_e.book 37 ページ 2008年11月11日 火曜日 午後6時30分 Main Specifications UM-1G: USB MIDI Interface Controllers [ADVANCED DRIVER] switch [MIDI THRU] switch [MIDI CHECK] button Connectors MIDI IN Cable x 1 (16 MIDI Channels) MIDI OUT Cable x 1 (16 MIDI Channels) USB Cable x 1 Power Supply Supplied from the computer Current Draw 60 mA Dimensions 80.0 (W) x 41.2 (D) x 20.
UM-1G_e.book 38 ページ 2008年11月11日 火曜日 午後6時30分 Index A P [ADVANCED DRIVER] Switch ........................................... 9 Performance Settings ...................................................... 30 Advanced Mode ................................................................... 9 Audio MIDI Setup .............................................................. 19 S Standard Driver Mode ................................................. 9, 36 B BUS Power .......................................
UM-1G_e.
UM-1G_e.
UM-1G_e.book 41 ページ 2008年11月11日 火曜日 午後6時30分 For EU Countries This product complies with the requirements of EMC Directive 2004/108/EC. For the USA FEDERAL COMMUNICATIONS COMMISSION RADIO FREQUENCY INTERFERENCE STATEMENT This equipment has been tested and found to comply with the limits for a Class B digital device, pursuant to Part 15 of the FCC Rules. These limits are designed to provide reasonable protection against harmful interference in a residential installation.
UM-1G_e.
UM-1G_e.
UM-1G_e.