AR-200_e.book 1 ページ 2003年7月14日 月曜日 午後1時11分 Owner’s Manual Before using this unit, carefully read the sections entitled: "USING THE UNIT SAFELY" and "IMPORTANT NOTES" ( p. 2, p. 3). These sections provide important information concerning the proper operation of the unit. Additionally, in order to feel assured that you have gained a good grasp of every feature provided by your new unit, Owner's manual should be read in its entirety. The manual should be saved and kept on hand as a convenient reference.
AR-200_e.book 2 ページ 2003年7月14日 月曜日 午後1時11分 USING THE UNIT SAFELY Used for instructions intended to alert the user to the risk of death or severe injury should the unit be used improperly. Used for instructions intended to alert the user to the risk of injury or material damage should the unit be used improperly. * Material damage refers other adverse effects respect to the home furnishings, as well animals or pets.
AR-200_e.
AR-200_e.book 4 ページ 2003年7月14日 月曜日 午後1時11分 IMPORTANT NOTES In addition to the items listed under “USING THE UNIT SAFELY” on page 2-3, please read and observe the following: Power Supply • Do not use this unit on the same power circuit with any device that will generate line noise (such as an electric motor or variable lighting system). • Use a cable from Roland to make the connection. If using some other make of connection cable, please note the following precautions.
AR-200_e.book 5 ページ 2003年7月14日 月曜日 午後1時11分 Contents USING THE UNIT SAFELY ..............................................................................2 IMPORTANT NOTES ........................................................................................4 Main Features ..................................................................................................7 Panel Descriptions ..........................................................................................
AR-200_e.book 6 ページ 2003年7月14日 月曜日 午後1時11分 Contents Specifying Phrases in Binary Notation (Binary Playback) .................................................................................... 31 To Specify Phrases with Binary Signals ...................................................................................................... 32 Phrase Number / Binary Signal chart .........................................................................................................
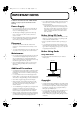
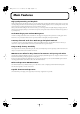
AR-200_e.book 7 ページ 2003年7月14日 月曜日 午後1時11分 Main Features High-quality Recording and Playback Thanks to Roland’s innovative RDAC system, you can enjoy high-quality, recording and playback using less data. You can select recording settings that suit the situation and the capacity of the card (sampling frequency: 6 levels, recording mode: 4 levels). This ensures support for recording and playback in a variety of situations and uses.
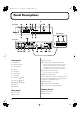
AR-200_e.book 8 ページ 2003年7月14日 月曜日 午後1時11分 Panel Descriptions fig.kakubu Front Panel Bottom Chassis Rear Panel Front panel 15. INPUT VOLUME 1. PHONES jack 16. Control input and DC input terminal (CONT A) 2. MIDI/CLIP indicator 3. SLAVE Indicator 4. Display 17. Control I/O connector (CONT B) 5. PLAY button * This is not an RS-232C type connector. 6. PLAY indicator 18. MIDI OUT/THRU connector 7. STOP button 8. Decrement ( 9. Increment ( ) button ) button 10. MEMORY FULL indicator 11.
AR-200_e.book 9 ページ 2003年7月14日 月曜日 午後1時11分 Important Notes on Making Connections and Switching the Power On and Off • To prevent malfunction and/or damage to speakers or other devices, always turn down the volume, and turn off the power on all devices before making any connections. • Once the connections have been completed, turn on power to your various devices in the order specified. By turning on devices in the wrong order, you risk causing malfunction and/or damage to speakers and other devices.
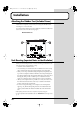
AR-200_e.book 10 ページ 2003年7月14日 月曜日 午後1時11分 Installation Attaching the Rubber Feet (Included Items) Attach these as required, such as when you’re using the AR-200 without mounting it on a rack or the like. Peel off the double-sided tape from the rubber feet and affix the rubber feet at the locations shown in the following figure. fig.
AR-200_e.book 11 ページ 2003年7月14日 月曜日 午後1時11分 Installation Rack-Mounting the AR-200 By attaching a rack mount adaptor to the AR-200 (RAD-50: sold separately) you can install it in an EIA rack. One RAD-50 can accommodate up to two AR-200 units. 1 Remove the four rubber feet from bottom of the unit. fig.set-02 Note: Do not use these holes. 2 Attach the RAD-50 adaptor to the AR-200 using the screws that are supplied with the RAD-50. fig.
AR-200_e.book 12 ページ 2003年7月14日 月曜日 午後1時11分 Examples of Usage and Connection for the AR-200 You can use the AR-200 alone or in combination with other AR-200 units or other equipment to play audio in a wide variety of scenes. This section shows some examples of these. You can use these examples as a starting point for making changes to match your own usage circumstances.
AR-200_e.book 13 ページ 2003年7月14日 月曜日 午後1時11分 Examples of Usage and Connection for the AR-200 Using the MIDI Connectors • Spatial Expression Using MIDI signals from a master AR-3000 (sold separately), you can play back background music performances from sound generating modules and other devices as well as sound effects phrases on slave AR-200s. This lets you create sonic fields with six-channel multi-playback. "Controlling the AR-200 with MIDI Signals (MIDI control)" (p. 42) fig.
AR-200_e.book 14 ページ 2003年7月14日 月曜日 午後1時11分 Examples of Usage and Connection for the AR-200 What You Can Do (Usage Tips) Repeat Playback of the Same Phrase There are several methods for doing this. Choose a playback method that matches your usage conditions. "Interval Playback" (p. 34) Changing Playback Mode Settings to Interval Mode You can have phrases be played back repeatedly at set intervals.
AR-200_e.book 15 ページ 2003年7月14日 月曜日 午後1時11分 Cards Handled by the AR-200 Types of Usable Cards The AR-200 stores recorded audio and MIDI signals on the card. Additionally, all information other than recorded audio (phrase information) is stored on the card as well. (That is, it is not stored in the AR unit itself.) This means that you can change the settings simply by swapping cards.
AR-200_e.book 16 ページ 2003年7月14日 月曜日 午後1時11分 Cards Handled by the AR-200 Notes Regarding Formatting Performing formatting erases all data on the card. Before you format the card, make sure it contains no data you don’t want to lose. * A maximum of 250 phrases may be created on cards formatted on the AR-200. * The available recording time for a single card varies according to card capacity and recording settings.
AR-200_e.book 17 ページ 2003年7月14日 月曜日 午後1時11分 Cards Handled by the AR-200 Card Compatibility with Other Models in the AR Series If You’re Using a Legacy Model In case the card you are using with the AR-200 has been used on one of Roland’s previous AR-2000, AR-100, or AR-1 devices; or if using an AR-200 card on one of these legacy models, the operational specifications are shown below. Basic Editing Operations • When using a card formatted on the AR-2000 (compatible models: AR2000/100/1) with the AR-200.
AR-200_e.book 18 ページ 2003年7月14日 月曜日 午後1時11分 Recording Audio Recording Units—Phrases A single item of data recorded from the point where you start recording until the point where you stop recording is called a phrase. Audio data and MIDI data are both handled as phrases. Phrases are managed by phrase numbers. "What is a MIDI Phrase?" (P.26) fig.rec-01 Phrase Number Connecting External Devices The AR-200 features analog input jacks (INPUT) on the rear panel.
AR-200_e.book 19 ページ 2003年7月14日 月曜日 午後1時11分 Recording Audio Procedure for Recording To enable recording with the AR-200 using cards formatted on the AR-2000, carry out the "Formatting a Card" (P.15) procedure. Required Settings for Recording Audio Signals (Recording Settings) Basic Editing Operations In order perform recording matched to usage conditions, including the connected equipment, recording source, sound quality, time, and playback system, you make recording settings.
AR-200_e.book 20 ページ 2003年7月14日 月曜日 午後1時11分 Recording Audio The different grade settings are shown in the following table. SW 1 SW 2 SW 3 ANNOUNCE ON OFF OFF LONG2 OFF ON OFF LONG1 OFF OFF OFF STANDARD ON ON OFF HIGH OFF OFF ON S-HIGH ON OFF ON RDAC-Grade 3 If the type of card does not provide the recording time you want, change the RDAC mode or RDAC grade setting to use less card capacity, then perform recording again. Turn on the power of the AR-200.
AR-200_e.book 21 ページ 2003年7月14日 月曜日 午後1時11分 Recording Audio What’s RDAC? RDAC (Roland Digital Audio Coding) is a proprietary audio recording standard from Roland. It achieves high sound quality and also makes it possible to record for long times. If You’re Not Sure About Which Grade and Mode to Choose Basic Editing Operations The optimal grade and mode vary according to the usage conditions, including the connected equipment, recording source, sound quality, time, and playback system.
AR-200_e.book 22 ページ 2003年7月14日 月曜日 午後1時11分 Recording Audio Procedure Make the correct connections, then turn on the power switch. 1 2 Insert a formatted card into one of the slots. Press the [ ] or [ to be recorded. ] button to select the number of the phrase The non-recording phrase number in display is flashed. fig.rec-05 * If you are re-recording over a previously recorded phrase, you should delete the phrase. (p.
AR-200_e.book 23 ページ 2003年7月14日 月曜日 午後1時11分 Recording Audio 5 When you press the PLAY button, sounds are input to the input jacks, and recording begins. * Even when the PLAY button is pressed, recording does not begin until the sound is at or above the base level (-36 dBu) (in trigger recording standby). While recording is in progress, the PLAY indicator lights, and a dot flashes in the display. fig.rec-06 6 Press the Stop button to end recording. fig.
AR-200_e.book 24 ページ 2003年7月14日 月曜日 午後1時11分 Playback Using the Panel (Manual Playback) Here is how to playback the phrase to check the recording. The sound will be output from the Phones jack and from the output jacks. fig.man-01 Procedure 1 2 Insert a card containing recorded information into a slot. Press the [ ] or [ ] button to select the number of the phrase to be played back. * The non-recording phrase number in display is flashed. 3 Press the PLAY button and the phrase will playback.
AR-200_e.book 25 ページ 2003年7月14日 月曜日 午後1時11分 Deleting Phrases You can delete unneeded phrases, either by deleting single phrase units or entire collections of phrases. Deleting Single Phrases 1 ] button to select the number of the phrase Basic Editing Operations 2 Press the [ ] or [ to be deleted. You cannot delete phrases on cards formatted on the AR-2000. Attempting to enter the menu screen causes the error message “Er16” to appear in the display.
AR-200_e.book 26 ページ 2003年7月14日 月曜日 午後1時11分 Recording and Playing MIDI Data (MIDI Phrase) What is a MIDI Phrase? You can use the AR-200 for recording and playback of MIDI data. MIDI data recorded with the AR-200 are called “MIDI phrases.” This automatically changes to MIDI THRU during recording and in recording standby. MIDI phrases and audio phrases are treated identically as phrases. "Important Notes on Making Connections and Switching the Power On and Off"(P.
AR-200_e.book 27 ページ 2003年7月14日 月曜日 午後1時11分 Recording and Playing MIDI Data (MIDI Phrase) fig.mid-04 The MEMORY FULL indicator tells how much recording time is left. The MEMORY FULL indicator light flashes when the recorded data reaches 90% of the card’s capacity, then stays on when 100% capacity is reached. 6. Press the Stop button to end recording. * Recording will also stop if a Stop signal is received from the connected MIDI device. Procedure for Playing Back MIDI Phrases Manual playback 1.
AR-200_e.book 28 ページ 2003年7月14日 月曜日 午後1時11分 Controlling the AR-200 from an External Device (Control Input Connectors) You can use the control input and DC input screw terminals (CONT A) and the 25-pin D-sub-type control I/O connector (CONT B) on the AR-200’s rear panel to control the AR-200 from an external device. This chapter explains how to connect external devices and make the settings for the AR-200.
AR-200_e.book 29 ページ 2003年7月14日 月曜日 午後1時11分 Controlling the AR-200 from an External Device (Control Input Connectors) Connectors Used for Direct Play (Control I/O Connector) “1–9”: Inputting a control signal directly to the terminal with the number corresponding to the phrase starts playback of the phrase. fig.inp-06 Port NO. 1 Port NO. 2 0002 “10 (Stop)”: This stops phrase playback. In addition to the connectors just described, shorting “11/12 (GND)” (ground) connectors enables “On.” fig.
AR-200_e.book 30 ページ 2003年7月14日 月曜日 午後1時11分 Controlling the AR-200 from an External Device (Control Input Connectors) Playing Back Phrases Assigned to the Connectors (Direct Playback) What Is Direct Playback (Reverse Priority)?/Use and Applications By inputting control signals directly to Port Nos. 1 through 9, you can play back the phrases assigned to those numbers. Up to 9 phrases can be played back. Assign phrases 1 through 9 beforehand to Port Nos. 1 through 9.
AR-200_e.book 31 ページ 2003年7月14日 月曜日 午後1時11分 Controlling the AR-200 from an External Device (Control Input Connectors) AR-200 Settings fig.inp-14 Binary Specification Port No.1--8 87654321 Selecting the Control Input Mode Set the MODE switches on the AR-200’s bottom panel to select “DIRECT PLAYBACK” from the control input modes (PLAYBACK BY CARD DATA/DIRECT PLAYBACK/ BINARY PLAYBACK/INTERVAL PLAYBACK). You cannot achieve control input playback merely by connecting a device to the port.
AR-200_e.book 32 ページ 2003年7月14日 月曜日 午後1時11分 Controlling the AR-200 from an External Device (Control Input Connectors) Operational Specifications of Binary Playback Procedure for Setting the Control Input Mode Basic Operation of Binary Playback 2. Set the MODE switches on the AR-200’s bottom panel as shown below. fig.inp-16 Binary Specification Port No.1--8 1. Turn off the power of the AR-200. SW1: OFF 0001 SW2: ON 3. Turn on the power of the AR-200.
AR-200_e.book 33 ページ 2003年7月14日 月曜日 午後1時11分 Controlling the AR-200 from an External Device (Control Input Connectors) Phrase Number / Binary Signal chart Phrase No.
AR-200_e.book 34 ページ 2003年7月14日 月曜日 午後1時11分 Controlling the AR-200 from an External Device (Control Input Connectors) Repeated Playback of Phrases (Interval Playback) modes (PLAYBACK BY CARD DATA/DIRECT PLAYBACK/BINARY PLAYBACK/INTERVAL PLAYBACK). The specified phrase will be played back at fixed intervals. Make each of the terminal settings beforehand for the playback interval and phrases to be played back. You cannot achieve control input playback merely by connecting a device to the port.
AR-200_e.book 35 ページ 2003年7月14日 月曜日 午後1時11分 Controlling the AR-200 from an External Device (Control Input Connectors) Connecting Equipment Recording 9: 0 (Off) Connectors Used in Terminal Rec 10: 1 (On) 1–8: Phrases are specified in binary format using combinations of 0 (Off) and 1 (On). → While control signals are being input, the specified phrase 9, 10: Combinations of 0 (Off) and 1 (On) are used to specify record, erase, and playback. is recorded.
AR-200_e.book 36 ページ 2003年7月14日 月曜日 午後1時11分 Controlling the AR-200 from an External Device (Control Input Connectors) Playback Erase 9: 1 (On) 9: 1 (On) 10: 0 (Off) 10: 1 (On) → The specified phrase is played back. Even when control → First, when ON is input to Port No. 9, and then ON is signals are input continuously, the phrase is played back input to Port No. 10, erasure of the specified phrase one time only and then ends. begins. Erasure ends when the signal from the CONT- fig.
AR-200_e.book 37 ページ 2003年7月14日 月曜日 午後1時11分 Controlling the AR-200 from an External Device (Control Input Connectors) To Specify Phrases with Binary Signals Note that the way phrases are specified in Terminal Rec differs from that used in Binary Playback. Example: Binary specification of Phrase 112 (Phrase #: 112) Convert the phrase number to a binary signal number.
AR-200_e.book 38 ページ 2003年7月14日 月曜日 午後1時11分 Controlling Another Device with the AR-200 (Control Output Connectors) You can use the screw-type control input and DC input terminals (CONT A) and the 25-pin D-sub-type control I/O connector (CONT B) on the AR-200’s rear panel to control an external device from the AR-200. Starting Another Device (Busy Out) The AR-200 outputs two kinds of control signals, Busy Out and Control Out.
AR-200_e.book 39 ページ 2003年7月14日 月曜日 午後1時11分 Controlling Another Device with the AR-200 (Control Output Connectors) Controlling Another Device (Control Out) What is the Control Out Signal?/ Connecting Devices The Control Out signal is output for a duration of one second from the CONT OUT connector after playback of audio phrases, MIDI phrases, pattern phrases, and song phrases. This signal can be used to start amplifiers and other external devices in sync with phrase playback.
AR-200_e.
AR-200_e.
AR-200_e.book 42 ページ 2003年7月14日 月曜日 午後1時11分 Controlling the AR-200 with MIDI Signals (MIDI control) What is MIDI Control?/What You Can Do Using MIDI Control MIDI is an acronym for “Musical Instrument Digital Interface,” and is a standard by which electronic musical Instruments and computers can exchange musical data. You can connect any device conforming to the MIDI standard with a MIDI cable, and then transmit performance data and control the device’s operation and settings.
AR-200_e.book 43 ページ 2003年7月14日 月曜日 午後1時11分 Controlling the AR-200 with MIDI Signals (MIDI control) When Playing Back MIDI Phrases Using MIDI Signals MIDI Note Map (Phrase Assignments from Program Changes and Note Numbers) fig.midi-02 fig.midi-04 (As a MIDI Sequencer) MIDI OUT Program Change MIDI Sequencer MIDI IN MIDI OUT Note No. Phrase No.
AR-200_e.book 44 ページ 2003年7月14日 月曜日 午後1時11分 Controlling the AR-200 with MIDI Signals (MIDI control) AR-200 Settings MIDI Receive channel Settings (MIDI channel) This sets the MIDI receive channel. MIDI allows you to independently control two or more devices over a single MIDI cable. For example, when the MIDI channel for the sending device is set to “1,” then unless the MIDI channel of the receiving device (here, the AR-200) is also set to “1,” the MIDI message is not transmitted.
AR-200_e.book 45 ページ 2003年7月14日 月曜日 午後1時11分 Synchronized Recording and Playback with Multiple AR Units (AR-LINK) What is AR-LINK?/What You Can Do Using AR-LINK The AR-LINK connector is a transmission connector used for creating completely synchronized recording and playback with multiple AR-3000/200 devices. The connectors feature special leads for commands and master clock, allowing synchronization with sampling frequency precision.
AR-200_e.book 46 ページ 2003年7月14日 月曜日 午後1時11分 Synchronized Recording and Playback with Multiple AR Units (AR-LINK) AR-200 Settings Selecting the AR-200’s Operation (ARLINK SLAVE) Set the AR-2000 so as to enable synchronization with ARLINK. The AR-200 can only be set to AR-LINK slave. Settings Procedure 1. Turn off the power of the AR-200. 2. Set the MODE switches on the AR-200’s bottom panel as shown below. SW4: ON 3. Turn on the power of the AR-200. The SLAVE indicator on the front panel lights up.
AR-200_e.book 47 ページ 2003年7月14日 月曜日 午後1時11分 Other Useful Functions During Phrase Playback Moreover, by using an optional AR-3000 to create and edit phrases, you can also use the following functions. For detailed information, please refer to the AR-3000 user’s manual. Line Out (Thru) Setting During Phrase Playback You can take audio from Line In, mix it during phrase playback, and mixed it from Line Out (or Line Thru). fig.
AR-200_e.book 48 ページ 2003年7月14日 月曜日 午後1時11分 Other Useful Functions During Phrase Playback Line Thru Output Specifications The following output specifications apply, depending on the Line Thru settings. fig.
AR-200_e.
AR-200_e.book 50 ページ 2003年7月14日 月曜日 午後1時11分 Troubleshooting About recording Recording does not start • In trigger recording, recording starts automatically when the audio input is of a higher level than the trigger level (lever for starting recording). Adjust the input level so that recording is allowed to start. → " Trigger recording standby." (p.
AR-200_e.book 51 ページ 2003年7月14日 月曜日 午後1時11分 Troubleshooting Others AR-3000 to confirm whether or not the composite phrase has been saved. No sound • Reconfirm that the power to the AR-200 or connected device is on. • Reconfirm that the volume control on the AR-200 or connected device is turned up. • Reconfirm that there are no shorts in any connector cables.
AR-200_e.book 52 ページ 2003年7月14日 月曜日 午後1時11分 Error messages If an incorrect operation is attempted or execution is not possible, an error message will appear in the display. Note the message that appears, and take the appropriate action. fig.er-3 Situation: Action: It is possible that the data in the PC card or the PC card itself has been damaged. Delete all phrases (p. 25).
AR-200_e.book 53 ページ 2003年7月14日 月曜日 午後1時11分 Regarding Cards Card Audio Recording Time Chart The following table shows recording times available for cards formatted for the AR-3000. * Recording times listed are for mono recording. Recording times are halved when data is recorded in stereo. * These times are for when 1phrase is recorded continuously, and are provided for your reference when recording.
AR-200_e.book 54 ページ 2003年7月14日 月曜日 午後1時11分 Appendices Recorded Phrase Data When a piece of Phrase data recorded by the AR-200, the settings of data on the card will be as follows. Control output: OFF MIDI playback tempo: 120 Phrase name: MESSAGE1 (MESSAGE + Phrase number) If you will be using the card on the AR-3000, refer to this list.
AR-200_e.book 55 ページ 2003年7月14日 月曜日 午後1時11分 Appendices AR-3000 settings that can be used MIDI settings OUT MIDI OUT: (MIDI OUT/THRU) MIDI note map: The following AR-3000 settings can be used by the AR-200. C-1: ↓ Refer to this list if you will be using a card created by the AR3000.
AR-200_e.book 56 ページ 2003年7月14日 月曜日 午後1時11分 MODE SW Settings MODE Switch Specifications In addition to the REC MODE switches (p. 20-22), the AR200’s bottom panel also houses the MODE switches. Various applications are possible by changing the settings of the MODE switches. Switch Protect Setting (SW 5) This setting prevents malfunctioning caused when buttons are pressed by mistake. Setting Switch Protect to “ON” disables any action from the buttons on the front panel if they are pressed.
AR-200_e.book 57 ページ 2003年7月14日 月曜日 午後1時11分 Control I/O Connector specifications fig.contB 13 1 DC power supply • Power can be supplied to the AR-200 from an external power supply unit (DC power supply) as well as from the AC adaptor. 25 14 fig.continput Port No.
AR-200_e.book 58 ページ 2003年7月14日 月曜日 午後1時11分 MIDI Implementation Model: AR-200/3000 (Audio Recorder) Date: Nov.1,2000 Version: 1.00 1. Receive data (Media Player Section) ■Channel Voice Message ● Note Off Status Second Third 8nH kkH vvH 9nH kkH 00H n = MIDI Channel No. : 0H - FH (ch.1 - ch.16) kk = Note No. : 00H - 7FH (0 - 127) vv = Velocity : 00H - 7FH (1 - 127) * This stops playback of the phrase for the corresponding note number. (For more on the corresponding phrases, refer to the Note On parameter.
AR-200_e.book 59 ページ 2003年7月14日 月曜日 午後1時11分 MIDI Implementation ● MIDI Time Code * ❍ Full Messages * Data is received when Sync Source is set to "MTC." When the Quarter Frame message is received, operation proceeds with the start of the song synchronized to "00h00m00s00f00" with the "MTC Offset" and the "Delay Time" added. * This acts upon the currently selected audio phrase. * MIDI phrases and pattern phrases are ignored when Dual Mono mode is selected.
AR-200_e.book 60 ページ 2003年7月14日 月曜日 午後1時11分 MIDI Implementation 2. Transmitted data (Media Player Section) 2.1 Transmitted messages while a phrase is being played back * The stored MIDI message are transmitted When the MIDI phrase will playback after OUT is set in the MIDI OUT. In this case, AR-200/3000 is not transmitted MIDI messages which are received. F1H mmH (= 0nnndddd) Regarding the Quarter Frame, please refer to "Receive data (Media Player Section) ~Quarter Frame~". 2.
AR-200_e.
AR-200_e.book 62 ページ 2003年7月14日 月曜日 午後1時11分 MIDI Implementation * * Not received when recording mode is not “Standby”. The same processing will be carried out as when Start is received. 15# ● Stop status FCH * Not received when recording mode is not “record”. 3.4 Messages received for trouble in MIDI connection. detecting ■System Realtime message ● Active Sensing Status FEH * When Active Sensing is received, the unit will begin monitoring the intervals of all further messages.
AR-200_e.
AR-200_e.book 64 ページ 2003年7月14日 月曜日 午後1時11分 MIDI Implementation AUDIO RECORDER Date : Nov. 1, 2000 MIDI Implementation Chart Model AR-200 Version : 1.00 Media Player Section Transmitted Remarks Recognized Function ...
AR-200_e.book 65 ページ 2003年7月14日 月曜日 午後1時11分 AUDIO RECORDER Date : Nov. 1, 2000 MIDI Implementation Chart Model AR-200 Version : 1.00 MIDI Recording Section Transmitted Recognized Remarks Function ...
AR-200_e.book 66 ページ 2003年7月14日 月曜日 午後1時11分 Specification Recording Format RDAC (Roland Digital Audio Coding) RDAC-GRADE (Sampling rate) S-HIGH: 48kHz HIGH: 44.1kHz STANDARD: 32kHz LONG1: 22.
AR-200_e.
AR-200_e.book 68 ページ 2003年7月14日 月曜日 午後1時11分 Specification Input/Output Standard fig.
AR-200_e.book 69 ページ 2003年7月14日 月曜日 午後1時11分 Index A S AR-LINK ...................................................................45, 56 AR-LINK SLAVE ............................................................46 sampling frequency ........................................................19 slave ..................................................................................46 Smart Media ....................................................................15 Switch Protect ..........................
AR-200_e.book 70 ページ 2003年7月14日 月曜日 午後1時11分 Information When you need repair service, call your nearest Roland Service Center or authorized Roland distributor in your country as shown below. AFRICA EGYPT Al Fanny Trading Office 9, EBN Hagar A1 Askalany Street, ARD E1 Golf, Heliopolis, Cairo 11341, EGYPT TEL: 20-2-417-1828 REUNION Maison FO - YAM Marcel 25 Rue Jules Hermann, Chaudron - BP79 97 491 Ste Clotilde Cedex, REUNION ISLAND TEL: (0262) 218-429 SOUTH AFRICA That Other Music Shop (PTY) Ltd.
AR-200_e.book 71 ページ 2003年7月14日 月曜日 午後1時11分 For EU Countries This product complies with the requirements of European Directive 89/336/EEC. For the USA FEDERAL COMMUNICATIONS COMMISSION RADIO FREQUENCY INTERFERENCE STATEMENT This equipment has been tested and found to comply with the limits for a Class B digital device, pursuant to Part 15 of the FCC Rules. These limits are designed to provide reasonable protection against harmful interference in a residential installation.
AR-200_e.