* 5 1 0 0 0 3 1 5 6 4 - 0 2 *
USING THE UNIT SAFELY Before using this unit, carefully read the sections entitled “USING THE UNIT SAFELY” and “IMPORTANT NOTES”. These sections provide important information concerning the proper operation of the unit. Additionally, in order to feel assured that you have gained a good grasp of every feature of your new unit, read Owner’s manual should be read in its entirety. This manual should be saved and kept on hand as a convenient reference.
IMPORTANT NOTES CAUTION Avoid climbing on top of the unit, or placing heavy objects on it Never climb on top of, nor place heavy objects on the unit. CAUTION Keep small items out of the reach of children To prevent accidental ingestion of the parts listed below, always keep them out of the reach of small children. • Included Parts Bolts, Spacers (p.
Getting Started Main Features • A bar-type single trigger pad that you can strike with the shoulder of your stick • Can be attached to the hoop of a V-Drums mesh pad or your acoustic drum Also supports commercially-available rod type mounts and V-Drums stand pad mounts • The BT-1 is designed to minimize unintended triggering, and can be used as a pad switch for changing kits or starting/stopping songs • Compact design that won’t obstruct your playing What’s in the Package • BT-1 • Attachment (for rod type
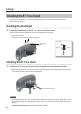
Settings The BT-1 can be attached to the hoop (tuning bolt) of a V-Drums mesh pad or your acoustic snare or tom. By using the included attachment, you can also attach it to a commercially-available stand (rod type mount) or to the pad mount of a V-Drums stand. Attaching the BT-1 to a Drum Hoop NOTE When the BT-1 is attached on the hoop of an acoustic drum or V-Drums pad, striking the BT-1 will cause the drum it is mounted on to sound. If this presents a problem, the BT-1 can be mounted on a stand (p. 6).
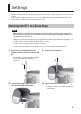
Settings Attaching the BT-1 to a Stand In order to attach the BT-1 to a stand (rod type mount), you must first install the included attachment on the BT-1. Installing the attachment 1. Install the attachment on the BT-1 as shown in the illustration. Use the included attachment bolts to fasten the attachment securely. * Remove the spacer. * Use your own drum key to tighten the bolts. Attachment Bolts Drum Key Tighten Loosen Attaching the BT-1 to a stand 1.
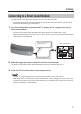
Settings Connecting to a Drum Sound Module Use the included cable to connect the BT-1 to your drum sound module. * To prevent malfunction and equipment failure, always turn down the volume, and turn off all the units before making any connections. 1. Use the included cable to connect the BT-1’s output jack to a trigger input of your drum sound module. * You must use a stereo cable. Operation will not be correct if any other cable is used.
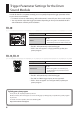
Trigger Parameter Settings for the Drum Sound Module In order for the BT-1 to operate correctly, you must specify the optimal trigger parameter values on your drum sound module. * For details on how to make settings, refer to the owner’s manual of your drum sound module. * You may need to adjust the trigger parameters depending on how you’ve attached the BT-1 and the location at which you’ve installed it.
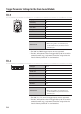
Trigger Parameter Settings for the Drum Sound Module Octapad SPD-30 Pad Type BT-1 20–40 X-Talk Cancel Rate * When using a BT-1 on a V-Drums pad, set this X-Talk Cancel Rate parameter for that V-Drums pad. * The BT-1 will operate only as the head trigger. * If “BT-1” does not appear as a Pad Type choice, update your system program (p. 8). SPD-SX INPUT MODE HEAD&RIM TRIG TYPE BT-1 20–40 XTALK CANCEL * When using a BT-1 on a V-Drums pad, set this XTALK CANCEL parameter for that V-Drums pad.
Trigger Parameter Settings for the Drum Sound Module TD-9 Trig Type PD8 Sensitivity 12 Threshold 8 Scan Time 1.6 Retrig Cancel 4 Mask Time 8 XTalk Cancel 25 Rim Gain 1.0 20–40 XTalk Cancel * When using a BT-1 on a V-Drums pad, set this XTalk Cancel parameter for that V-Drums pad. * The “KIK” and “RDB” trigger inputs are not supported. * The BT-1 will operate as the rim trigger of the pad. No sound or control function (e.g.
Troubleshooting If the BT-1 does not operate as you expect, please check the following points first. If you are still unable to resolve the problem, contact your retailer, the nearest Roland Service Center, or an authorized Roland distributor, as listed on the “Information” page. Problem Check / Action Check the connections. (p. 7) Firmly insert the plug of the connection cable all the way into the jack. Use a stereo cable. (p. 7) Adjust the volume to an appropriate level.
Main Specifications Roland BT-1: Bar Trigger Pad Trigger 1 Connector OUTPUT Jack (Stereo 1/4” phone type) Dimensions 170 (W) x 53 (D) x 60 (H) mm 6-3/4 (W) x 2-1/8 (D) x 2-3/8 (H) inches Weight 300 g 11 oz Accessories Owner’s manual, Attachment, Attachment bolt, Spacer, Connection cable (stereo) Supported V-Drums pads PD-128S, PD-128, PD-108, PD-125, PD-105, PDX-100, PD-85 13–16 mm (9/16–11/16”) Acceptable hoop size 12 mm (1/2”) Max * Depending on the shape of the hoop, it might not be possible
For EU Countries For China WARNING For C.A. US (Proposition 65) This product contains chemicals known to cause cancer, birth defects and other reproductive harm, including lead.
Information AFRICA EGYPT Al Fanny Trading Office 9, EBN Hagar Al Askalany Street, ARD E1 Golf, Heliopolis, Cairo 11341, EGYPT TEL: (022)-417-1828 REUNION MARCEL FO-YAM Sarl 25 Rue Jules Hermann, Chaudron - BP79 97 491 Ste Clotilde Cedex, REUNION ISLAND TEL: (0262) 218-429 SOUTH AFRICA Paul Bothner(PTY)Ltd. Royal Cape Park, Unit 24 Londonderry Road, Ottery 7800 Cape Town, SOUTH AFRICA TEL: (021) 799 4900 ASIA CHINA Roland Shanghai Electronics Co.,Ltd. 5F. No.
VENEZUELA IRELAND SWITZERLAND QATAR Instrumentos Musicales Allegro,C.A. Av.las industrias edf.Guitar import #7 zona Industrial de Turumo Caracas, VENEZUELA TEL: (212) 244-1122 Roland Ireland E2 Calmount Park, Calmount Avenue, Dublin 12, Republic of IRELAND TEL: (01) 4294444 Roland (Switzerland) AG Landstrasse 5, Postfach, CH-4452 Itingen, SWITZERLAND TEL: (061) 975-9987 AL-EMADI TRADING & CONTRACTING CO. P.O.
MEMO