To resize thickness, move all items on the front cover and center registration marks to left or right Owner’s Manual ■ Before using this unit, carefully read the sections entitled: “USING THE UNIT SAFELY” and “IMPORTANT NOTES” (Page 4–5; Page 6–8). These sections provide important information concerning the proper operation of the unit. Additionally, in order to feel assured that you have gained a good grasp of every feature provided by your new unit, Owner’s Manual should be read in its entirety.
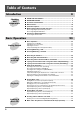
Table of Contents Introduction Checking and Preparations 4 ■ ■ ■ ■ ■ ■ USING THE UNIT SAFELY........................................................................... 4 IMPORTANT NOTES .................................................................................... 6 Check the Included Items............................................................................ 9 Main Features............................................................................................. 10 Panel Descriptions......
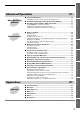
Checking and Preparations Advanced Operation 51 ■ Using the Metronome ................................................................................ 52 Sounding a Count-In to Ensure Accurate Timing (Count-in) ..................................... 53 Getting Started Other Recording Methods ■ Automatically Starting Recording When Sound Begins ........................ 54 ■ Assigning Tracks Numbers While You Record....................................... 55 Using [MARKER] to assign track numbers ........
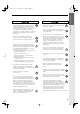
PL.e.fm 4 ページ 2005年8月11日 木曜日 午後2時9分 Introduction USING THE UNIT SAFELY The symbol alerts the user to important instructions or warnings.The specific meaning of the symbol is determined by the design contained within the triangle. In the case of the symbol at left, it is used for general cautions, warnings, or alerts to danger. Used for instructions intended to alert the user to the risk of death or severe injury should the unit be used improperly.
PL.e.fm 5 ページ 2005年8月11日 木曜日 午後2時9分 Checking and Preparations 101b • This unit, either alone or in combination with an amplifier and headphones or speakers, may be capable of producing sound levels that could cause permanent hearing loss. Do not operate for a long period of time at a high volume level, or at a level that is uncomfortable. If you experience any hearing loss or ringing in the ears, you should immediately stop using the unit, and consult an audiologist. ...................................
Introduction IMPORTANT NOTES In addition to the items listed under “USING THE UNIT SAFELY” on Page 4–5, please read and observe the following: Power Supply 301 • Do not connect this unit to same electrical outlet that is being used by an electrical appliance that is controlled by an inverter (such as a refrigerator, washing machine, microwave oven, or air conditioner), or that contains a motor.
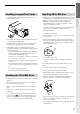
Checking and Preparations Handling CompactFlash Cards Handling CD-R/RW Discs *** • Carefully insert the CompactFlash card all the way in— until it is firmly in place. • DO NOT play a CD-R/RW disc (CD-R/RW disc on which track data from a CompactFlash card has been backed up Page 71) on a conventional audio CD player. The resulting sound may be of a level that could cause permanent hearing loss. Damage to speakers or other system components may result. fig.
Introduction IMPORTANT NOTES (continued) Copyright 851 • Unauthorized recording, distribution, sale, lending, public performance, broadcasting, or the like, in whole or in part, of a work (musical composition, video, broadcast, public performance, or the like) whose copyright is held by a third party is prohibited by law. (852a) • This unit is designed for professional use.
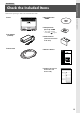
Checking and Preparations Introduction Check the Included Items Check the CD-2 package to make sure it includes these items. ❑ CD-2 ❑ Blank CD-R disc Check the Included Items : 700MB ❑ CompactFlash (CF card): 128MB ❑ AC Adaptor (PSB-7U) * The card is already formatted.
Introduction Main Features Easily create an original music CD using only the CD-2 You can record on three types of media. CompactFlash (CF cards) CD-R discs CD-RW discs ● You can create a music CD from selected songs recorded on a CompactFlash card. ● You can create a music CD by directly recording onto a CD-R/RW disc. Easily record using the internal mics, and listen back using the built-in speakers ● Since stereo mics are built in, you can start recording immediately.
Checking and Preparations Convenient practice functions for music lessons ● You can change the playback pitch (key) of a song.* Main Features ● You can slow down the playback speed without affecting the pitch of a song.* Page 40 Page 41, 42 ● You can remove the vocal from the playback of a CD.* Page 42 The CD-2 provides a Center Cancel function that can eliminate much of the main vocal part from a CD so it becomes less noticeable. This lets you use your favorite CDs as karaoke CDs.
Introduction Panel Descriptions Top Panel Internal Speakers/Internal Mics EDIT Button These are a pair of stereo speakers built into the CD-2. Use this button when you want to edit the tracks of a CF card. Page 58–63, “Editing a CF Card” MIC L/MIC R Stop ( These are a stereo pair of mics built into the CD-2. You can use these mics to record. Page 30, “Recording with the Internal Mics” Press this button to stop playback or recording.
COMPACT DISC Operation Area The controls in this area let you control the CD-R/RW disc or music CD. MASTERING Button PITCH Button This button lets you apply mastering effects to tracks on the CF card. Page 49, “Creating a Professional-Sounding CD” ● You can use this button to adjust the pitch (fine TRACK SELECT Button This button lets you select the CF card tracks that you want to write to a CD-R/RW. Page 46, “Creating a Music CD from a CF Card” adjustments of less than a semitone) of the CD playback.
Introduction Panel Descriptions (continued) Side Panel (CompactFlash Slot) MIC 1/MIC 2 Jacks Mics with XLR-type plugs can be connected to these jacks. Page 20, “Connecting Other Equipment” Security Slot ( ) Display The display shows various information or messages related to the operation you’re performing, such as when making various settings or editing tracks. LEVEL Meter You can attach a commercially available security lock here. http://www.kensington.
Checking and Preparations Front Panel Panel Descriptions (continued) MIC SELECT Button MIC 1/GUITAR Knob This selects the audio input source that will be recorded. Page 37, “Selecting the Recording Source” This adjusts the input level of the MIC 1 jack or the GUITAR jack. Page 37, “Adjusting the Input Level” EFFECT Button This button applies an effect to the audio input source.
Introduction Panel Descriptions (continued) Rear Panel POWER Switch LINE IN Jacks This turns the power on/off. Page 24, “Turning the Power On/Off” You can connect your electronic piano or keyboard to these jacks, and record your performance. Page 20, “Connecting Other Equipment” AC Adaptor Jack Connect the included AC adaptor to this jack. Page 20, “Connecting Other Equipment” LEVEL Knob This knob adjusts the input level of the LINE IN jacks.
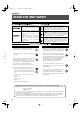
Media That Can Be Used with the CD-2 As its recording media, the CD-2 uses CompactFlash cards (CF cards) and CD-R/RW discs. The functions available for editing or deleting songs (tracks) after recording will differ according to the media you use. The table below shows the functions that can be used with each type of media.
Notes Regarding CompactFlash (CF) Cards In this manual, CompactFlash cards are referred to as “CF cards.” You can purchase CF cards at your local computer dealer or at a store that handles digital cameras. ■ Specifications ● Supported capacities: ■ Recording Modes and Maximum Recording Times When using a CF card for recording, you can select one of three recording modes as appropriate for the desired recording time and audio quality ( Page 36).
Checking and Preparations Attaching the Card Protector Media That Can Be Used with the CD-2 (continued) You can attach the included card protector in front of the CF card slot to block the slot and prevent theft of the CF card. To attach the card protector, proceed as follows. 1 Turn off the CD-2 and all connected equipment. 2 Turn the CD-2 upside down, and remove the card protector. • Disconnect all cables from the CD-2.
Introduction Connecting Other Equipment NOTE • To prevent malfunction and/or damage to speakers or other devices, always turn down the volume, and turn off the power on all devices before making any connections. ● Front Panel Electric guitar Electric bass Mic Headphones ● Side Panel ● Rear Panel Foot switch AC adaptor L R (PSB-7U: included) To analog output jacks L R To analog input jacks AC cord (Included) To MIDI IN connector To power outlet MIDI sound module, etc. 20 Amp, audio set, etc.
Checking and Preparations Cautions When Making Connections MIC 1/MIC 2 Jacks • To prevent the inadvertent disruption of power to your unit (should the plug be pulled out accidentally), and to avoid applying undue stress to the AC adaptor jack, anchor the power cord using the cord hook, as shown in the illustration. • This instrument is equipped with balanced (XLR/TRS) type jacks. Wiring diagrams for these jacks are shown below.
Introduction Connecting Other Equipment (continued) Connecting Condenser Mics If you’re using condenser mics, you must make settings so that phantom power is supplied to them. NOTE • Supplying phantom power to a dynamic mic or an audio playback device will cause malfunctions. Also, the CD-2 cannot be used with devices other than condenser mics that require phantom power (such as the BOSS Direct Box DI-1).
Basic Operation This section explains how to carry out basic CD-2 procedures, from recording and playback through creating a music CD. ■ Basic Operation .................................................................................... 24 Turning the Power On/Off .................................................................................... 24 Adjusting the Screen Contrast ............................................................................. 25 Adjusting the Volume .........................
Getting Started Basic Operation Turning the Power On/Off Turning the Power On NOTE • Once the connections have been completed ( Page 20), turn on power to your various devices in the order specified. By turning on devices in the wrong order, you risk causing malfunction and/or damage to speakers and other devices. • This unit is equipped with a protection circuit. A brief interval (a few seconds) after power up is required before the unit will operate normally.
Adjusting the Screen Contrast Press For example, you might find this convenient when you need to answer the telephone. until “LCD Contrast” appears in the display, and then press . • You can also select this item by turning [DATA]. 1 • The sound from the headphones is not silenced. 2 Turn When you want to once again hear the sound, press again. to adjust the LCD contrast. The button goes out, and the volume returns to the previous setting. • You can adjust this in a range of 1–10. 3 .
Getting Started Inserting/Removing a CD Inserting a Disc Removing a Disc 1 1 Press . The disc tray opens. 2 Press . The disc tray opens. Place the disc on the disc tray. Place with the label surface facing upward 2 Remove the disc. 3 Press once again. The disc tray closes. • You can also close the disc tray by gently pressing the front of the disc tray. Disc tray 3 Press once again. If the Disc Tray Doesn’t Open The disc tray closes.
Getting Started Inserting/Removing a CF Card Inserting a CF Card Removing a CF Card NOTE Insert the CF card into the CF card slot. Carefully insert the CF card all the way in—until it is firmly in place. • The CD-2’s power must be turned off before removing a CF card. Keep the CF card inserted while the CD-2’s power is turned on. 1 Switch off the CD-2’s power.
Recording to CF/CD Recording on the CD-2 Three Methods of Recording Broadly speaking, there are three methods of recording on the CD-2.
Cautions When Recording on a CF Card or CD-R/RW Disc When Recording on a CF card (continued) ■ Recording Time for One Track (One Song) ■ Minimum Recording Rime for One Track The maximum length of one track is three hours. Each track on a music CD must be at least four seconds long. Since the CD-2 creates music CDs from the songs you record, it does not allow you to record a track that is less than four seconds long.
Recording to CF/CD Recording with the Internal Mics Here’s how to record a vocal or instrumental performance via the CD-2’s internal mics (see the illustration below). 2 Press You can record to either a CF card or a CD-R/RW disc. light in green. HINT This means that you’ll be recording the sound from the internal mics. • You can check the amount of time that remains on the media.
Recording to CF/CD Recording from a Connected Mic or Instrument This section explains how to connect mics or instruments to the CD-2, and record a vocal or instrumental performance. You can record to either a CF card or a CD-R/RW disc. 2 Press light in orange. HINT • The sound from a mic or instrument connected to the MIC 1/MIC 2/GUITAR/LINE IN jacks will be selected for recording. • You can check the amount of time that remains on the media.
Recording to CF/CD Layering Your Performance with a Song from a Music CD (Overdubbing) While you play back a music CD, you can add your own vocal or instrumental performance and record the combined result on a CF card. This process is called “overdubbing.” 1 Connect your mic(s). Page 20, “Connecting Other Equipment” The CF card will contain the following recording. Record your vocal while playing the music CD 2 Power up the CD-2.
4 6 Prepare the music CD. Page 26, “Inserting a Disc” or to select the track that you want to play back. 4 Adjust the playback level of the music A new track is created at the end of the CF card. CD. Page 38, “Temporarily Adjusting the Playback Level of a Music CD or CF Card” If necessary, you can also adjust the input level of the mic or guitar so that the overall balance is appropriate (Step 3- 3 ).
Recording to CF/CD Layering Your Performance with a Song from a CF Card (Overdubbing) While playing back a previously recorded performance from a CF card, you can layer—or “overdub”—another vocal or instrumental performance and record the combined result to a new track. Since you can continue overdubbing parts, you can create a song by adding elements one at a time. For example, you can start with drums, then add bass, and then a vocal, and so on. The CF card will contain the following.
4 6 Preparing the CF Card 1 Press or . Recording begins. While you listen to the playback of the track you selected in Step 4, perform your additional vocal or instrumental part to record it. on the CF card side. The CF card is selected as the source. 2 Press On the CF card side, press • If you’re overdubbing with a song from a CF card, the upper right of the screen will indicate “CF→CF.” to select the track that you want to play back.
Recording to CF/CD Settings for Recording Preparing a CF Card for Use (Formatting) When you insert a CF card, the CD-2 determines if it can use the card in its current state. If the message “Not CD-2 Format” appears, the CF card will have to be formatted before it can be used with the CD-2. Choosing the CF Card Recording Mode When you use a CF card to record, you can choose one of three recording modes as appropriate for the desired audio quality and recording time.
Selecting the Recording Source (MIC SELECT) Select the audio source that you want to record. 1 Press enough times to choose the audio source you want to record. Lit green Lit orange CHECK • An instrument (guitar or bass) connected to the GUITAR jack Make sure that [MIC SELECT] is lit green. Page 37 MEMO • If Auto Level Control ( Page 76) is “On,” the input level of the internal mics will be adjusted automatically. You won’t need to adjust the internal mic input level.
Recording to CF/CD Settings for Recording (continued) Adjusting the Input Level (continued) MIC 1/MIC 2/GUITAR/LINE IN Jacks Here’s how to adjust the input level of the input jacks (MIC 1/ MIC 2/GUITAR/LINE IN jacks) to which you’ve connected mics or instruments. Make sure that [MIC SELECT] is lit orange. Page 37 CHECK 1 * If you want to record only from a device connected to the LINE IN jacks, make sure that [MIC SELECT] is not lighted.
When Recording from Connected Mics (Pan Setting) “Pan” refers to the left/right position of the sound. On the CD-2, the pan of the mics connected to the MIC1 and MIC2 jacks can be set to left, right, or center. When using two mics to record a lecture or band performance, you can set the pan to left and right so that the natural spaciousness of the sound is captured (i.e., stereo recording). Press until “Ext MIC1/2 Pan” appears in the display, and then press . The following screen appears.
Playback Playing Back a CD 1 2 Playing Back at a Slower Speed (Slow Playback) Insert the CD. Page 26, “Inserting a Disc” On the CD side, press . You can play back the CD slowly without changing the pitch of the sound. This is convenient when you want to play your instrument along with a “minus-one” CD, or to learn phrases by ear. The CD is selected as the audio source, and playback begins. Elapsed playback time MEMO • Slow Playback is a CD-only function. You can’t use it with a CF card.
Making Fine Adjustments to the Playback Pitch (Pitch) You can make fine adjustments (of less than a semitone) to the pitch of the CD playback. Sometimes when you are practicing your instrument along with a CD, you may have difficulty because the CD playback is pitched slightly different than your instrument. In such cases, you can adjust the CD playback pitch to match your instrument.
Playback Playing Back a CD (continued) Changing the Key of the Playback (Key) You can raise or lower the key of the CD playback. This can be useful in situations like the following. • You want to practice flute along with an accompaniment CD that was created for alto sax. • You want to sing along with a karaoke CD at a key that’s easier for you to sing. MEMO • Key change is a CD-only function. You can’t use it with a CF card. 1 Press display.
Repeatedly Playing Tracks (1 Track/All Repeat) You can have a favorite track (or all tracks) play back repeatedly. 1 Press Repeatedly Playing a Section (A-B Repeat) You can have a specified section play back repeatedly. Repeatedly listening to a section of a song is convenient when you’re practicing your instrument along with the song, or learning the song by ear. to select Repeat mode. Each time you press the button, the Repeat mode indication will change as follows.
Playback Playing Back a CF Card 1 2 Repeatedly Playing Tracks (1 Track/All Repeat) Insert the CF card. Page 27, “Inserting a CF Card” You can have a favorite track (or all tracks) play back repeatedly. On the CF card side, press . The CF card is selected as the source, and playback begins. Elapsed playback time 1 Press to select Repeat mode. Each time you press the button, the Repeat mode indication will change as follows.
Repeatedly Playing a Section (A-B Repeat) You can have a specified section play back repeatedly. Repeatedly listening to a section of a song is convenient when you’re practicing your instrument along with the song, or learning the song by ear. You can also play back wave files (WAV format) that have been written to the CF card using a computer Wave files (WAV format) written to the CF card using a computer can also be played back.
Creating a Music CD Creating a Music CD from a CF Card Here’s how you can create a music CD by writing tracks from a CF card to a CD-R/RW disc. 4 Turn NOTE • We cannot guarantee that music CDs created by the CD-2 will play back on all CD players. Depending on its support for CD-R/RW discs, your CD player may be unable to play them correctly. to select the track that you want to write. • You can also press or to select the track.
8 If “No” is selected in Step 8 Choose whether you want to finalize the disc. 1 Press Finalization is a process that makes the newly written CD-R/RW disc playable in a conventional CD player. (If you decide to cancel writing, press • The CD-2 is able to play back unfinalized CD-R/ RW discs. Yes . .) Writing to the CD-R/RW disc begins. When writing has been successfully completed, the CD-R/RW disc is ejected and the message “Write Completed. Another Disc?” appears.
Creating a Music CD Creating a Music CD from a CF Card (continued) What to do if a track is larger than the capacity of a CD-R/RW disc Even if a track is larger than can be written to a single CD-R/RW disc, it can automatically be divided across multiple CD-R/RW discs for writing. First CD-R/RW disc Second CD-R/RW disc If you want to automatically divide and write a large track, proceed as follows. ● In Steps 4–5 on Page 46, specify the large track as the first track to be written.
Creating a Professional-Sounding CD (Mastering Effects) When creating a music CD from tracks on a CF card, you can apply a mastering effect to eliminate inconsistencies in the volume across the various frequency ranges, making the music CD more professional sounding. You can choose one of 25 different Mastering Effect patches. Choose the patch that is most suitable for the music CD you want to create. MEMO • You can’t use a Mastering Effect at the same time as the other effects ( Page 70). 1 Press .
Creating a Music CD Make a Disc Playable in a Conventional CD Player (Finalize) In order for a CD-R/RW disc you’ve recorded on the CD-2 to be playable in a conventional CD player, you must “finalize” the disc. A finalized CD-R disc or CD-RW disc can be played back as a music CD in a CD player that supports CD-R or CD-RW playback, respectively.
Advanced Operation This section explains the more advanced functions of the CD-2. ■ Using the Metronome ........................................................................... 52 Other Recording Methods Sounding a Count-In to Ensure Accurate Timing (Count-in) ............................... 53 ■ Automatically Starting Recording When Sound Begins ................... 54 ■ Assigning Tracks Numbers While You Record.................................. 55 Using [MARKER] to assign track numbers .............
Other Recording Methods Using the Metronome You can sound a metronome—a convenient feature for practicing your instrument. 3 MEMO Setting the tempo. 1 Press • The metronome cannot be used while overdubbing a performance with a music CD ( Page 32). until “Tempo” appears in the display, and then press . • You can also select this item by turning [DATA]. 1 The following screen appears. Press . The metronome is turned on, and the [METRONOME] button blinks. 2 2 Turn to set the metronome’s tempo.
2 Turn to choose which metronome beats are emphasized. • A quarter-note will be counted as one beat. 0: No beats are emphasized. 1: Every beat is emphasized. 2: Every second beat is emphasized. 3: Every third beat is emphasized. 4: Every fourth beat is emphasized. 5: Every fifth beat is emphasized. 6: Every sixth beat is emphasized. 7: Every seventh beat is emphasized. : Each beat is divided into a triplet, and an emphasized beat will sound at the beginning of each triplet.
Other Recording Methods Automatically Starting Recording When Sound Begins You can have the CD-2 start recording when it detects sound that is louder than a specified level. If you start recording the usual way, by pressing a button, a length of silence will be recorded until you begin playing your instrument.
Other Recording Methods Assigning Tracks Numbers While You Record You can assign a track number while recording, so that subsequently recorded material will be on a new track. MEMO Using [MARKER] to assign track numbers • You can assign track numbers only during recording. If several songs are being recorded in succession, such as during a live performance, you can assign a track number to each song while you continue recording. • The track numbers can be assigned no closer than four seconds apart.
Other Recording Methods Assigning Tracks Numbers While You Record (continued) Assigning Track Numbers at Specified Intervals When making a long recording such as a lecture, you can automatically assign track numbers at fixed time intervals to divide the recording into tracks. If you’ve assigned track numbers, it will be easier to find a desired location in the recording. 1 5 Turn to specify the time interval at which track numbers are to be assigned.
Assigning Track Numbers When Silence is Detected You can have track numbers automatically assigned whenever the CD-2 detects a region of silence (longer than one second) during recording. 1 Press until “Auto Marker” appears in the display, and then press . • You can also select this item by turning [DATA]. The following screen appears. You’re returned to the previous readout.
More Functions Editing a CF Card Eight editing operations such as Delete or Rename are provided so songs recorded on a CF card can be edited. Preparations common to all CF card editing operations Erasing All Tracks 1 Insert the CF card that you want to edit. The contents of the CF card will change as follows. Track number 1 button to 2 Press the CF card select the CF card as the source. 2 A 3 B 4 C D Delete NOTE • You can’t recover a track that you’ve erased.
Assigning a Title to a Track You can assign a title of up to 250 characters to each track on a CF card. MEMO • Track titles such as “SNG01_00 ➔ SNG02_00 ➔... SNG99_00” are automatically assigned to each track. ■ Entering characters Characters are entered at the location of the cursor. Move the cursor and enter the desired characters. To move the cursor Press or The cursor will move backward or forward. Track number assigned when recording.
More Functions Editing a CF Card (continued) Preparations common to all CF card editing operations 1 Insert the CF card that you want to edit. button to 2 Press the CF card select the CF card as the source.
7 Press 5 . At the desired End Point, press the CF card side. on The message “Are You Sure?” appears. Four seconds of sound following the End Point will play repeatedly. Plays repeatedly Four seconds 8 To execute the Trim In operation, press . (If you decide to cancel, press End Point .) The Trim In operation will be carried out. Once it’s complete, you’re returned to the original readout. 6 Turn to precisely adjust the End Point.
More Functions Editing a CF Card (continued) 1 Insert the CF card that you want to edit. Preparations common to all CF card editing operations button to 2 Press the CF card select the CF card as the source. Dividing a Track (Divide) 4 On the CF card side, press The track will begin playing. 5 Press at the approximate location where you want to divide the track. The contents of the CF card will change as follows. Track number 1 2 A .
Converting a Track to a Wave File (Wave Convert) Formatting a CF Card Tracks that were recorded with a recording mode ( Page 36) of “Standard” or “Long” can be converted into a wave file (WAV format) that can be handled by your computer or other device. If you turn off the power or subject the CF card to a strong physical shock while the CD-2 is operating, the data in the CF card may be damaged, and the system may stop operating correctly. If this occurs, re-format the CF card.
More Functions Erasing Tracks from a CD-RW Disc If you’re using a CD-RW disc, you can erase previously recorded tracks. • You can’t erase tracks from a CD-R disc. Preparations common to all CD-RW editing operations Erasing All Tracks Here’s how to erase all tracks from the CD-RW disc. Insert the CD-RW disc from which you want to erase tracks. MEMO • If the CD-R/RW disc has been finalized ( Page 50), finalization will automatically be removed when you erase all tracks.
Removing Finalization You can remove finalization from a CD-RW disc ( Page 50) so that the disc can once again be used for recording. MEMO • You can’t remove finalization from a CD-R disc. • Removing finalization will not erase the recorded tracks. 1 Press until “UNFINALIZE” appears in the display. 2 Press . The message “Are You Sure?” appears. To remove finalization, press (If you decide to cancel, press . Erasing Tracks from a CD-RW Disc 3 .) Finalization is removed from the disc.
More Functions Tuning Your Instrument (Tuner) You can use the CD-2’s chromatic tuner function to tune your instrument. The tuner function can be used with any of the CD-2’s inputs, including the internal mics. 4 If the string is tuned within +/-50 cents of the correct pitch, tuning guides are displayed in the screen, indicating the distance between the actual pitch and the displayed note name. MEMO • You can’t play back or record while using the tuner. • The effect ( the tuner.
Changing the Tuner’s Reference Pitch Listening to a Guide Tone While Tuning You can calibrate the CD-2’s Tuner to another instrument or tuning standard by adjusting its “reference pitch.” As a tuning aid, you can have the CD-2 sound a guide tone from the internal speakers. The reference pitch is the frequency of the A4 note. For example, this is the pitch of the middle A note on a piano. 1 1 Press until “TUNER” appears in the Press until “Tone” appears in the display.
More Functions Copying an Original Music CD You can use the CD-2 to copy a CD containing your original music. Copyright • Unauthorized recording, distribution, sale, lending, public performance, broadcasting, or the like, in whole or in part, of a work (musical composition, video, broadcast, public performance, or the like) whose copyright is held by a third party is prohibited by law. • This unit is designed for professional use.
Preparations Insert a CF card to hold the music CD tracks. 5 To proceed copying, press (If you decide to cancel, press 1 Press until “CD COPY” appears in .) The CD-2 will begin writing the data to the disc. the display. When the data has been written successfully, the CD-R/RW disc is ejected and the “Another Disc?” message appears. • You can also select this item by turning [DATA]. 2 . Press . The message “Insert Master CD” appears.
More Functions Applying Effects to Your Vocal or Instrumental Performance You can apply a variety of effects (acoustical processing) to your vocal or instrumental performance. For example, you can apply echo to your vocal, or apply distortion to the sound of your electric guitar. 1 The CD-2 provides a variety of preset patches that are suitable for different instruments, and these are organized by category into three groups. Use the effect patch that’s appropriate for your instrument and situation.
More Functions Backing Up Tracks from a CF Card You can back up all tracks (recorded data) from a CF card to a CD-R/RW disc. Preparations 1 Obtain the necessary number of CD-R/RW discs for the backup. If you’re using a high-capacity CF card that holds 1 GB or 2 GB, the data may be too large to fit on a single CD-R/RW disc. It’s a good idea to back up important tracks to a CD-R/RW disc as a precaution against accidental damage or loss of the CF card. NOTE If so, the backup will span two or more discs.
More Functions Recovering Backed-up Data (Recover) Here’s how backed-up data from a CD-R/RW disc can be recovered to a CF card so that it can be played or edited. 4 MEMO Use or to select the track that you want to recover. • Backed-up data can be recovered to a CF card in units of individual tracks. • If a track with an identical title is recovered, a two-digit number will automatically be appended to the title. Track title • The lower line of the screen indicates the track title ( Page 59).
More Functions Playing SMF (Standard MIDI File) Data The CD-2 can play back SMF (Standard MIDI File) data from a CD-R/RW disc, and transmit the MIDI data to an external MIDI device (sound module or electronic keyboard) to play its sounds. 1 • SMF data written on a CF card cannot be played. Insert the CD-R/RW disc that contains the SMF data. When the CD-2 detects the CD-R/RW disc, the SMF screen appears.
More Functions Restoring the Factory Settings (Initialize) When you execute the Initialize operation, all settings will revert to their factory settings. If the CD-2 does not operate as you expect even when you follow the steps in this manual, you may wish to execute the Initialize operation. The table on the right shows the factory settings.
More Functions Other Functions and Settings Displaying the Remaining Time You can switch the display to show either elapsed time or remaining time during playback and recording. You can also switch the time display as follows. When you press 1 from the main screen, the time display will change as follows. Press until “Time Display” appears in the display, and then press . • You can also select this item by turning [DATA].
More Functions Other Functions and Settings (continued) Specifying the Function of the Foot Switch You can use a separately sold foot switch (such as the Roland DP-2 or BOSS FS-5U) to perform the following functions. • Start/pause track playback • Assign track numbers (only during recording) You can choose one of the above functions for the foot switch to control. MEMO • Connect the foot switch to the FOOT SW jack located on the rear panel of the CD-2.
Adjusting the Output Level from the AUX OUT Jacks Choosing the Audio Source that is Output from the AUX OUT Jacks Adjusting the Output Level of the AUX OUT Jacks Here’s how to choose the audio source that will be output from the CD-2’s rear panel AUX OUT jacks. Here’s how to adjust the output level of the AUX OUT jacks. 1 Press until “AUX OUT Select” appears in the display, and then press 1 Press until “AUX OUT Level” appears in the display, and then press . .
More Functions Other Functions and Settings (continued) Switching the Line Input On/Off When you’re using mics as well as instruments connected to the LINE IN jacks, you may want to temporarily use only the mics. If so, you can turn off the line input. Sound will no longer be input from the LINE IN jacks, and only the sound from the mics will be heard.
Adjusting the Playback Level of a Music CD/CF Card Here’s how to adjust the playback level of a music CD or CF card. 1 • To adjust the playback level of a music CD Press until “CD Mix Level” appears in the display, and then press . • You can also select this item by turning [DATA]. The following screen appears. • To adjust the playback level of a CF card Press until “CF Mix Level” appears in the display, and then press . • You can also select this item by turning [DATA]. The following screen appears.
Appendices Refer to this information when needed. Reference ■ ■ ■ ■ ■ ■ ■ Troubleshooting.................................................................................... 82 Messages............................................................................................... 87 Effect Patch List.................................................................................... 88 Menu List ...............................................................................................
Reference Troubleshooting If you suspect a malfunction, please check the following points. If this does not resolve the problem, contact a nearby Roland Service Center. ■ Power Supply Problem The power does not turn on when you press the [POWER] switch.
■ Problems with the Sound (continued) Problem The input source (audio source) is not output Cause and Action See Page ● Could devices be connected to both the MIC 1 jack and GUITAR jack? ➔ If you connect devices to both the MIC 1 jack and the GUITAR jack, the sound from the MIC 1 jack will not be input. If you want to input sound from the MIC 1 jack, remove the plug from the GUITAR jack.
Reference Troubleshooting (continued) ■ CD-Related Problems Problem Normal playback does not work See Page Cause and Action ● Could the CD be upside down? ➔ Insert the CD with the label facing upward. 26 ● Could you have inserted a CD on which nothing has been recorded? ➔ Insert a different disc. — ● Could you be using Repeat playback? ➔ Press [1/ALL] enough times to get the Repeat icon ( / ) to disappear.
■ CD-Related Problems (continued) Problem Can’t record (continued) See Page Cause and Action ● Are you using a generic CD-R/RW disc? ➔ Use a CD-R/RW disc from a recommended manufacturer. After recording, the CD won’t play back on a conventional CD player 18 ● Did you finalize the disc after recording? ➔ Execute the Finalize operation. 50 ● Is your CD player able to play back CD-R or CD-RW discs? ➔ If your CD player does not support CD-R or CD-RW discs, they may not play back correctly.
Reference Troubleshooting (continued) ■ CF Card-Related Problems (continued) Problem See Page Cause and Action Insufficient playback volume ● Could the CF card playback level be set to the minimum? Can’t record ● Is the CF card inserted all the way into the slot? ➔ Adjust CF Mix Level to raise the playback level. 38, 79 ➔ Make sure that the card is oriented correctly, and that it is pushed all the way into the slot.
Reference Messages If a message is displayed, refer to the following list and take the appropriate action. Message Content Action Use a CD-R/RW disc that is not blank. The disc could not be read/written in time. If this appears during playback, use an unscratched disc. If this appears during recording, use a recommended brand of disc. CD Disc Full The disc is full. No more tracks can be recorded. Record on another disc. Delete unwanted tracks to increase the free space (CD-RW disc).
Reference Effect Patch List ■ DYN (Dynamics Group) Patch Name Function Compressor Limiter De-Esser Noisy Room Loud Voice Soft Voice Piano Drum Kit Rock Band Jazz Band Orchestra Squish! CMP+FAT EQ LO&SLOW FLNG ST CHORUS PS:DETUNE ST DOUBLER CHORUS+DELAY 1920’s RADIO 1960’s RADIO VINTAGE 45’s CLASSIC LP Basic control of audio dynamic range. Basic control of extreme peaks in audio dynamic range. Removes sibilance and harshness from the voice.
Patch Name Function Unison VOX M&F Duet VOX Detune CHIPS & MUNK Deep Voice Adds a octave down voice to the vocal. Transforms a voice into a male part and female part. Adds a detune voice to the vocal. Pitch shifting effect that raises the octave of the voice. Pitch shifting effect that lowers the octave of the voice.
Reference Menu List The following table shows the various menus that are displayed when [MENU] is pressed.
Reference Specifications Recorder Tracks 2 (Stereo) Sample Rate 44.1 kHz Signal Processing AD/DA conversion: 24 bits Recording Mode Standard, Long, WAV Recording Media CompactFlash (16 MB–2 GB), CD-R, CD-RW Recording Time (unit: min) 16MB 32MB 64MB 128MB 256MB 512MB 1GB 2GB Standard 3 6 12 24 49 98 196 392 Long 6 2 24 49 98 196 392 784 WAV 1.5 3 6 12 24 49 98 196 * The above-listed recording times are approximate. Times may varys slightly depending on the number of songs that were created.
Index Numerics E 1 Track Repeat (CD) ...................................................... 43 1 Track Repeat (CF) ....................................................... 44 Editing a CF Card assigning a title ........................................................ 59 Divide ........................................................................ 62 erasing a track .......................................................... 58 erasing all tracks ......................................................
K R Key ................................................................................... 42 Recording mode ............................................................ 36 Recover ........................................................................... 72 RECOVER CD→CF ....................................................... 72 Reference pitch .............................................................. 67 Remain ............................................................................
Information AFRICA EGYPT Al Fanny Trading Office 9, EBN Hagar A1 Askalany Street, ARD E1 Golf, Heliopolis, Cairo 11341, EGYPT TEL: 20-2-417-1828 REUNION Maison FO - YAM Marcel 25 Rue Jules Hermann, Chaudron - BP79 97 491 Ste Clotilde Cedex, REUNION ISLAND TEL: (0262) 218-429 SOUTH AFRICA That Other Music Shop(PTY)Ltd. 11 Melle St., Braamfontein, Johannesbourg, SOUTH AFRICA TEL: (011) 403 4105 FAX: (011) 403 1234 Paul Bothner(PTY)Ltd.
To resize thickness, move all items on the front cover and center registration marks to left or right. Table of Contents Introduction Checking and Preparations 4 ■ ■ ■ ■ ■ ■ USING THE UNIT SAFELY............................................................................4 IMPORTANT NOTES .....................................................................................6 Check the Included Items ............................................................................9 Main Features.................
To resize thickness, move all items on the front cover and center registration marks to left or right Owner’s Manual ■ Before using this unit, carefully read the sections entitled: “USING THE UNIT SAFELY” and “IMPORTANT NOTES” (Page 4–5; Page 6–8). These sections provide important information concerning the proper operation of the unit. Additionally, in order to feel assured that you have gained a good grasp of every feature provided by your new unit, Owner’s Manual should be read in its entirety.