Roland COLORCHOICE® Software for Windows Version 3 User Guide Thank you very much for purchasing the FJ-50/40, CJ-500/400. • To ensure correct and safe usage with a full understanding of this product’s performance, please be sure to read through this manual completely and store it in a safe location. • Unauthorized copying or transferal, in whole or in part, of this manual is prohibited. • The contents of this operation manual and the specifications of this product are subject to change without notice.
Welcome ....................................................................................................................................................... 5 System Requirements ................................................................................................................................ 5 Windows 95/98 Installation ......................................................................................................................5 Windows NT Installation ............................
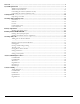
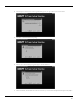
Windows 95/98 Installation 1 Insert the Roland COLORCHOICE Installation CD into your CD-ROM drive. The CD Setup Screen appears. 2 Select the appropriate language and then click Next. The Registration dialog box appears. 3 Enter “1000” and then click Next. You are prompted to confirm your Registration number. 4 Enter “1000” and then click Next. The Software to Install dialog box appears.
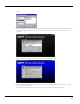
Select the appropriate language and then click Next. After a brief setup period, the Welcome dialog box appears. 6 Click Next in the Welcome dialog box. The Select Program Folder dialog box appears. 7 Select a location for the COLORCHOICE program group and then click Next. The Choose Destination Location dialog box appears. 8 Accept the default location or specify a new one. Click Next when you are finished. The Setup program copies files to your computer.
9 Click Yes. You are asked if you want to restart your computer. 10 Select Yes and then click OK. After your computer restarts, the Setup dialog box appears. 11 Select the model of your output device from the list, and then click Next. The Add Setup dialog box appears. 12 Select the port to which your output device is connected, and then click OK. The following message appears: 13 Click OK to the message. The installer for Adobe PostScript Printer Driver automatically launches.
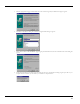
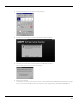
14 Click Accept from the End User License Agreement dialog box if you agree with the terms of this License. 15 Click Next on the Printer Driver Setup dialog. 16 Select No from the Install Setup Program dialog box and then click Next. 17 Select Local Printer, and then click Next.
install. 18 The file is located in the C:\Program Files\Roland COLORCHOICE 3\PPD folder. Select the PPD according to the model of your printer. Click Next when you have finished. The next dialog prompts you for the port to which the printer is connected. 19 It does not matter which port you select in this dialog box. Select any port and click Next. 20 From the Add Printer dialog box you may choose the printer as your default printer. You don’t need to print a test page, so select No for that option.
21 The Properties dialog box for the printer you selected appears. 22 Click OK. You are returned to the Adobe PostScript Printer Driver installation. 23 Click Exit. The installer will now install the Roland COLORCHOICE Software. The last screen asks if you want to restart your computer. 24 Select Yes, then click OK. You will notice, each time that your computer is started, an icon for the Roland COLORCHOICE Software in the lower right corner of your monitor.
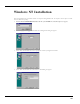
Windows NT Installation This section describes how to install the software on computers running Windows NT. The computer on which the software is installed must have Administrator priviledges. 1 Insert the Roland COLORCHOICE Installation CD into your CD-ROM drive. The CD Setup Screen appears. 2 Select the appropriate language and then click Next. The Registration dialog box appears. 3 Enter “1000” and then click Next. You are prompted to confirm your Registration number.
5 Select the appropriate language and then click Next. After a brief setup period, the Welcome dialog box appears. 6 Click Next in the Welcome dialog box. The Select Program Folder dialog box appears. 7 Select a location for the COLORCHOICE program group and then click Next. The Choose Destination Location dialog box appears. 8 Accept the default location or specify a new one. Click Next when you are finished. The Setup program copies files to your computer.
9 Click Yes. You are asked if you want to restart your computer. 10 Select Yes and then click OK. After your computer restarts, the Setup dialog box appears. 11 Select the model of your output device from the list, and then click Next. The Add Setup dialog box appears. 12 Select the port to which your output device is connected, and then click OK. the following message appears: 13 Click OK to the message. The installer for the Adobe PostScript Printer Driver automatically launches.
The next screen asks if you want to view the Adobe ReadMe file. 15 Click Next from the Printer Driver Setup dialog box. The next screen gives you the option to copy the Setup program. 16 Choose No, and then click Next. You are asked to specify how the printer is connected to your computer. 17 Select Local Printer, and then click Next. The next screen asks you to locate the PostScript Printer description file (PPD) to install.
connected. 19 It does not matter which port you select in this dialog box. Select any port and click Next. The next dialog asks if the printer is shared. 20 Make the appropriate selections, and then click Next. The next screen asks if you would like to print a test page.
21 Do not print a test page at this time. Click Next. The Properties dialog box appropriate for your printer appears. 22 Click OK. The next screen gives you the option to add another printer. 23 24 Click Exit on this screen. The installer will now install the Roland COLORCHOICE software. The last screen asks if you want to restart your computer. 25 Select Yes, then click OK.
Uninstalling the Software (Windows 95/98) 1 2 3 4 5 6 7 8 9 10 11 Quit the Roland COLORCHOICE Software by right clicking on the Roland COLORCHOICE icon in the lower right corner of your monitor and selecting Exit. Click Start>Settings>Control Panel. In the Control Panel, double-click the Add/Remove Programs icon. Remove Roland COLORCHOICE. Click OK when you are finished. Go into the drive where the Roland COLORCHOICE Software is located. Its default name should be ‘Roland COLORCHOICE 3’.
Getting Started Once installed, Roland COLORCHOICE RIP Software automatically starts each time you start your computer. The Print Monitor displays when you double-click the Roland COLORCHOICE RIP Software Icon located in the lower right corner of your screen. You can control every facet of job management from the Print Monitor. The Print Monitor is essentially a queue, listing all the files that are waiting to be printed. Jobs appear in the queue in the order that they were received.
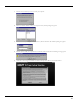
General tab The General tab displays standard Windows printer settings associated with printer port selection and media size. Port- Selects the port to which the printer is connected. You should only change the Port selection if you physically change the port to which your printer is connected. Media Size- Select a media size that is currently loaded into your printer. You can specify custom media sizes by selecting other from the list and then editing the Height and Width values.
Print tab The Print tab displays basic processing settings and allows you to access your printer’s Driver Options. Resolution- You may set the output resolution here. A higher resolution will generally result in better results but slower output. The resolution set here is separate from the resolution used by your application. Setting a resolution in this driver that is higher than the resolution in the application will not necessarily improve the output.
• curves. Perceptual is best for photographic images. The relationship between colors in the original is scaled proportionally to fit the output device’s color gamut. Relative Colorimetric When a color in the current color space is out of gamut in the target color space, it is mapped to the closest possible color within the gamut of the target color space, while colors that are in gamut are not affected. Only the colors that fall outside of the destination gamut are changed.
PHOTO 720dpi (Printing is done with 1440dpi along the material feed direction) SUPER 720dpi FINE 720dpi NORMAL 360dpi FAST 360dpi DRAFT 180dpi Print Direction- You can select what direction of head travelling to make printing, single way or both. Again, printing quality and printing time are in trade off. Unidirectional printing might produce better quality. Overprint- You can select the number of times to print the same image superimposed over the same location. The default time is one.
Cut Media After Printing- Check this option to cut the media after the output is complete. Please consult "Remove the Material - Cut the Material from the Roll - When sending a material-cutting command from the computer to separate the material automatically" in the CAMM JET User's Manual for more information. Print Crop Mark- When this option is checked, the printer will add automatically a crop mark to the output.
Cutter Driver Options- Clicking this button launches the Cutter Driver Options dialog box, shown below. Custom Head tab None- When this mode is selected, Roland COLORCHOICE will not send any settings regarding the cutting operation. The settings in the printer panel will be used instead. Cut Fast, Cut Medium, Cut Slow- When these options are selected, Roland COLORCHOICE will send the settings for the cutting operation.
Color Adjust tab The Color tab displays settings associated with the color quality of the image. Using the sliders on the tab, you can adjust the image quality. The sliders that appear vary, depending on which color mode is selected on the Print tab. In all modes, you can adjust the overall image contrast using the Contrast slider. The modifications that you make on the Color Adjust tab do not affect the original file.
Working with density curves 1 Click Setup>Density Adjustment. The Density Calibration dialog box appears. 2 Highlight a density file and then click Edit, or click New to create a new density file. The Density Adjustment dialog box appears. 3 4 Select a channel to edit from the Channel list. Edit the curve as described below. Adjusting the Density curve The density curve translates input dot values read from the file into output dot values that appear on the printed media.
Printing with COLORCHOICE There are two approaches to using the Roland COLORCHOICE RIP Software. • • Printing already prepared jobs from one station. Creating and printing jobs on one station. These approaches can be used concurrently or in combination. Printing Already Prepared Jobs 1 2 3 4 5 6 Load the CD or disk that has the prepared jobs into the appropriate drive. Double-click on the Roland COLORCHOICE RIP Software icon in the lower right corner of your screen to launch the program. Select Add...
The Device Options tab Printer features- Highlight any item in the Printer features list. The ‘Change setting for’ list, located just below, applies changes to reflect the option for the selected feature. After Spooling- Tells the Print Monitor what to do with the job after it arrives in the Queue, either Hold or Print. After Printing- Tells the Print Monitor what to do with the job after it has finished printing, either Hold or Delete.
The Graphics tab Although the Graphics tab contains a DPI setting, this setting is not used in RIPing. Instead, the DPI setting in the Print tab of the Setup Properties is used during RIPing. Windows NT Printer Properties Windows NT presents the same printer properties as Windows 95, but in a different format.
Working with Jobs Roland COLORCHOICE Software provides you with a number of tools for job management. This section explains some of the many ways in which you can manipulate jobs from the Print Monitor. Adding Jobs to the Print Monitor You can add jobs to the Print Monitor by clicking the Add a Job button located on the toolbar. You may alternatively select File>Add. 1 Click the Add a Job button from the toolbar. The Add a Job dialog appears.
Printing Jobs Once jobs are in the Print Monitor, you can select individual jobs or groups of jobs for printing. When you select a group of jobs, they are printed in the order that they appear in the queue. 1 2 Select the job or jobs that you want to print by selecting them in the Print Monitor window. Click the Send button. The job is RIPed and then printed. You also can click File>Send to RIP and print a job.
Saving Jobs in Native Format Once a job has been printed, you may want to save the RIPed file so that you can reprint it without having to RIP the file again. Saving a file as Native format, with a .prt extension, allows you to save RIPed files for reprinting. 1 2 Select the job that you want to save as in Native Format by selecting it in the Print Monitor window. Click the Save a job button. You also can click File>Save to save a job in Native Format.
The General tab Preview Mode—You can display the image in Page mode or view it in Layout Preview mode, which displays the image as it will print on the media. Simply select the preview mode you want from the list. Scale—You may change the size of the output here. In most cases, a job’s size should be controlled from within the application in which it was created to prevent unexpected results. Fit to Media—Increases or decreases the job proportionally to fit the maximum width of the output device.
The Print tab The Print tab settings are identical to the settings on the Print tab of the Setup Properties dialog box. See “Print tab” on page 19. The Cut tab Use the Cut tab to specify the number of passes that the blade makes over each path and to access Cutter Driver Options., if desired. The Cut tab is only available for the CJ-400/CJ-500.
The Color Adjust tab The Color Adjust tab settings are identical to the settings on the Color tab of the Setup Properties dialog box. See “Color Adjust tab” on page 24.
Advanced Printing Procedures If your program is not listed, refer to a section on a similar program. CorelDRAW 8 1 From the Roland COLORCHOICE Print Monitor click Setup>Setup Properties. Then click the Print tab. 2 3 Make sure the Perform Color Correction checkbox has a check in it. In the ICC input profile area, select appropriate CMYK and RGB profiles. If you know which profiles your application is using, select that profile. If you don’t, use the default setting.
7 Click the Properties button. Choose a page size from the Paper field or select Custom Page for a custom page size. 8 If you choose a Custom Page, click on the Custom button and enter the custom size in the paper width and height fields. The paper size should match the size entered in Corel. 9 10 11 Click OK in the Printer Properties dialog. Click OK in the Print Setup dialog. Click File>Print. Then select your printer from the Name menu.
CorelDRAW 7 1 From the Roland COLORCHOICE Print Monitor click Setup>Setup Properties. Then click the Print tab. 2 3 5 6 Make sure the Perform Color Correction checkbox has a check in it. In the ICC input profile area, select appropriate CMYK and RGB profiles. If you know which profiles your application is using, select that profile. If you don’t, use the default settings. For the ICC output profile, select the appropriate ink/media combination. Also select a rendering intent to use.
height. The paper size should match the page size entered in Corel. 9 10 11 Click OK in the Printer Properties dialog. Click OK in the Print Setup dialog. Click File>Print. Then select your printer from the Name menu. 12 Set the options as shown and click OK to print. Illustrator 7 The Kodak Color Management System must be installed to output successfully from Illustrator 7 to Roland COLORCHOICE Software. 1 From the Roland COLORCHOICE Print Monitor click Setup>Setup Properties.
4 In Illustrator, go to File>Document Setup. 5 6 7 Select ‘Use printers default screen.’ Select ‘Use Print Setup’. Click the Print Setup button. Print Setup screen appears. 8 9 Select your printer in the Name field. Click the Properties button. 10 11 Choose a paper size from the ‘Paper’ field or select a Custom page for a custom page size.
height. 12 13 14 15 16 17 If you choose custom page, click OK to Custom Defined Size dialog. Click OK in the Properties dialog. Click OK in the Print Setup dialog. Click OK in the Document Setup dialog. If you want your monitor to soft-proof CMYK output, go to File>Color Settings and check ‘Simulate print colors on display’. Go to File>Print. 18 19 20 21 If not dimmed, set Output to Composite. Set PostScript to Level 2. Check Force Fonts to Download. Click OK to print.
PageMaker 6.5 These directions assume that you have Kodak ICC Color Management installed. Before starting PageMaker, copy your printers’ PPD files to PM65\RSRC\USENGLSH\PPD4 directory. The PPDs can be found on your installation CD in the ‘Ppd’ folder. 1 From the Roland COLORCHOICE Print Monitor click Setup>Setup Properties. Then click the Print tab. 2 3 Make sure the Perform Color Correction checkbox has a check in it. In the ICC input profile area, select appropriate CMYK and RGB profiles.
Photoshop 4 1 From the Roland COLORCHOICE Print Monitor click Setup>Setup Properties. Then click the Print tab. 2 3 Make sure the Perform Color Correction checkbox has a check in it. In the ICC input profile area, select appropriate CMYK and RGB profiles. If you know which profiles your application is using, select that profile; if you don’t, use the default settings. For the ICC output profile, select the appropriate ink/media combination. Also select a rendering intent to use.
8 Click the Properties button. Choose a paper size from the Paper field or select a Custom page for a custom page size. 9 If you choose a custom page size, you may enter the custom size by clicking the ‘Custom’ button and entering the width and height. The paper size should match the canvas size created in Photoshop. Click OK to Custom Page Size. 10 11 12 If you choose a custom page, click OK to Custom Defined Size dialog. Click OK to Printer Properties. Click the Screen button.
Photoshop 5 1 From the Roland COLORCHOICE Print Monitor click Setup>Setup Properties. Then click the Print tab. 2 3 Make sure the Perform Color Correction checkbox has a check in it. In the ICC input profile area, select appropriate CMYK and RGB profiles. If you know which profiles your application is using, select that profile; if you don’t, use the default settings. For the ICC output profile, select the appropriate ink/media combination. Also select a rendering intent to use.
8 Click the Properties button. Choose a paper size from the Paper field or select a Custom page for a custom page size. 9 If you choose a custom page size, you may enter the custom size by clicking the ‘Custom’ button and entering the width and height. The paper size should match the canvas size created in Photoshop. Click OK to Custom Page Size. 10 11 12 If you choose a custom page, click OK to Custom Defined Size dialog. Click OK to Printer Properties. Click the Screen button.
Contour Cutting Adobe Illustrator 7 When using Adobe Illustrator with a hybrid device such as the CAMM JET, you can print objects and then cut a contour line around them. Follow these steps to send Illustrator files with contour cut lines: 1 2 3 4 Copy the file “CAMM_JET.ai”, located on the Installation CD, to the Swatch Libraries folder of Illustrator. Start Illustrator. Open the file that you want to contour cut, if it’s not already open.
Using the Palette 1 2 Select objects that you want to cut. Go to Tool bar>Outline Color. Outline Color button Custom palettes button 3 Click the 'Custom Palettes' button in 'Outline Color' dialog. 4 Select User Defined Inks in the Type list. 5 Select CutContour to apply it to the selected objects. FreeHand 8 1 2 3 4 5 Copy the file ‘Cammjet.bcf ’, located in the ‘Spot Color Library\Cammjet\FreeHand’ folder to FH8\Usenglsh\Colors folder. Start FreeHand.
6 7 'Cut Contour' will be listed in the Color Library window. Click OK. 'Cut Contour' will be added to the Color List Palette. Use this color to define the cut line. QuarkXPress 4 1 2 3 4 5 Select Edit>Color and click Add from the Default Color dialog. Execute File>Import and select the file ‘CAMM JET QuarkXPress.qxd’, located in the ‘Spot Color Library\Cammjet\QuarkXPress’ folder. (It is recommended to copy this file to your Hard Disk before importing it.
R1-990920