Roland CutChoice™ Ver. 1 USER’S MANUAL Thank you very much for purchasing the Roland cutter. • To ensure correct and safe usage with a full understanding of this product’s performance, please be sure to read through this manual completely and store it in a safe location. • Unauthorized copying or transferal, in whole or in part, of this manual is prohibited. • The contents of this operation manual and the specifications of this product are subject to change without notice.
TABLE OF CONTENTS Welcome......................................................................................................................................... 4 Overview of Software.....................................................................................................................................4 Supported Output Devices.............................................................................................................................4 System Requirements Windows..............
Apply..................................................................................................................................................................16 The Cut Tab..................................................................................................................................................17 Resolution ..........................................................................................................................................................17 Passes ......
Welcome Welcome to the User Guide for the Roland CutChoice Software. We recommend that you read and understand this document. This document contains instructions for Microsoft Windows and Macintosh computers. Overview of Software Once you’ve created a design, you will most likely want to output. Roland CutChoice allows you to access a user-friendly application that will allow you to use your output device quickly and efficiently.
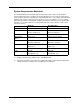
System Requirements Windows The following table lists the minimum and recommended system setup to run the Software. System requirements vary according to the design application you are using, the output device used, and other variables. Your particular setup and intended use of the software determine what hardware and software setup you need to get the most out of the Software. If you are working with relatively small files, the minimum setup may be sufficient.
System Requirements Macintosh The following table lists the minimum and recommended system setup to run the Software. System requirements vary according to the design application you are using, the output device used, and other variables. Your particular setup and intended use of the software determine what hardware and software setup you need to get the most out of the Software. If you are working with relatively small files, the minimum setup may be sufficient.
Installing Roland CutChoice (Windows) Please make sure all applications are closed before installing this software. 1. Insert the Roland CutChoice Installation CD into your CD-ROM drive. The system displays the Welcome window. 2. Click Next. The System will ask if you wish to view the Readme file. Click Yes to View, Click No to continue installing. The Select Components window displays. 3. Note: If you click yes to view the Readme box you must click the close box to continue after viewing the Readme.
Installing Roland CutChoice (Macintosh) Please make sure all applications are closed before installing the software. 1. Insert the Roland CutChoice Installation CD into your CD-ROM drive. 2. Double-click the Installer icon. 3. Select the Installer language from the Installer window. 4. Select the language you would like from the Language drop-down box. 5. Click OK.
Accessing the Roland CutChoice Roland CutChoice may only be accessed via a software application. Complete the following steps to access Roland CutChoice after you have opened your software application: Adobe Illustrator 8 and 9 • From the File menu select Cut/Plot. CorelDraw 8 and 9 1. From the Tools menu select Scripts. 2. Select Run Script. 3. Double-click the scripts folder. 4. Select CutChoice. 5. Click Open. CorelDraw 10 1. From the Tools menu select Run Script. 2.
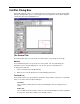
Cut/Plot Dialog Box The Cut/Plot dialog box gives you complete control over how your job is produced. The Cut/Plot dialog box displays when you access the Cut/Plot from your application. The Cut/Plot dialog box contains two tabs: General and Advanced. The General Tab The General tab is where you specify the size and location of your design on the media. Material Use the Material group box to specify the size of the media. The sizes that display are appropriate for the selected output device.
Position The Position group box allows you to specify where on the media the job will cut. You also can specify the number of copies. If you want to manually position the job on the media, simply drag it to a new location in the preview area. Position Tools The Positioning tools located at the bottom of the tab provide another way to position your job on the media. Use this To do this Move the job to a new location on the media. When moving multiple copies, they may be repositioned to fit on the media.
View You can easily zoom in on a particular part of the preview area or move around the view using the View tools located at the bottom of the dialog box. Use this To do this Zoom in on a particular element in your design. With each click of the mouse, you zoom in closer. Holding down Ctrl while clicking zooms out. You also may click and drag to define the area that you want to preview. Zoom to the width of the media. It returns the view to its default. Send Send the job to Roland CutChoice for output.
Advanced Tab The Advanced tab contains more settings related to the processing of your file. Advanced after plot Moves the media forward and reset the origin after the output is completed. Pause between colors Tells the cutter or plotter to pause between colors (allowing you to change the pen or media) if the “Send all colors” option in the Advanced Tab is selected. Copy Spacing Specifies how much space is left on all four sides of each copy that is cut or plotted.
Automatic Registration Marks This setting automatically places registration marks on the media. Send all colors Sends all colors at the same time. Weed border Cuts a border around all objects in the selected color. The size of the weeding border is determined by the size of the design and the Margin entered in the Job Options dialog box. Panel Margin This setting allows the user to set the distance between the panel and the design. Restore Defaults Resets all settings to the system default settings.
Setup Properties The Setup Properties dialog can be accessed from within the Cut/Plot dialog or from Roland CutChoice and defines the settings used to process jobs that do not have properties of their own associated with them. Setup Properties contain settings for a specific output device. The Setup Properties dialog contains following three tabs: General, Cut and Communication on Windows and General, Cut and Ports on Macintosh computers.
USB USB (Universal Serial Bus) ports will automatically appear in the list of ports (usually as USB00x) in the Roland CutChoice on Windows 2000. Media This setting allows the user to customize the media settings. Margin This setting allows the user to set the Left, Right, Top and Bottom margins of their media. OK Applies changes and closes the current window. Cancel Closes the current window without applying the changes. Apply Applies changes without closing the current window.
The Cut Tab Cut properties include all settings related to cutting and plotting. Resolution Specifies the resolution of the output device. Changing this value from the default is not recommended. Passes Specifies the number of times the knife cuts each object in the design. Most media will require one pass; however, additional passes may be required to cut through thicker media. Advance after plot Advances media when cutting is done. Curve Quality Select how smooth you would like the curves to be.
Send Packets Specifies the packet size that is used to send the data to the output device. Reset Returns system to default settings. Cutter Driver Options Launches the Cutter Driver Options dialog. The settings in this dialog differ, depending on the output device. The Communication Tab (Windows only) The Communication tab displays basic communication settings for the parallel port. Changing of these settings are not recommended.
Roland CutChoice You can control every facet of job management from the Roland CutChoice. Roland CutChoice is essentially a queue, listing all the files waiting to be processed. Roland CutChoice is also used to configure output devices, and control the output of files. Menus You may access a number of the Roland CutChoice’s functions using the menus at the to of the main window.
1. Click on the job or jobs you would like to output. 2. From the File Menu select Send. Abort A job can be aborted during processing. To Abort a Print Job 1. Click on the job you would like to abort. 2. From the File Menu select Abort. Exit The Exit command ends the program and closes Roland CutChoice window. To Exit Program From the File menu select Exit. Edit Menu The Edit menu allows the user to select all files, delete a file, and change preferences.
Setup Properties Setup Properties displays the default print settings for your printer. To View Setup Properties From the Setup menu select Setup Properties The Setup Properties dialog opens with the General tab selected (See Setup Properties section). Test Cut The Test Cut command allows you to ensure that your software is properly installed and that the connection to the output device is established. To Test Cut From the Setup Menu select Test Cut. A small test file is sent to the output device.
Index Material, 10 Media, 16 Menus, 19 Model, 15 A Abort, 20 Add Job, 19 Adobe Illustrator 8, 9 Advanced after plot, 13 Advanced Tab, 13 After Out put, 20 Automatic Registration Marks, 14 P Panel Margin, 14 Parallel Ports (LPT ports), 15 Passes, 13 Pause between colors, 13 Ports, 15 Position, 11 Position Tools, 11 Preferences, 20 C Change Setup, 20 Copy Spacing, 13 CorelDraw 10, 9 CorelDraw 8, 9 Cut/Plot Dialog Box, 10 CutChoice Production Manager, 19 Cutter Driver Options, 14 R Resolution, 17 Restore D
Uninstalling Cut/Plot (Windows), 7 Units, 13, 20 View Menu, 21 W V Weed border, 14 View, 12 23
License Agreement Carefully read the following terms and conditions before installing the software. This is a legal agreement between you, the end user (either an individual or an entity), and Roland DG Corporation. Use of this program indicates your acceptance of the terms and conditions stated below.