
User`s manual


7
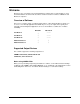
Installing Roland CutChoice (Windows)
Please make sure all applications are closed before installing this software.
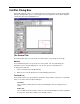
1. Insert the Roland CutChoice Installation CD into your CD-ROM drive. The system displays
the Welcome window.
2. Click Next. The System will ask if you wish to view the Readme file. Click Yes to View, Click
No to continue installing. The Select Components window displays.
3. Note: If you click yes to view the Readme box you must click the close box to continue after
viewing the Readme.
4. Select Typical, and then click Next. The Select Program Folder window displays.
5. Click Next. The select Program Folder displays. The Select Program folder displays.
6. Select the folder you would like Roland CutChoice to display in.
7. Click Next. The Destination Location window displays.
8. Select the destination by clicking on Browse or except the default location.
9. Click Next.
10. Click OK to restart your computer.
Setting Up the Roland CutChoice
Once the computer restarts, CutChoice is automatically launched and you are prompted to select
the output device.
1. Select the model of your output device.
2. Click Next.
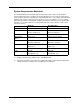
3. Select the port type you would like to use. Please select the following ports depending on
the OS and the output device.
OS SX Cutters CX Cutters
Windows 98/ME
LPT1 LPT2 (*1)
Windows 2000
LPT1 USB00x
*1 – Requires the installation of USB to Parallel driver provided with the CX cutters.
4. Click Finish.
5. Click OK.
Uninstalling Roland CutChoice (Windows)
1. Exit the application that you are using.
2. Click Start>Settings>Control Panel.
3. In the Control Panel, double-click the Add/Remove Programs icon.
4. Remove Roland CutChoice. Click OK when you are finished.
5. Empty your Recycle Bin. You have successfully uninstalled the Roland CutChoice.