FA-101_e.book 1 ページ 2004年4月5日 月曜日 午後3時52分 Owner’s Manual Before using this unit, carefully read the sections entitled: “USING THE UNIT SAFELY” and “IMPORTANT NOTES” (p. 3–p. 5). These sections provide important information concerning the proper operation of the unit. Additionally, in order to feel assured that you have gained a good grasp of every feature provided by your new unit, Owner’s manual should be read in its entirety. The manual should be saved and kept on hand as a convenient reference.
FA-101_e.book 2 ページ 2004年4月5日 月曜日 午後3時52分 For the U.K. IMPORTANT: THE WIRES IN THIS MAINS LEAD ARE COLOURED IN ACCORDANCE WITH THE FOLLOWING CODE. BLUE: NEUTRAL BROWN: LIVE As the colours of the wires in the mains lead of this apparatus may not correspond with the coloured markings identifying the terminals in your plug, proceed as follows: The wire which is coloured BLUE must be connected to the terminal which is marked with the letter N or coloured BLACK.
FA-101_e.book 3 ページ 2004年4月5日 月曜日 午後3時52分 USING THE UNIT SAFELY The symbol alerts the user to important instructions or warnings.The specific meaning of the symbol is determined by the design contained within the triangle. In the case of the symbol at left, it is used for general cautions, warnings, or alerts to danger. Used for instructions intended to alert the user to the risk of death or severe injury should the unit be used improperly.
FA-101_e.
FA-101_e.book 5 ページ 2004年4月5日 月曜日 午後3時52分 IMPORTANT NOTES 291a In addition to the items listed under “USING THE UNIT SAFELY” on page 3, please read and observe the following: Power Supply Maintenance 301 401a • Do not connect this unit to same electrical outlet that is being used by an electrical appliance that is controlled by an inverter (such as a refrigerator, washing machine, microwave oven, or air conditioner), or that contains a motor.
FA-101_e.book 6 ページ 2004年4月5日 月曜日 午後3時52分 Handling CD-ROMs 801 • Avoid touching or scratching the shiny underside (encoded surface) of the disc. Damaged or dirty CD-ROM discs may not be read properly. Keep your discs clean using a commercially available CD cleaner.
FA-101_e.book 7 ページ 2004年4月5日 月曜日 午後3時52分 Contents Contents of the package ......................................................... 8 Front and rear panel ................................................................ 9 Front panel ............................................................................................................................ 9 Rear panel............................................................................................................................
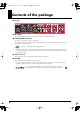
FA-101_e.book 8 ページ 2004年4月5日 月曜日 午後3時52分 Contents of the package ■ FA-101 fig.FA-101 ■ AC adaptor This is the dedicated AC adaptor for the FA-101. Use only the supplied AC adaptor. ■ FireWire (IEEE 1394) cables (one 6-pin ↔ 6-pin cable, one 6-pin ↔ 4-pin cable) Use one of these cables to connect the FA-101 to the IEEE 1394 connector (FireWire connector, iLink connector, DV connector) of your computer. The 6-pin ↔ 4-pin cable cannot supply bus power. * Use only the FireWire (IEEE 1394) cables.
FA-101_e.book 9 ページ 2004年4月5日 月曜日 午後3時52分 Front and rear panel Front panel fig.front 1 5 3 4 2 7 8 6 9 10 11 13 15 14 16 12 fig.jack-type 1. Combo input jacks These are analog audio input jacks with mic preamps. They accommodate either XLR or phone plugs, allowing you to connect a variety of equipment. Either balanced or unbalanced signals may be connected. Phantom power (48 V) is provided for XLR type connections, allowing you to connect condenser mics that require phantom power.
FA-101_e.book 10 ページ 2004年4月5日 月曜日 午後3時52分 Front and rear panel fig.front 5 3 4 1 7 2 8 6 9 10 11 13 15 12 14 16 4. Input/output level indicators These LEDs light according to the level of the signals that are being input via the combo input jacks (1) and WAVE OUT 1/2 (in the case of WDM, OUTPUT 1 ➔ see p. 22). (see block diagram ➔ front cover) To adjust the input level, stop playback of the sound from your computer.
FA-101_e.book 11 ページ 2004年4月5日 月曜日 午後3時52分 Front and rear panel 9. Sample rate select switch This specifies the sampling frequency at which audio data will be recorded and played back. In order to get this setting to take effect, you must exit all of your software, then cycle the power to the FA-101 (switch it off, then back on again). * If you are using Macintosh and want to change the sampling frequency, you must first power down the FA-101.
FA-101_e.book 12 ページ 2004年4月5日 月曜日 午後3時52分 Front and rear panel Rear panel fig.rear 17 18 19 20 21 24 25 22 23 17. Power switch Used to switch the power on (DC IN) or off (OFF), and for switching to bus power (BUS). fig.power-sw BUS Bus power can be used if the FA-101 is connected to your computer via a FireWire (IEEE 1394) cable. In this case, power is supplied from your computer via the FireWire (IEEE 1394) cable. If you want to use bus power, set the power switch to the BUS position. fig.
FA-101_e.book 13 ページ 2004年4月5日 月曜日 午後3時52分 Front and rear panel 20. Grounding terminal Depending on the circumstances of a particular setup, you may experience a discomforting sensation, or perceive that the surface feels gritty to the touch when you touch this device, microphones connected to it, or the metal portions of other objects, such as guitars. This is due to an infinitesimal electrical charge, which is absolutely harmless.
FA-101_e.book 14 ページ 2004年4月5日 月曜日 午後3時52分 Installing the driver (Macintosh) 1 2 With the FA-101 disconnected, start up your Macintosh. Use a FireWire (IEEE 1394) cable to connect the FA-101 to your Macintosh. 1. With the FA-101’s power switch off, connect the power cord to it. 2. Plug the AC adaptor cable into an AC outlet. 3. Use a FireWire (IEEE 1394) cable to connect the FA-101 to your Macintosh. 3 Turn on the FA-101’s power switch. The driver will be installed automatically.
FA-101_e.book 15 ページ 2004年4月5日 月曜日 午後3時52分 Installing the driver (Macintosh) * Depending on the model of Macintosh you are using, starting up the Macintosh when the FA-101 is connected may cause operation to become unstable. In this case, start up the Macintosh and then connect the FA-101. * If you want to change the FA-101’s sample rate, turn the FA-101 off, change the sample rate, and then turn the FA-101 on again.
FA-101_e.book 16 ページ 2004年4月5日 月曜日 午後3時52分 Installing the driver (Macintosh) Checking that you hear sound Now, let’s play back the sample data to verify that the connections and settings are correct. We will use iTunes to play back the sample data provided on the included CDROM. Before you continue, connect headphones or monitor speakers to the FA-101 as described in “Basic connections” (p. 25). 1 2 Set the FA-101’s sample rate select switch to 48 kHz.
FA-101_e.book 17 ページ 2004年4月5日 月曜日 午後3時52分 Installing the driver (Windows) What is a driver? A driver is software that allows data to be transferred between the FA-101 and application software running on your computer when the FA-101 is connected to your computer via a FireWire (IEEE 1394) cable. The driver sends data from your application software to the FA-101, and from the FA101 to your application software. The driver is required in order for you to use the FA101 while connected to your computer.
FA-101_e.book 18 ページ 2004年4月5日 月曜日 午後3時52分 Installing the driver (Windows) 8 From the Windows start menu, choose “Run...” The “Run” dialog box will appear. 9 Input the name into the dialog box as shown, and click [OK]. fig.win-run Checking the name of your drive. From the start menu, choose My Computer. In the window that appears, verify the name of the CDROM drive into which you inserted the CD-ROM in step 7. The (D:) or (E:) displayed by the CD-ROM drive icon is the drive name.
FA-101_e.book 19 ページ 2004年4月5日 月曜日 午後3時52分 Installing the driver (Windows) 14 A dialog box entitled “Completing the Found New Hardware Wizard” appears. Click [Finish]. Once again, the “Found New Hardware” message appears near the taskbar. Please wait. 15 16 A dialog box entitled Welcome to the Found New Hardware Wizard appears. Make sure that the box indicates “EDIROL FA-101 Sub 2,” choose “Install the software automatically (Recommended),” and click [Next].
FA-101_e.book 20 ページ 2004年4月5日 月曜日 午後3時52分 Installing the driver (Windows) If you changed the “Driver Signing Options” setting (p. 17, step 4), restore the setting to its previous state after restarting Windows. 1. Log on to Windows using the same user account as the one used when the driver was installed. 2. From the Windows start menu, choose Control Panel. 3. In “Pick a category,” click Performance and Maintenance. 4. In “or Pick a Control Panel icon,” click the System icon.
FA-101_e.book 21 ページ 2004年4月5日 月曜日 午後3時52分 Installing the driver (Windows) Giving priority to background services Crackling may occur in the sound if you omit making this setting. To ensure that audio and MIDI are processed smoothly, make the setting as follows. 1 Open the System Properties dialog box. 1. From the Windows start menu, choose Control Panel. 2. In “Pick a category,” click “Performance and Maintenance”. 3. In “or Pick a Control Panel icon,” click the System icon.
FA-101_e.book 22 ページ 2004年4月5日 月曜日 午後3時52分 Installing the driver (Windows) Driver settings About the input and output devices In order to get the best performance from the software you are using, you must choose the correct device settings. The FA-101’s audio driver supports WDM and ASIO 2.0.
FA-101_e.book 23 ページ 2004年4月5日 月曜日 午後3時52分 Installing the driver (Windows) Input/output device settings If you will be using the Windows Media Player application with the FA-101, specify the input/output devices as follows. The method in which you make device settings will depend on the software you are using. For details, refer to the owner’s manual for your software. 1 Open the Sound, Speech, and Audio Devices Properties dialog box.
FA-101_e.book 24 ページ 2004年4月5日 月曜日 午後3時52分 Installing the driver (Windows) Checking that you hear sound Now, let’s play back the sample data to verify that the connections and settings are correct. We will use standard Windows functionality to play back the sample data provided on the included CD-ROM. Before you continue, connect headphones or monitor speakers to the FA-101 as described in “Basic connections” (p. 25). 1 2 3 Insert the CD-ROM into the CD-ROM drive of your computer.
FA-101_e.book 25 ページ 2004年4月5日 月曜日 午後3時52分 Basic connections and settings This section explains basic connections and data flow for the FA-101. Refer to the block diagram printed on the front cover of the manual as you read this section. * Before making connections to other equipment, turn down the volume of all your equipment and turn off the power to avoid causing malfunctions or damaging your speakers.
FA-101_e.book 26 ページ 2004年4月5日 月曜日 午後3時52分 Basic connections and settings Recording a mic or guitar Here’s how to make connections and settings to let you sing or play your guitar while listening to audio data on your computer, and record just the vocal or guitar into your sequencer. fig.
FA-101_e.book 27 ページ 2004年4月5日 月曜日 午後3時52分 Basic connections and settings Input sensitivity knob Use the input sensitivity knob to adjust the input level. For the best audio quality, raise the level until it is as high as you can get it without causing the input level indicator to light in red. Other notes Don’t connect anything to jacks you are not using. Howling could be produced depending on the location of microphones relative to speakers. This can be remedied by: 1.
FA-101_e.book 28 ページ 2004年4月5日 月曜日 午後3時52分 Basic connections and settings Recording a digital signal fig.digital CD/MD/DAT player, hard disk recorder, etc. ON Specify the sample rate Set this to match the sample rate of your digital playback device Connections Connect your digital device to the digital input connector. Sample rate select switch Set this to match the sample rate of your digital playback device and the sample rate of your recording software.
FA-101_e.book 29 ページ 2004年4月5日 月曜日 午後3時52分 Basic connections and settings Connecting various types of equipment fig.send-return Amplified speakers Mixer, effects processor, etc. Guitar/bass Adjust the level of the input from a synthesizer or other device connected to the INPUT 7/8 jacks. Mic Effects processor, mixer, etc. FireWire cable IEEE1394 connector (FireWire connector, iLink connector, DV connector) Computer Synthesizer, etc.
FA-101_e.book 30 ページ 2004年4月5日 月曜日 午後3時52分 Software settings You will need to make audio and MIDI device settings for the software you’re using. Here are some examples for typical software applications. SONAR 3 In this example we are using SONAR 3 Producer Edition. You must make the following settings if you have switched the FA-101's sample rate or have changed the buffer size in the FA-101 Driver settings dialog box. 1. Power up the FA-101, and then start up SONAR. 2.
FA-101_e.book 31 ページ 2004年4月5日 月曜日 午後3時52分 Software settings fig.sonar-2.eps 8. Click the Drivers tab. In the lists of Input Drivers and Output Drivers, click the following devices to highlight them (white characters on blue background), and un-highlight all other devices. Click [OK].
FA-101_e.book 32 ページ 2004年4月5日 月曜日 午後3時52分 Software settings Digital Performer In this example we are using Digital Performer 4.12. fig.digiperf.eps 1. Power up the FA-101, and then start up Digital Performer. 2. From Digital Performer’s Setup menu, choose Audio System, and verify that MOTU Audio System is checked. 3. From the Setup menu, choose Configure Audio System Configure Hardware Driver. The Configure Hardware Driver dialog box will appear. 4.
FA-101_e.book 33 ページ 2004年4月5日 月曜日 午後3時52分 Software settings Cubase SX/SL In this example we are using the Macintosh version of Cubase SX/SL. 1. Power up the FA-101, and then start up Cubase. 2. From the Devices menu, choose Device Setup to open the Device Setup dialog box. 3. In the Devices list at the left side of the dialog box, choose VST Multitrack. 4. Select the Setup tab in the right side of the dialog box. 5. From the drop-down list for ASIO Driver, choose EDIROL FA-101. 6.
FA-101_e.book 34 ページ 2004年4月5日 月曜日 午後3時52分 Software settings Logic Here is an example using Logic Platinum 6. 1. Power up the FA-101, and then start up Logic. 2. From the Logic Platinum menu, choose Preferences - Audio Hardware & Driver to open the Preferences dialog box. 3. In the Core Audio section, set Driver to EDIROL FA-101. 4. Select (add a check mark to) the checkbox located at the left of Core Audio. 5. If a dialog box like the following appears, click [Try (Re)Launch]. fig.logic.eps 6.
FA-101_e.book 35 ページ 2004年4月5日 月曜日 午後3時52分 Software settings FA-101 Driver Settings dialog box (Windows) There is no FA-101 Driver Settings dialog box on Macintosh. Make settings from within your software. You can adjust the audio latency by changing the FA-101 driver settings. Decreasing the buffer size will shorten the latency. Increasing the buffer size may eliminate problems such as clicks or pops in the sound.
FA-101_e.
FA-101_e.book 37 ページ 2004年4月5日 月曜日 午後3時52分 Troubleshooting If you experience problems, read this chapter first/ It contains tips for solving most problems. Driver-related problems (Windows) Can’t install the driver correctly You attempted to install as described in “Installing the driver,” but did not succeed. Install the FA-101 driver once again as described in “Installing the driver (Windows)” (p. 17).
FA-101_e.book 38 ページ 2004年4月5日 月曜日 午後3時52分 Troubleshooting Does your computer or FireWire (IEEE 1394) repeater hub have a sufficient power supply? If you are using bus power, the FA-101 cannot be connected if insufficient power is being supplied to it. Check whether the following cases might apply. • If you are using a notebook computer running on its battery, operation may be unstable with some computers. If this is the case, connect your computer to its AC adaptor.
FA-101_e.book 39 ページ 2004年4月5日 月曜日 午後3時52分 Troubleshooting No sound Can’t record or play back audio or MIDI No sound Are the volume controls of the FA-101 set appropriately? Adjust the headphone volume knob and direct monitor volume of the FA-101’s front panel. Is your audio playback system (e.g., stereo) connected correctly? Make sure that the FA-101’s output jacks are correctly connected using audio cables to the input jacks of your audio playback system.
FA-101_e.book 40 ページ 2004年4月5日 月曜日 午後3時52分 Troubleshooting A device connected to the input jacks can’t be heard through headphones Are the input sensitivity knobs and direct monitor volume knob set appropriately? Turn the knobs toward the right to adjust the volume. Is the headphone volume knob raised appropriately? Turn the knob toward the right to adjust the volume.
FA-101_e.book 41 ページ 2004年4月5日 月曜日 午後3時52分 Troubleshooting Noise or pops are heard when recording/playing on your computer Noise is heard during audio playback Pops/clicks occur during audio playback Noise is heard in the recorded sound In Windows, did you make the setting described in “Giving priority to background services”? In order to ensure that audio/MIDI processing occurs smoothly, make the setting described in “Giving priority to background services.
FA-101_e.book 42 ページ 2004年4月5日 月曜日 午後3時52分 Troubleshooting Could two or more computers be connected to the FA-101 or to your mixer or audio devices? Try connecting the FA-101 to only one computer. Check whether the noise disappears when the FA-101 is connected to only one computer. Connecting numerous audio devices to a computer may produce noise in some situations. If this occurs, connect only the FA-101 to your computer.
FA-101_e.book 43 ページ 2004年4月5日 月曜日 午後3時52分 Troubleshooting Is the FA-101 connected to a FireWire (IEEE 1394) hub? Try connecting the FA-101 directly to the FireWire (IEEE 1394) connector of your computer itself. Noise may be entering via the line inputs or mic inputs.
FA-101_e.book 44 ページ 2004年4月5日 月曜日 午後3時52分 Troubleshooting Noise or distortion occurs when the FA-101 is not connected to your computer The sound is too weak Has a mic or guitar been left connected? If a mic or guitar is connected to the FA-101, disconnect the mic or guitar and turn the input sensitivity knob all the way toward the left (lowering the input level).
FA-101_e.book 45 ページ 2004年4月5日 月曜日 午後3時52分 Troubleshooting Others Can’t start the Cubase The first time you use the FA-101 with Cubase, turn on the power with the FA-101's sample rate select switch at the 44.1 kHz position. If this switch is not set to 44.1 kHz, it may be impossible to start Cubase.
FA-101_e.book 46 ページ 2004年4月5日 月曜日 午後3時52分 Main Specifications ● Number of Audio Record/ Playback Channels <44.1/48/88.2/96 kHz> (Full duplex) Record: 10 channels Playback: 10 channels Some computers may not have sufficient performance. ● Signal Processing PC interface: AD/DA Conversion: 44.1/48/88.2/96 kHz 44.1/48/88.2/96 kHz 44.1/48/88.2/96/192 kHz ● Frequency Response 96.0 kHz : 88.2 kHz : 48.0 kHz : 44.
FA-101_e.book 47 ページ 2004年4月5日 月曜日 午後3時52分 Index Numerics I ....................................................................... 12 ....................................................................... 12 4-pin 6-pin A ....................................................... 12 .......................................................... 22, 35–36 Audio devices .......................................................... 22 Audio MIDI Setup ....................................................
Information EUROPE EDIROL (Europe) Ltd. Studio 3.4 114 Power Road London W4 5PY U. K. TEL: +44 (0)20 8747 5949 FAX:+44 (0)20 8747 5948 http://www.edirol.com/europe Deutschland TEL: 0700 33 47 65 20 France TEL: 0810 000 371 Italia TEL: 02 93778329 When you need repair service, call your nearest EDIROL/Roland Service Center or authorized EDIROL/Roland distributor in your country as shown below. HONG KONG BARBADOS PERU IRELAND CYPRUS Parsons Music Ltd. 8th Floor, Railway Plaza, 39 Chatham Road South, T.