Owner’s Manual Look What You Can Do with the FP-90X/FP-60X Play the Piano ˙ Play various sounds page 8 This unit contains a wide variety of tones (sounds). You can freely select and perform using these tones. ˙ Play two layered tones (Dual Play) page 9 You can layer two tones on a single key. ˙ Play different tones with your left and right hands (Split Play) page 9 You can divide the keyboard into left and right zones, and select a different tone for each zone.
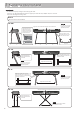
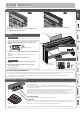
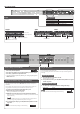
° Placing This Unit on a Stand For the FP-90X Be careful not to pinch your fingers when setting up the stand. Please use one of the following Roland stands to support your FP-90X: KSC-90, KS-G8B, KS-10Z, KS-12 or KS-20X. Refer to the following when using a stand. KSC-90 Refer to the KSC-90 Owner’s Manual. KS-G8B NOTE For safety, do not use the stand in its very highest adjustment position. Align the center of the Piano with the center of the stand.
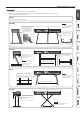
Placing This Unit on a Stand For the FP-60X Be careful not to pinch your fingers when setting up the stand. Please use one of the following Roland stands to support your FP-60X: KSC-72, KS-G8B, KS-10Z, KS-12 or KS-20X. Refer to the following when using a stand. KSC-72 Refer to the KSC-72 Owner’s Manual.
° Contents Placing This Unit on a Stand . . . . . . . . . . . . . . . . . . . . . . . . . . . . . . . 2 Main Specifications. . . . . . . . . . . . . . . . . . . . . . . . . . . . . . . . . . . . . . . . 4 Panel Descriptions. . . . . . . . . . . . . . . . . . . . . . . . . . . . . . . . . . . . . . . . . Rear Panel. . . . . . . . . . . . . . . . . . . . . . . . . . . . . . . . . . . . . . . . . . . . . . . Basic Operations . . . . . . . . . . . . . . . . . . . . . . . . . . . . . . . . . . . . . . . .
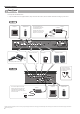
° Panel Descriptions Attaching the Music Rest FP-90X FP-60X 2 1 3 1 1 2 1 3 1. Loosen the attachment screws. 2. Fit the cut-outs of the music rest onto the attachment screws. 3. Firmly tighten the attachment screws. 1. Insert the music rest into the slit on the top of the piano. [L] button Turning On the Power * Before turning the unit on/off, always be sure to turn the volume down. Even with the volume turned down, you might hear some sound when switching the unit on/off.
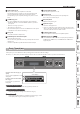
Panel Descriptions ˙ Rear Panel Connect pedals and USB flash drive. * To prevent malfunction and equipment failure, always turn down the volume, and turn off all the units before making any connections. Computer Place the AC adaptor so the side with the indicator (see illustration) faces upwards.The indicator will light when you plug the AC adaptor into an AC outlet.
Panel Descriptions 1 USB Computer port 5 Speaker [Off/On] switch Here you can connect your computer via a USB cable (sold separately). If your computer is connected, performance data can be transferred between the piano and sequencer software (sold separately) on your computer, allowing you to produce or edit music. 2 USB Memory port You can use USB flash drives (sold separately) to do the following. 55 Play WAV files, MP3 files, and standard MIDI files (SMF files) copied from your computer.
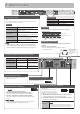
° Operation Guide Selecting a Tone (Single) Basic operations In addition to piano sounds, the unit lets you enjoy performing with many other sounds. These sounds are called “Tones.” The Tones are divided into five groups, each of which is assigned to a different Tone button. Tone groups [Piano] button [E. Piano] button [Organ] button [Strings/Pad] button [Synth/Other] button Allows you to select various historical instruments, including grand pianos, or harpsichords.
Operation Guide Playing Different Tones with the Right and Left Hands (Split) You can play different tones in the areas at the left and right of a specified key. For example, you can use your left hand to play a bass tone and use your right hand to play a piano tone. This feature is called “Split Play,” and the point at which the keyboard is divided is called the “split point.” Turning Split Play on Press the [Split/Dual] button several times to access the Split screen.
Operation Guide Display Basic operations The display shows information such as the tone name, song name, tempo, and time signature. Single Select a setting item Press the [K] [J] buttons. Edit a value Restore the default value Cancel an operation Press the [-] [+] buttons. Press the [–] [+] buttons simultaneously. Press the [Exit] button.
Operation Guide Selecting a Song Category list Access the song screen, and select a song. 1. Press the [Song] button to access the song screen. Category Tempo Category Explanation Preset Songs Songs built into the piano USB Memory Songs saved on a USB flash drive Internal Memory Songs saved in internal memory NOTE Song name Time signature Measure * When the SMF Play Mode (p. 27) is set to “Auto-Select” or “Internal,” there are some parts whose volume is not affected by the [Song Vol.
° Connecting the Piano and a Mobile Device via Bluetooth Here’s What You Can Do By using the Bluetooth function, you can wirelessly connect the piano with a mobile device such as your smartphone or tablet, allowing you to do the following things. Music played back by the mobile device can be heard through the piano’s speakers. You can play back music data that’s saved on your iPhone or other mobile device, and wirelessly listen to it through the piano’s speakers.
Connecting the Piano and a Mobile Device via Bluetooth Listening to Music Through the Piano’s Speakers Here’s how to make settings so that music data saved on your mobile device can be wirelessly played back through the piano’s speakers. * If your mobile device is already paired with the piano, there is no need to perform pairing again. Refer to “Connecting an Already-Paired Mobile Device” (p. 13). 7. Press the [Exit] button several times to exit Function mode. This completes initial settings.
Connecting the Piano and a Mobile Device via Bluetooth Using the Piano with an App Here’s how to make settings so that you can use the piano with an app that’s installed on your mobile device. Apps You Can Use with This Piano App name Supported OS Bluetooth Explanation This app lets you download electronic scores, practice songs as if you were playing a game, or keep a record of your practicing. iOS Android Piano Every Day iOS Android This app lets you customize the piano sound to your taste.
Connecting the Piano and a Mobile Device via Bluetooth If Pairing Does Not Succeed in “Using the Piano with an App” If pairing is not successful in “Using the Piano with an App” (p. 14), try steps 1–4 below. 1 M ake sure that the piano’s Bluetooth function is “On.” 3 1. Press the piano’s [Function] button. 2. Use the [K] [J] buttons to select “Bluetooth.” 3. Press the [Function] (Enter) button. I f already paired, cancel pairing, and turn off the Bluetooth function. Clearing the pairing 1.
° Advanced Operation ˙ Playing Various Tones Selecting Your Preferred Performance Environment (My Stage) “My Stage” is a function that lets you select your preferred piano and performance environment while at home. This function reproduces the sound and resonance that you would experience when playing in locations such as a concert hall, church, or rehearsal studio on a grand piano that’s ideally matched for that location.
Advanced Operation Changing the Settings for Metronome Detecting the Tempo of Your Own Performance (Tempo Coach) Change the following settings while the [Metronome] button is on. By using the tempo coach function, you can ascertain the tempo of the current keyboard performance. 1. Use the [K] [J] buttons to access the parameter that you want to edit. 2. Use the [–][+] buttons to specify the value. Tempo Coach Uses the Tempo Coach function (p. 17).
Advanced Operation ˙ Recording Your Performance It’s easy to record your own performances. You can play back a recorded performance to check your playing, or play along with a recorded performance. Audio recording 55 You can change the name of the song (p. 19). 55 You can delete the song (p. 20). NOTE Type of recording SMF recording MEMO Never turn off the power while “Saving...” is shown in the display. 55 The performance is recorded as MIDI data.
Advanced Operation Starting your recording and saving it Renaming a Song (Rename Song) 1 2 Here’s how to rename a previously-saved song. 1. Press the [Function] button, and then use the [K] [J] buttons to select “Rename Song.” 2. Press the [Function] (Enter) button. The Rename Song screen appears. 1. Press the [s] button. Recording starts. When recording starts, the [t] button and [s] button light. 2. Press the [s] button. Recording stops, and your performance is automatically saved. 3.
Advanced Operation Copying a Saved Song (Copy Song) Deleting a Saved Song (Delete Song) Songs that have been saved in internal memory can be copied to USB flash drive. Alternatively, songs stored on a USB flash drive can be copied to internal memory. Here’s how to delete a song that you saved on an internal memory or USB flash drive. * Audio files cannot be copied. * If a USB flash drive is not connected, you won’t be able to perform this operation. 1.
Advanced Operation ˙ Personalizing Your Piano Sound (Piano Designer) Parameter What is Piano Designer? This unit allows you to personalize your piano sound by adjusting various factors that affect the sound, such as the piano’s strings, the resonance produced using the pedals, and the sound of the hammers striking the strings. This function is called “Piano Designer.
Advanced Operation ˙ Using the Microphone You can connect a dynamic microphone (sold separately) to the Mic Input jack and sing while playing. Applying an Effect to the Mic (Mic Effects) Here’s how to apply an effect to the sound of the mic. Connecting a Microphone FP-90X 1. Press the [Mic] button. Here’s how to connect a microphone to the Mic Input jack. 1 FP-90X 4 4 FP-60X 1 The Mic Effects screen appears. 2. Use the [K] [J] buttons to select the effect that you want to apply. 3 2 3.
Advanced Operation ˙ Saving Performance Settings (Registrations) What Is a Registration? Saving Current Settings into a Registration Tone settings and performance settings such as Dual Play or Split Play can be saved as a “registration” and recalled whenever you like. Here’s how to save the performance settings to a registration. This unit has five registration buttons ([1]–[5]), and you can save nine different registrations under each button. This means that you can save as many as 45 registrations.
Advanced Operation Saving a Registration Set (Registration Set Export) Here’s how the registration set that’s saved in this unit can be saved to a USB flash drive. * If you’re saving to a USB flash drive, connect your USB flash drive to the USB Memory port before proceeding. 1. Press the [Function] button. 2. Use the [K] [J] buttons to select “Reg. Set Export.” 3. Press the [Function] (Enter) button. The Reg. Set Export screen appears. 4. Renaming the registration set.
Advanced Operation ˙ Convenient Functions Initializing the Memory (Format Media) You can completely erase all data that were saved in internal memory or on a USB flash drive. NOTE 55 All data saved in internal memory or on the USB flash drive will be erased when you initialize the media. 55 If you want settings other than the internal memory and USB flash drive songs to be returned to their factory-set state, execute a Factory Reset (p. 25). 1.
Advanced Operation ˙ Various Settings (Function Mode) 1. Press the [Function] button. The [Function] button lights, and the unit is in Function mode. 2. Press the [K] [J] buttons to select the setting you want to 3. Press the [–] [+] buttons to adjust the value. 4. Press the [Exit] button to finish. change. * Depending on the item you select, an additional screen may be displayed.
Advanced Operation Indication [K] [J] buttons Parameter [-] [+] buttons Explanation Song Vol. This setting adjusts the volume of your keyboard performance while a song plays back. This adjusts the volume of the song (SMF data / audio data) that is played back. Adjusting the Song Volume (Song Volume)  FP-60X * On the FP-90X, the [Song Vol.] slider simultaneously adjusts the volume of the SMF and the audio. * If the SMF playback mode (p.
Advanced Operation Indication [K] [J] buttons Parameter [-] [+] buttons Explanation Center Pedal Part When you press the pedal connected to the Pedal Sostenuto jack during Dual Play or Split Play, the pedal effect is normally applied to both tones, but you can also select the tone to which the effect is to be applied. Refer to “Changing How the Pedal Effects Are Applied (Damper Pedal Part)” (p. 27).
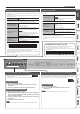
° Troubleshooting Problem Even though you’re using headphones and the sound is muted, a thumping sound is heard when you play the keyboard Items to Check Could you be hearing the sound of the hammers inside the keyboard, or vibrations in the floor or walls? Action Page Playing the keyboard causes internal hammers to operate, and the vibrations may be transmitted to the floor or walls.
° Error Messages Indication Error 2 Error 10 Error 11 Error 14 Error 15 Error 18 Error 30 Error 40 Error 41 Error 43 Error 51 Error 65 ° Meaning An error occurred during writing. The external media may be corrupted. Insert other external media and try again. Alternatively, you can initialize the external media (p. 25). The internal memory might be damaged. Format the internal memory (p. 25). No external media is inserted. Insert the external media and try again. The internal memory might be damaged.
° Tone List Piano FP-90X # 1 2 3 4 5 6 7 8 9 10 11 12 13 14 15 16 17 18 19 20 Tone Name Concert Piano * Stage Grand * Concert Ballad * Concert Mellow * Concert Bright * Concert Brilliance * Stage Mellow * Stage Bright * Upright Piano Mellow Upright Bright Upright Rock Piano Ragtime Piano Bright Forte SA Piano JD Piano 70’s E.Grand Magical Piano Harpsichord Harpsi 8’+4’ Piano # 1 2 3 4 5 6 7 8 9 10 11 12 13 14 15 16 FP-60X E.
° USING THE UNIT SAFELY WARNING WARNING Concerning the Auto Off function Use only the supplied AC adaptor and the correct voltage Use only the stand that is recommended Use only the supplied power cord The power to this unit will be turned off automatically after a predetermined amount of time has passed since it was last used for playing music, or its buttons or controls were operated (Auto Off function).
Internal Song Music Book 内蔵曲楽譜集 1 : Elevations 2 : Reflection
Elevations Allegro (oca.140) Original œ œ œ œ œ œ œ œ œ 3 œ œ œ & 4 œ œ œ œ œ œ œ œ œ œ œ œ F playful .. œ œ œ œú . œ œ ú Œ œ ? 34 Œ úú . œ œ ú. œ ú. ° ° C j C6 G 7/C Dm œ G9 œ œ œ œ œ œ œ œ œ œ œ œ œ œ œ œ œ œ œ œ & œ œ œ œ œ rit. œ œ œ œ œ œ œ œ œ œ œ œ œ ? ° ° ° Am C œ œ œ œ œ œ a tempo & . œ ? ° C œœ .. C/G œ œ œ œ œ œ F/A úú .. ° G F C/G G œ œ œ œ œ œ œ œ œ œ œ œ œœœ ... œœœ ... úú .. ú. ° ° ° C/G F6 C a tempo j & œ œ œ œ œ œ œ œ œ œ œ œ œ œ P poco rit. j ? Œ œ œ ‰ œ œ ú.
j j j j & œ œ œ œ œ œ œ œ œ œ œ œ œ œ œ œ Jœ œ œ œJ œ œ œ . ú. úú .. úú .. úú .. úú .. ? ú C C maj7 Am j j j j & œ œ œ œ œ œ œ . úú .. ? úú . C/B j ú & œ œ œ œ Am œ œ œ ? œ œ œ F maj7 & ú. Ó œ F expressivo ? Œ œ œ œ ú. j C C maj7 ú. ú œ œ ú. œ œ œ œ œ œ œ œ œœ œœ œœ œ J J J J j œ œ j œ œ œœ œœ œœ œœ œœ œœ œœ J J j œú .. úú .. ú. C/B ú. ú œœ œœ œœ œœ œœ úú J J C/G G j œ œ ú. œ Œ œ œ œœ œ œ ? úú .. ú. Œ ú ú. j F maj7 úÓ . œ ‰ œ œ œj ‰ œ œ ‰ Œ œ œ œ ú. ú œ œ ú.
úú ú & C/E ? œ j œ œœ œ F6 A m7 œ œ œ œ œ œ œ œ b úú .. & ú. f rit. j ? ‰ œ œ bœ bœ œ bú . A maj7 úú & ? œ. ú. œ b œœ œ œ F m6 œ b œœ œ œ œ & œJ œ œ Jœ œ œ œ ? ú. j j œ œ ú. j C playful ú œ ú œ F Œ œ œ ú. ú. œ œ œ œ úú . ú . œ œ ú ú G œ œ œ œ œ ú. œ Œ œ œ ú. j G ú œ ú. œ œ œ œ œ ú ‰ J rit. ú œ Œ œ œ ú .. ú. ú Œ œ j œ. œ. œœ œ œ œ œ œœ J J Am C maj7 úúú ... œ œ jœ œ œ œ ‰ œ ú. œ j a tempo œ œ œ œ œ œ œ œ œ œ œj œ œ Œ œ ú. œ ‰ œj ú.
b úú F m6 & ú ... ú ú b ? ú. b œœ œœ j œ œ b úúúú .... poco rit. C/G œ expressivo Œ ú ú. F maj7 œ œ úú œ Œ ú œ ú. j b Più mosso j œ œ œ ? Œ ‰ bœ . bú . j j œ œ úú .. ú. & œj œ œ œj œ úú .. ? Œ bœ bú ú. . bú ú. j & ú ? œ œ œ œ j C/G ú ú œ œ œ œ œ œ ú Œ ú. ú œ G œ œ úú j j œ œ œ œ œ Œ ‰ œ. bú . j œ œ ú . ú .. ú j œ úú .. ú. Œ ú œ ú. B b6 A bmaj7 C ú .. ú G sus4 j úú ú. úú .. A maj7 & úú ú j G & ú úú ? ú. ú. ú.
Reflection Original Moderate (oca.112) œœ œœ j j j j . . œ . j œ j . œ œ œ . œ œ œ . œ œ & c œ œ œ œ œ œ F ú œ œ ú. ú œ œ ú. ? c Œ Œ C j & œ. Am ? Œ ú jœ. œ j j œ j œ. œ œ ú. jœ. œ C & œ. ? Ó ú. Œ œ œ œ j F & œ ? œ j œ œ œ œ œ jœ œ œ œ œ. œ F jœ. œ D m7 F maj7 F6 Œ ú j œ j œ. œ œ j ú. jœ œ œ œ œ jœ œ œ œ œ. j œ. jœ œ œ œ jœ. œ œ œ œ œ ú. Ó ú. Œ œ œ ú. œ œ j œ.
& œ. C jœ. œ ? œœú j œ œ œ œ œ. jœ. j œ. j œ œ œ œ œ œ œ œ œ ú. ú œ œ ú. Œ j œ. œ œ j j Am & œ œ œ œ œ œ œ œ ? & ? œ œ œ j œ. œ j j C œ. œ œ ú œ ? C œ. œ œ ú j œ. œ j & ? œ ú. œ F m7 b5 F j œ. œ a tempo œ œ œ œ œ Œ nú j œ. #œ œ j E b6 j œœ œ œ. œ œ œ ú. œ. œ ú poco rit. j jœ. j œ. œ œ j & # G/B bœ bœ j ú b E6 jœ œ œ œ œ. œ bœ bœ j ú ww jœ. œ j bœ . j œ œ œ œ œ œ œ œ ú. jœ. œ j bœ . j œ œ œ œ œ œ poco rit. œ œ ú.
© 2020 Roland Corporation