
User's Manual
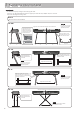
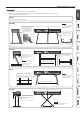
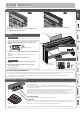
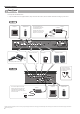
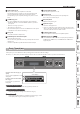
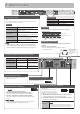
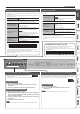
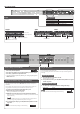
Table Of Contents
- Contents
- Placing This Unit on a Stand
- Main Specifications
- Panel Descriptions
- Operation Guide
- Connecting the Piano and a Mobile Device via Bluetooth
- Advanced Operation
- Playing Various Tones
- Selecting Your Preferred Performance Environment (My Stage)
- Practicing with the Metronome
- Dividing the Keyboard for Two People (Twin Piano)
- Recording Your Performance
- SMF Recording
- Recording Audio
- Convenient Functions for Song Playback
- Renaming a Song (Rename Song)
- Copying a Saved Song (Copy Song)
- Deleting a Saved Song (Delete Song)
- Personalizing Your Piano Sound (Piano Designer)
- Using the Microphone
- Connecting a Microphone
- Applying an Effect to the Mic (Mic Effects)
- Saving Performance Settings (Registrations)
- What Is a Registration?
- Recalling a Registration
- Saving Current Settings into a Registration
- Convenient Functions
- Initializing the Memory (Format Media)
- Returning to the Factory Settings (Factory Reset)
- Retaining Settings After Power-Off (Memory Backup)
- Using USB
- Various Settings (Function Mode)
- Adjusting the Keyboard Response (Key Touch)
- Matching the Pitch with Other Instruments (Master Tuning)
- Changing the Tuning Method (Temperament)
- Specifying a Song’s Tonic (Temperament Key)
- Editing the Equalizer Settings
- Transposing the Pitch of the Song Playback (Song Transpose)
- Adjusting the Song Volume (Song Volume)
- Adjusting the Volume of an Audio Playback Device (Input/Bluetooth Vol.)
- Adjusting the Volume from the Computer (USB Audio Input Volume)
- Setting the Song (SMF) Playback Mode (SMF Play Mode)
- Selecting the Format for Recording (Recording Mode)
- Changing How the Pedal Effects Are Applied (Damper Pedal Part)
- Changing the Function of the Center Pedal (Center Pedal)
- Changing How the Pedal Effects Are Applied (Center Pedal Part)
- Sending Tone-Change Information (Transmit MIDI Information)
- Preventing Doubled Notes When Connected to a Sequencer (Local Control)
- MIDI Transmit Channel Settings (MIDI Transmit Ch.)
- Adjusting the Brightness of the Display (Display Contrast)
- Adjusting the Brightness of the Buttons (Panel Brightness)
- Outputting Sound Both from Headphones and Internal Speakers (Speaker Auto Mute)
- Making the Power Automatically Turn Off After a Time (Auto Off)
- Troubleshooting
- Error Messages
- Saved Settings
- Tone List
- Internal Song List
- USING THE UNIT SAFELY
- IMPORTANT NOTES

6
Panel Descriptions
˙
Rear Panel
Connect pedals and USB ash drive.
* To prevent malfunction and equipment failure, always turn down the volume, and turn o all the units before making any connections.
*1 When operating the pedal, take care not to pinch your ngers between the moving part and the body of the unit. Pay special attention to this when using the unit where
children are present.
Place the AC adaptor so the side
with the indicator (see illustration)
faces upwards. The indicator will
light when you plug the AC adaptor
into an AC outlet.
1 2
3
4 5 6 7 8 9
Computer USB ash drive
Cord hook
AC outlet
Power cord
AC adaptor
Indicator
Place the AC adaptor so
the side with the indicator
(see illustration) faces
upwards.The indicator will
light when you plug the AC
adaptor into an AC outlet.
1 2
3
4
5
6 7 8 9
10
Pedal
DP-10 (*1)
Sold separately: KPD-90, RPU-3, EV-5
Dynamic microphone
Audio player
Amplied speakers
Computer USB ash drive
AC outlet
Power cord
Indicator
Cord hook
AC adaptor
Use the cord hook to
secure the cord of the
AC adaptor as shown in
the illustration.