Owner’s Manual (this document) Read this first. It explains the basic things you need to know in order to use the INTEGRA-7. PDF Manual (download from the Web) • Parameter Guide To obtain the PDF manual 1. Enter the following URL in your computer. http://www.roland.com/manuals/ This explains all parameters of the INTEGRA-7. • Sound List This is a list of the sounds built into the INTEGRA-7. • MIDI Implementation This is detailed information about MIDI messages. 2.
WARNING: To reduce the risk of fire or electric shock, do not expose this apparatus to rain or moisture. CAUTION RISK OF ELECTRIC SHOCK DO NOT OPEN ATTENTION: RISQUE DE CHOC ELECTRIQUE NE PAS OUVRIR CAUTION: TO REDUCE THE RISK OF ELECTRIC SHOCK, DO NOT REMOVE COVER (OR BACK). NO USER-SERVICEABLE PARTS INSIDE. REFER SERVICING TO QUALIFIED SERVICE PERSONNEL.
USING THE UNIT SAFELY Quick Guide Before using this unit, carefully read the sections entitled: “IMPORTANT SAFETY INSTRUCTIONS” (p. 2), “USING THE UNIT SAFELY” (p. 3), and “IMPORTANT NOTES” (p. 5). These sections provide important information concerning the proper operation of the unit. Additionally, in order to feel assured that you have gained a good grasp of every feature provided by your new unit, Owner’s manual should be read in its entirety.
USING THE UNIT SAFELY WARNING Turn off the unit if an abnormality or malfunction occurs Immediately turn the unit off, remove the power cord from the outlet, and request servicing by your retailer, the nearest Roland Service Center, or an authorized Roland distributor, as listed on the “Information” page when: • The power-supply cord or the plug has been damaged; or • If smoke or unusual odor occurs; or • Objects have fallen into, or liquid has been spilled onto the unit; or • The unit has been exposed to r
IMPORTANT NOTES Power Supply • With the factory settings, the INTEGRA-7 will automatically be switched off four hours after you stop playing or operating the unit. If you don’t want the unit to turn off automatically, change the “Auto Off” setting to “OFF” as described on p. 55. Placement • Using the unit near power amplifiers (or other equipment containing large power transformers) may induce hum.
IMPORTANT NOTES Intellectual Property Right • Do not use this product for purposes that could infringe on a copyright held by a third party. We assume no responsibility whatsoever with regard to any infringements of third-party copyrights arising through your use of this product. • The copyright of content in this product (the sound waveform data, style data, accompaniment patterns, phrase data, audio loops and image data) is reserved by Roland Corporation.
Contents IMPORTANT SAFETY INSTRUCTIONS . . . . . . . . . . . . . . . . . . . . . . . . . . . . . . 2 USING THE UNIT SAFELY. . . . . . . . . . . . . . . . . . . . . . . . . . . . . . . . . . . . . . . . . . 3 Quick Guide 8 Main Features. . . . . . . . . . . . . . . . . . . . . . . . . . . . . . . . . . . . . . . . . . . . . . . . . . . 8 Getting Ready. . . . . . . . . . . . . . . . . . . . . . . . . . . . . . . . . . . . . . . . . . . . . . . . . . 10 Using the Internal Sounds. . . . . . . . . . . . .
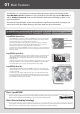
01 Main Features The INTEGRA-7 is a completely new sound module that contains expressive and high-quality SuperNATURAL sounds in addition to a rich sound library from the ever-popular SRX series, as well as “Motional Surround,” which uses RSS (Roland Sound Space) technology to offer a new type of sound field. The powerful SuperNATURAL sounds are reproduced using Motional Surround in a deeper and even more natural sound field, allowing a truly new dimension of sound creation.
Quick Guide The INTEGRA-7 brings together the classic sounds of Roland synthesizers (PCM Tones) Classic preset sounds from past models of Roland synthesizers, as well as the sounds from the entire SRX series wave expansion boards have been included, especially tuned for the INTEGRA-7. The sound data includes PCM synth tones and PCM drum kits, and can be called up from the preset banks and expansion banks.
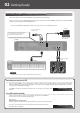
02 Getting Ready Connection example 1: A compact production setup Here’s an example of the use of the INTEGRA-7 for high-quality music production. This is an easy way to set up a full-fledged music production system based on the INTEGRA-7 simply by connecting it to DAW software in your computer and to a MIDI keyboard. * If you turn the INTEGRA-7’s USB-MIDI Thru setting “ON,” you’ll be able to use it as a MIDI interface (p. 45). Computer Connect an instrument or other device.
Quick Guide Connection example 2: Using the INTEGRA-7 as a sound module for live performance Here’s a connection example of including the INTEGRA-7 in an existing live performance system. In this example, the MIDI connector is used to connect a keyboard or another sound module. Keyboard MIDI OUT Introduction OUTPUT INTEGRA-7 MIDI IN Playing/Creating Sounds INPUT Use with a Computer MEMO Turn the INTEGRA-7’s USB-MIDI Thru setting “OFF” (p. 45).
03 Using the Internal Sounds About the INTEGRA-7’s screen When you turn on the INTEGRA-7, the top screen will appear. You can choose the type of top screen (p. 48). Part number The “!” indicates use of sound that’s not loaded The “*” indicates an edit Tone number and tone name of the current part Tone type Part level meter Tone bank Mute on/off of each part (p. 30) Playing SuperNATURAL tones 1. Part number Solo on/off of the current part (p. 30) Playing PCM tones 1.
Quick Guide Types and Features of the Internal Sounds For details on how to select sounds, refer to p. 12. SuperNATURAL Acoustic Tone (SN-A) Changes in dynamics From delicate pianissimo to powerful fortissimo, these tones provide natural timbral variation (dynamics) that goes beyond mere changes in volume. Introduction * Dynamics can be controlled by note-on velocity, modulation controller (CC01), and expression (CC11).
04 Using the Expansion Sounds About the EXPANSION Virtual Slots The INTEGRA-7 contains all the sound data from the entire SRX series of wave expansion boards, as well as expansion SuperNATURAL tones. You can add these sounds by loading each title into one of the INTEGRA-7’s four EXPANSION Virtual Slots (Slot A–D). (In other words, sound data for up to four titles can be used simultaneously.) The sound data includes tones (patches), drum kits (rhythm sets), instruments, and wave (waveform) data.
1. 2. Quick Guide Loading sound data into an EXPANSION Virtual Slot Press the [MENU] button. Choose “EXPANSION” and press the [ENTER] button. The EXPANSION screen will appear. This screen shows the sounds that are loaded into each EXPANSION Virtual Slot. 3. In the VIRTUAL SLOTS area, move the cursor to the slot that you want to load, and use the [DEC] [INC] buttons to select the desired sound data.
05 Creating a Sound Field with Depth Connection example Here’s an example of using the INTEGRA-7’s Motional Surround function for 5.1 channel surround output. Place your speakers as shown in the illustration. To use the Motional Surround function, press the [MOTIONAL SURROUND] button to turn the Motional Surround function on. C LFE It’s best to place the subwoofer at the same distance as the satellite speakers, with the listening position at the center.
1. Quick Guide Using Motional Surround Press the [MOTIONAL SURROUND] button. 2. Use the PART [ ][ Introduction Motional Surround will turn on, and the MOTIONAL SURROUND screen will appear. ] buttons to select a part. Playing/Creating Sounds The selected part number will be highlighted. 3. Use the cursor buttons to specify the sound’s panning (front/rear, left/right). Detailed settings for Motional Surround Here’s how to make detailed settings for the ambience effect and for each part. 1.
06 Using SONAR LE to Play Sounds (Windows) Installing SONAR LE Install the included SONAR LE in your computer. For details on installation and main operations, refer to the manual included on the SONAR LE DVD-ROM. * SONAR LE is for Windows only. If you are a Mac user, you’ll need to obtain DAW software separately. Audio and MIDI settings Important! Before you begin making settings, download the INTEGRA-7’s USB driver from the Roland website and install it (p. 43).
Quick Guide Recording on a MIDI track Connect the INTEGRA-7 to your computer as shown in “Connection example 1: A compact production setup” (p. 10). * Turn the INTEGRA-7’s USB-MIDI Thru setting (p. 49) ON. 1. In the [File] menu, click [New]. The “Create a New Project” dialog box will appear. 2. Record a MIDI track in SONAR. Introduction 3. In the “Template” area, choose [Normal]; in the “Name” area, enter a name for your project and then click [OK].
Panel Descriptions Front Panel 1 9 Number 2 3 4 5 6 7 8 9 Name Explanation Page Connect USB flash drive (sold separately) here. 1 USB MEMORY port 2 [VOLUME] knob * Use USB Flash Memory available from Roland. Proper operation cannot be guaranteed if other USB device is used. Adjusts the volume of the output from the A (MIX) L/MONO, R jacks and PHONES jack. By pressing the [VOLUME] knob you can audition the tone of the currently selected part. p. 50 p.
Panel Descriptions Turning the INTEGRA-7 On/Off Turning the INTEGRA-7 On Before turning the unit on/off, always be sure to turn the volume down. Even with the volume turned down, you might hear some sound when switching the unit on/off. However, this is normal and does not indicate a malfunction. 1. Turn the INTEGRA-7’s [ 3. 4. Turn on the power of your speakers. Use the [VOLUME] knob to adjust the volume appropriately. Introduction 2. Minimize the volume of the INTEGRA-7 and your speakers.
Panel Descriptions Rear Panel Connections AC IN jack Connect the included AC cord here. INPUT L/R jacks (rear) Use audio cables to connect a synthesizer or other instrument here. If an instrument is also connected to the INPUT L/R jacks (front), the sounds of both will be mixed. MIDI connectors page 11 For connecting MIDI device. OUTPUT jacks page 23 You can switch the output between stereo, mono, and 5.1 channel surround. For details on connections, refer to p. 23.
Panel Descriptions OUTPUT jacks D C B A C D Quick Guide (When motional surround (p. 34) is OFF) A (MIX) L/MONO, R jacks These jacks output a stereo signal (L/R) to your amp or mixer. If you want to output in mono, connect to only the L side. B Both XLR type and TRS type jacks are provided; they output the same audio. B, C, D L/R jacks A These jacks output a stereo signal (L/R) to your amp or mixer. * The [VOLUME] knob on the front panel does not adjust the volume of these jacks.
Getting Acquainted with the INTEGRA-7 Studio Sets Studio Sets allow you to use multiple tones and drum kits simultaneously. One studio set contains 16 “parts” for tones and one external part (EXT PART). You can assign a tone or drum kit to each part, allowing you to create an ensemble or to play rich-sounding layers. If you’re using an external MIDI device or DAW software, you’ll be able to independently control multiple sounds on a single INTEGRA-7 unit.
Getting Acquainted with the INTEGRA-7 How a Studio Set Is Structured Quick Guide A studio set has sixteen parts; you can assign a tone to each part, allowing you to use sixteen sounds simultaneously.
Getting Acquainted with the INTEGRA-7 Effects The INTEGRA-7 contains the following effects; each effect can be edited independently. STUDIO SET PART 1–9, 11–16 TONE MOTIONAL SURROUND INST/PARTIAL EQ MFX MOTIONAL SURROUND ON/OFF 2 CH/ MIX OUT MASTER EQ ON PART 10 (DRUM PART) OFF REVERB DRUM KIT COMP+EQ 1–6 CHORUS EQ MFX DRUM INST 1–62 5.
Getting Acquainted with the INTEGRA-7 About Memory Quick Guide Memory is where data such as the settings for studio sets and tones are held. There are three types of memory: “temporary memory” (the temporary area, and the EXPANSION Virtual Slots), “rewritable memory” (user memory, system memory, and USB memory), and “non-rewritable memory” (preset memory).
Basic Operation This section explains the basic button operations used to operate the INTEGRA-7. [TONE FINDER] button [PART VIEW] button [MENU] button [EDIT] button Accesses the TONE FINDER screen. Accesses the screen that lists all parts. Press this button once again to access the PART VIEW screen for the currently selected part. Accesses the menu screen. Accesses settings for the INTEGRA-7 or various functions. Accesses the TONE EDIT screen for the currently page 38 selected part.
Basic Operation [SHIFT] Button Operations Saving From the top screen, hold down the [SHIFT] button and press the [EDIT] button to access the WRITE MENU screen. Select a studio set or tone, and save your settings. If you hold down the [SHIFT] button while editing a parameter’s value, the value will change in larger steps. From the TONE EDIT screen, hold down the [SHIFT] button and press the [EDIT] button to save the tone.
Playing Sounds Choosing a Studio Set Viewing the Part Settings (PART VIEW Screen) A Studio Set stores the sounds selected for each Part, as well as various performance-related settings (except for system parameters). By switching studio sets you can change sounds at the beginning of a song or change large numbers of settings at once. NOTE In this screen you can edit the part parameters while focusing on a single part. 1. In the top screen, press the [PART VIEW] button twice.
Playing Sounds Choosing a Tone Selecting Drum Kits from a Tone List You can view the tone list by category or by type. 1. Press the [SuperNATURAL] or [PCM] button. Quick Guide In the PART VIEW screen you can select the tone for each part. The tone list will appear. Tone Preview function By pressing the [VOLUME] knob you can audition the tone of the selected part. 1. Press the [TONE FINDER] button. The tone list organized by category will appear.
Editing a Studio Set Studio Set Common Settings Tab Value Adjust the volume of each part. Level Here you can make settings that are common to the entire studio set. 1. 2. Parameter This setting’s main purpose is to adjust the volume balance between parts. Adjust the pan of each part. In the Top screen, press the [MENU] button. Pan “L64” is far left, “0” is center, and “63R” is far right. * This has no effect if Motional Surround is on. Choose “STUDIO SET COMMON” and press the [ENTER] button.
Editing a Studio Set Tab Parameter This determines what will happen to the tone’s level when the tone is played at a velocity greater than its specified velocity range. Tab Parameter Value OFFSET Vibrato Delay (*) For each part, this adjusts the time delay until the vibrato (pitch modulation) effect begins. Higher settings will produce a longer delay time before vibrato begins, while lower settings produce a shorter time.
Editing a Studio Set Saving a Studio Set Edits you make to a Studio Set are temporary; they will be lost when you turn off the unit or select another Studio Set. If you want to keep an edited Studio Set, you must save it. Panning the Sound with Depth (MOTIONAL SURROUND Screen) In addition to the left/right panning of each sound, the INTEGRA-7 lets you specify its depth in the sound field. NOTE When you execute the Write operation, the existing data at the write destination will be overwritten. 1.
Editing a Studio Set Editing the Motional Surround Settings 1. 1. In the top screen, press the [EFFECTS] button. The EFFECTS ROUTING screen will appear. In the MOTIONAL SURROUND screen, press the [ENTER] button. When Motional Surround is “off” MOTIONAL SURROUND EDIT screen will appear. Introduction 2. Quick Guide Here’s how to turn Motional Surround on/off and specify the size of the room.
Editing a Studio Set Editing the Effects of a Studio Set (EFFECTS ROUTING Screen) Here’s how to edit a studio set’s effects. 1. Editing the REVERB Settings To edit Reverb settings, access the Reverb parameter screen. * Reverb will not be available when Motional Surround is on. 1. In the top screen, press the [EFFECTS] button. The EFFECTS ROUTING screen will appear.
Editing a Studio Set Initializing a Part Initializing a Studio Set 1. 2. From the top screen or the STUDIO SET EDIT screen, press the [MENU] button. Choose “PART INIT” and press the [ENTER] button. Here’s how to initialize the currently selected Studio Set. 1. 2. 3. Choose “STUDIO SET INIT” and press the [ENTER] button. Introduction A message will ask “Are you sure?” From the top screen or the STUDIO SET EDIT screen, press the [MENU] button.
Editing a Tone Editing the Tones Assigned to a Part SuperNATURAL Synth Tone (SN-S) Here’s how to edit the sound of each part. 1. 2. PARTIAL 3 Select the part that you want to edit. PARTIAL 2 Press the [EDIT] button. PARTIAL 1 The tone edit screen will differ depending on the type of tone that’s selected for the part. MEMO For details on the tone parameters, refer to “Parameter Guide PDF.
Editing a Tone SuperNATURAL Drum Kit (SN-D) PCM Synth Tone (PCMS) Quick Guide PARTIAL 4 PARTIAL 62 PARTIAL 3 PARTIAL 1 MFX PARTIAL 2 PARTIAL 1 DRUM INST LFO 1 COMP+EQ 4 COMP+EQ 2 COMP+EQ 5 COMP+EQ 3 COMP+EQ 6 WAVE TVF PITCH ENV TVF ENV TVA MFX TVA ENV Introduction COMP+EQ 1 LFO 2 STEP LFO Playing/Creating Sounds Explanation COMMON Settings that apply to the entire tone. DRUM INST Instrument settings for each partial. COMP Settings for the drum part compressor.
Editing a Tone Saving a Tone/Drum Kit PCM Drum Kit (PCMD) Edits you make to a Tone/Drum Kit are temporary; they will be lost when you turn off the unit or select another Tone/Drum Kit. If you want to keep an edited Tone/Drum Kit, you must save it. PARTIAL 88 NOTE PARTIAL 1 When you execute the Write operation, the existing data at the write destination will be overwritten. MFX WAVE TVF TVA PITCH ENV TVF ENV TVA ENV 1. COMP+EQ 1 COMP+EQ 4 COMP+EQ 2 COMP+EQ 5 COMP+EQ 3 COMP+EQ 6 2.
Editing a Tone Editing the Effects of a Tone 1. Here’s how to make compressor and equalizer settings for the drum kit of a Drum COMP + EQ Assign part. In the top screen, press the [EFFECTS] button. There are six compressor/equalizer sets; for each instrument (DRUM INST) in the drum kit, you can select the compressor/equalizer set that will be used. The EFFECTS ROUTING screen will appear. When Motional Surround is “off” 1.
Editing a Tone Initializing a Tone Copying a Partial Here’s how you can initialize the settings of the current tone. 1. Press the [EDIT] button. The TONE EDIT screen will appear. 2. 3. Press the [MENU] button. Choose “TONE INIT” and press the [ENTER] button. Here’s how to copy the partial settings of a SuperNATURAL Synth Tone, SuperNATURAL Drum Kit, PCM Synth Tone, or PCM Drum Kit. 1. Press the [EDIT] button. The TONE EDIT screen will appear. 2. 3. Press the [MENU] button.
Using the INTEGRA-7 with Your Computer Computer’s USB port (Supports USB 2.0 Hi-Speed) What is the USB driver? The USB driver is software that transfers data between the INTEGRA-7 and the application (e.g., DAW software) on your computer when the INTEGRA-7 is connected via USB to your computer. The USB driver sends data from your application to the INTEGRA-7, and data from the INTEGRA-7 to your application.
Using the INTEGRA-7 with Your Computer USB Driver Here’s how to switch between the dedicated INTEGRA-7 USB driver and the generic driver provided by the operating system. If you want to use USB audio, you’ll need to use the VENDER driver. 1. 2. 3. Connecting the INTEGRA-7 to Your Computer 1. In the MENU screen, choose “SYSTEM” and press the [ENTER] button. If you want to use the INTEGRA-7’s USB audio functionality, change the USB Driver setting to VENDER and then install the driver.
Using the INTEGRA-7 with Your Computer USB MIDI This is convenient when you want to use a MIDI keyboard with DAW software on your computer to create song data. For details about settings on your computer, refer to the owner’s manual of the software you’re using. Computer Quick Guide If you connect your computer and MIDI keyboard to the INTEGRA-7 as shown in the illustration and turn the USB-MIDI Thru ON, you’ll be able to use the INTEGRA-7 as a MIDI interface.
Using the INTEGRA-7 with Your Computer USB AUDIO Sound played back by your computer can be output from the INTEGRA-7. MEMO If you want to use the INTEGRA-7’s USB audio functionality, change the USB Driver setting to VENDER and then install the driver. You can download the driver from the Roland website. Roland website http://www.roland.com/support/en/ The procedure for installing the driver will differ depending on your system.
Applying Motional Surround to Sounds of an External Device Connection Example It’s best to place the subwoofer at the same distance as the satellite speakers, with the listening position at the center. LFE Quick Guide You can assign the sound of the external input as the Ext part, and apply Motional Surround to it.
Overall Settings Startup Settings (STARTUP) System Settings Here you can make overall settings that apply to the entire INTEGRA-7, such as those for tuning and MIDI message reception. 1. In the MENU screen, choose “SYSTEM” and press the [ENTER] button The SYSTEM screen will appear. Parameter Value Startup Studio Set LAST-SET, (Studio Set number) Startup OFF, (Sound Library Expansion SlotA–SlotD name) Explanation Specifies the studio set that will be loaded when the unit is turned on.
Overall Settings MIDI Settings (MIDI) Parameter Studio Set Control Channel Explanation 17–32 When transmitting and receiving system exclusive messages, the device ID numbers of both devices must match. 1–16, OFF Preview Mode Specifies the MIDI receive channel on which MIDI messages (program change/bank select) from an external MIDI device will be received by the INTEGRA-7 to switch studio sets. Choose “OFF” setting if you don’t want studio sets to be switched from a connected MIDI device.
Convenient Functions Basic Procedure for Utility Operations 1. Initializing a USB Flash Drive (FORMAT USB MEMORY) This operation will initialize (format) a USB flash drive. In the MENU screen, choose “UTILITY” and press the [ENTER] button. NOTE The UTILITY screen will appear. When you execute this operation, all data saved on the USB flash drive will be lost. If the USB flash drive contains important data, back it up to your computer before initializing the USB flash drive. 1. 2.
Convenient Functions Exporting/Importing Sound Data 1. You can also select the desired studio sets or tones from a file that was exported to a USB flash drive, and import them into the INTEGRA-7. In the UTILITY screen, choose “IMPORT” and press the [ENTER] button. Quick Guide From the studio sets and tones saved in the INTEGRA-7, you can select the desired items and export them to a USB flash drive. Importing Sound Data (Import) The IMPORT screen will appear.
Convenient Functions Marking Multiple Items of Data Backing Up User Data You can select multiple consecutive items of sound data, and set or clear their marks in a single operation. 1. 2. You can back up all of settings in the INTEGRA-7 to a USB flash drive (sold separately), or restore those settings into the INTEGRA-7’s memory. In the screen where you’re selecting sound data, select the lowest-numbered item of sound data that you want to select.
Convenient Functions Renaming a Backup File 1. 1. In the UTILITY screen, choose “RESTORE” and press the [ENTER] button. You can rename a data file in the screen where you select a data file to be restored. The RESTORE screen will appear. In the UTILITY screen, choose “RESTORE” and press the [ENTER] button. The RESTORE screen will appear. 2. 3. 4. Select the data file that you want to rename. Press the [MENU] button. Choose “RENAME” and press the [ENTER] button.
Convenient Functions Restoring Backed-up Data from a Computer to a USB Flash Drive 1. 2. Transmitting the Temporary Area’s Data to an External MIDI Device (BULK DUMP) Here’s how to transmit the studio set and tone settings to an external MIDI device. This operation is called “bulk dump.
Convenient Functions Making the Unit Automatically Turn Off After a Time (Auto Off) This “FACTORY RESET” operation will restore all settings of the INTEGRA-7 to their factory-set state. With the factory settings, the INTEGRA-7 will automatically be switched off 4 hours after you stop playing or operating the unit. If you don’t need the unit to turn off automatically, set “Auto Off” to the “OFF” setting as described below.
Troubleshooting Problem Items to check Action Page The unit turns off unexpectedly Check the “Auto Off” system setting. The INTEGRA-7 will automatically be turned off when no operation has been performed for a certain length of time. (At the factory settings, the power will be turned off after 4 hours.) If you want the INTEGRA-7 to stay on, change the “Auto Off” system setting to “OFF.” p.
Troubleshooting Items to check Action Page Delay time does not change when you change the tempo Could the system setting “USB Song Sync Mode” have been set to “SLAVE”? If “Sync Mode” is set to “SLAVE,” change the tempo of the external device that is transmitting MIDI clock data. p. 48 When the Legato Switch (p.
Error Message List If an incorrect operation is performed, or if processing could not be performed as you specified, an error message will appear. Refer to the explanation for the error message that appears, and take the appropriate action. Message Meaning Action Cannot Import! Sound data cannot be imported. An import destination has not been selected. Select the import destination (p. 51). File Not Selected! No file is selected. Select a file. Incorrect File Name! The file name is invalid.
MIDI Implementation Chart Date : Jun. 1, 2012 Version : 1.
Specifications Roland INTEGRA-7: SuperNATURAL Sound Module Sound Generator Section Others Maximum Polyphony 128 voices (varies according to the sound generator load) Display Parts 16 parts Tones • PHONES jack (stereo 1/4-inch phone type) • INPUT jacks (L, R) (1/4-inch phone type, Front) SuperNATURAL Acoustic • INPUT jacks (L, R) (1/4-inch phone type, Rear) SuperNATURAL Synth • OUTPUT A (MIX) jacks (L, R) (1/4-inch TRS phone type) SuperNATURAL Drum Kit • OUTPUT A (MIX) jacks (L, R) (XLR type)
Index Symbols A AC IN jack . . . . . . . . . . . . . . . . . . . . . . . . 22 Assigning a Name . . . . . . . . . . . . . . . . 29 Auto Off. . . . . . . . . . . . . . . . . . . . . . 48, 55 B C 28 53 29 52 21 49 22 20 40 E Edit 51 28 58 37 42 37 37 42 50 20 22 29 25 L LCD Brightness. . . . . . . . . . . . . . . . . . . . 48 Contrast. . . . . . . . . . . . . . . . . . . . . . 48 M MASTER EQ. . . . . . . . . . . . . . . . . . . 26, 36 Master Key Shift. . . . . . . . . . . . . . . . . . 48 Master Level.
Block Diagram 62
MEMO Quick Guide Introduction Playing/Creating Sounds Use with a Computer Overall Settings Appendix 63
MEMO 64
MEMO Quick Guide Introduction Playing/Creating Sounds Use with a Computer Overall Settings Appendix 65
For EU Countries For China 66
Quick Guide INTEGRA-7 Sound Module Roland Corporation U.S. 5100 S. Eastern Avenue Los Angeles, CA 90040-2938 (323) 890-3700 For EU Countries FEDERAL COMMUNICATIONS COMMISSION RADIO FREQUENCY INTERFERENCE STATEMENT Introduction This product complies with the requirements of EMCD 2004/108/EC and LVD 2006/95/EC. For the USA Playing/Creating Sounds This equipment has been tested and found to comply with the limits for a Class B digital device, pursuant to Part 15 of the FCC Rules.
Information AFRICA EGYPT Al Fanny Trading Office 9, EBN Hagar Al Askalany Street, ARD E1 Golf, Heliopolis, Cairo 11341, EGYPT TEL: (022)-417-1828 REUNION MARCEL FO-YAM Sarl 25 Rue Jules Hermann, Chaudron - BP79 97 491 Ste Clotilde Cedex, REUNION ISLAND TEL: (0262) 218-429 SOUTH AFRICA Paul Bothner(PTY)Ltd. Royal Cape Park, Unit 24 Londonderry Road, Ottery 7800 Cape Town, SOUTH AFRICA TEL: (021) 799 4900 ASIA CHINA Roland Shanghai Electronics Co.,Ltd. 5F. No.