
Owner`s manual


Front and Rear Panels
10
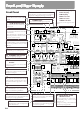
Front Panel
CURRENT
SONG
PTN
T1
T2
PTN
TRANS
-
MUTE
RHYTHM
SELECT
TONE
SELECT
PART
MUTE
PART
QTZ SELECT
WRITE
REDO
UNDO/
INITIALIZE
PARAM COPY
HOLD
CALL
POSE
RPS
OCTAVE
KEYBOARD PAD
MUTE CTRL
ON
FUNC
MODE
ARPEGGIATOR
RANGE
ACCENT RATE
ON
PLAY QUANTIZE
VELOCITY
TIMING
SHUFFLE
GROOVE
GRID
REVERB DELAY EFX
EFX OUTPUT LEVEL
DELAY LEVELREVERB LEVEL
EFX REVERB LEVEL
HF DAMP
REVERB TIME
EFX DELAY LEVEL
FEEDBACK
DELAY TIME
REVERB
DELAY
EFX/OUT
KEY SHIFT
PAN
LEVEL
TONE SWITCH
BD
SD
HH
CLP
SCALE
SHIFT
REALTIME ERASE
EDIT
LOW BOOST
VOLUME
OCTAVE
MAX
MIN
MAX
MIN
DISPLAY
SONG
PTN/
/MIXER
TEMPO
SET
PTN
SET
RPS
PART
MEGAMIX
D BEAM CONTROLLER
63
4
5
2
1
16
17
7
18
19
20
25
26
27
28
29
30
31
ARPEGGIO
REVERB DELAY EFX SEQ OU
PLAY QUANTIZE SETUP
GROOVE SHUFFLEGRID
DELETE INSERT
TRANSPOSE CHG VELO
F
-
ENV LEVEL PAN A
-
ENV
CHG GATE SHIFT C
COPY
ERASEPTN/SONG
PITCH
PATCH
FILTER
WAVE/FXM
P
-
ENV
PITCH FILTER AMPLIFIER
CTRL 3
CTRL 2
CTRL 1
AD LIB
TURN
-
TABLE
CUT
+
RESO
1 VOLUME Knob
Controls the overall volume of the
MC-505.
2 LOW BOOST Section
This controls the effect of the low
boost section.
3 D BEAM CONTROLLER section
You can apply a variety of effects to patterns
and patches simply by moving your hand.
4 MODE Section
Here you can switch the operating mode.
5 FUNC Button
This switches the function of the
various knobs.
When the button is blinking, the
function printed in the box near
each knob will be in effect.
6 CURRENT Display
NEXT Display
LCD Display
BEAT Indicator
MIDI Indicator
SLAVE Indicator
These show various types of infor-
mation.
7 DISPLAY Section
Use [INC] [DEC] or the VALUE dial
to select the parameter that you wish
to modify.
16 PLAY QUANTIZE Section
Modifies the groove of the pattern.
17 ARPEGGIATOR Section
Settings for playing arpeggios.
18 REVERB/DELAY/EFX
Section
Gives you control over effects like
reverb and delay.
19 PART MIXER Section
Use the part sliders to modify various
settings for each part.
20 PART SELECT/TONE
SELECT Buttons
Use these buttons to select part/
tone/rhythm groups, and to switch
muting on/off.
During recording, these buttons
select velocity and gate time.
25 KEYBOARD PAD Section
Here you can select the effect of the
keyboard pads, and specify how they
will function when played as a key-
board.
27 WRITE Button
Press this button to save a pattern or
patch, or to initialize a parameter.
28 UNDO/REDO Button
Press this button to cancel the previous
operation, or to copy a parameter.
29 SCALE Button
During step recording, this button
selects the note value unit.
30 EDIT Button
This button selects the editing pages
for a sound or pattern.
31 SHIFT Button
This button is used in conjunction
with other buttons.