PNC-1860 PNC-1410 PNC-1210 USER'S MANUAL * This User's Manual is intended for the PNC-1860, PNC-1410, as well as PNC-1210.
For the USA FEDERAL COMMUNICATIONS COMMISSION RADIO FREQUENCY INTERFERENCE STATEMENT This equipment has been tested and found to comply with the limits for a Class B digital device, pursuant to Part 15 of the FCC Rules. These limits are designed to provide reasonable protection against harmful interference in a residential installation.
Thank you very much for purchasing the CAMM-1 PNC-1860/1410/1210. • To ensure correct and safe usage with a full understanding of this product's performance, please be sure to read through this manual completely and store it in a safe location. • Unauthorized copying or transferal, in whole or in part, of this manual is prohibited. • The contents of this operation manual and the specifications of this product are subject to change without notice.
Typographic Conventions This manual uses certain typographic symbols, outlined below. This indicates a point requiring particular care to ensure safe use of the product. : Failure to heed this message will result in serious injury or death. : Failure to heed this message may result in serious injury or death. : Failure to heed this message may result in minor injury. : Indicates important information to prevent machine breakdown or malfunction and ensure correct use.
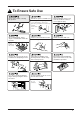
To Ensure Safe Use Never disassemble or modify this product. Handle the power cord with care. Do not step on or damage the power cord, or allow heavy objects to be placed atop it. Failure to heed this may result in electrocution or fire. Do not allow liquids, metal objects or flammables inside the machine. Install in a level and stable location. When pulling the power cord from an electrical socket, be sure to grip the plug. Handle the blade with care. The unit may tip over otherwise.
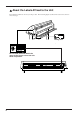
About the Labels Affixed to the Unit These labels are affixed to the body of this product. The following figure describes the location and content of these messages. Rating label Do not allow the hands within the space to the front or rear of the unit while in operation.
To Ensure Correct Use This product is a precision instrument and must be handled with care. Do not install in an area subject to dust, high humidity or poor ventilation. When the unit is not in use for an extended period, detach the electrical plug from the AC outlet. Arrange the power cord and interface connection cable to prevent tripping when moving around the unit. Do not connect to an AC outlet that supplies other than the specified voltage.
MEMO v
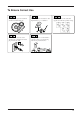
1 CHECKING ACCESSORIES Check the following to make sure that you received all the items that were shipped along with the unit. Power Cord: 1 Blade Holder XD-CH2 : 1 Blade (Cemented Carbide blade): 1 Alignment Tool: 1 Material for Test Cuts: 1 Test-use Application Tape: 1 Cutter Tool: 1 Test use Water Based Tweezers (for handling material): 1 Fiber Tipped Pen: 1 Test-use High-quality Paper: 1 User’s Manual: 1 CAMM-1 DRIVER for CAMM-1 DRIVER for windows 3.
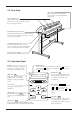
2-2 Rear View Sheet Sensor When a material is passed through this portion, this sensor detects the material's cutting range. Sheet Loading Lever When loading media, lift this lever to lower to pinch rollers. To removing media, lower this lever to raise the pinch roller. Parallel (Centronics) Connector In a parallel configuration, this connector is where you need to connect the parallel cable in order to communicate with your computer.
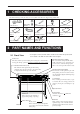
3 BASIC OPERATION * In this manual, sections that explain commons points for the PNC-1860/ 1410/1210 use only illustrations of the PNC-1860. Some details of the PNC1410/1210 differ from the figure. 3-1 Setting Up and Connection Setting up Never install this unit in any of the following situations, as it could result in damage: Places where the installation surface is unstable or not level. Places with excessive electrical noise. Places with excessive humidity or dust.
3-2 Installing the Cutter Always make sure the power switch is OFF before installing (or replacing) the cutter. Do not touch the tip of the blade with your fingers, as the cutting performance of the blade will be impaired. Installation Push-pin (1) Insert a blade into the blade holder until it snaps into place with an audible click. Blade holder * Take care not to break or chip the blade. Blade *Adjusting the Cutter Blade The amount of cutter blade extension can be adjusted by rotating the cap.
3-3 Loading the Material Below are shown the allowable widths (horizontal dimension) of materials that can be loaded and the maximum widths that can be cut.
PNC-1210 The PNC-1210 has no middle pinch roller. Material 6" (approx. 152 mm) 12" (approx. 305 mm) 18" (approx. 457 mm) 24" (approx. 610 mm) 30" (approx. 762 mm) The right-hand movable pinch roller can be moved within this range. When loading material with a width other than one indicated above, move the right-hand movable pinch roller. Material with Material with Material with a width a width a width of 18" of 24" and 30" of 12" Material with a width of 6" * Do not set the pinch roller here.
Pinch roller (3) Pull out as much from the roll as needed, and pass the material from the back of the main unit to the front as shown in the figure. At this time, line up the right edge of the material with the guide lines at the front and rear of the grit roller near the control panel, and pull the material straight out to the front. Make sure that the edge of the material lies above the grit rollers.
Close the front cover (7) Close the front cover, then follow the messages on the control panel to use the and keys to select "Roll" and press the ENTER key. SELECT SHEET ROLL EDGE PIECE * If cutting is to be performed from the front edge of the material, select "Edge." PRESS SETUP KEY (8) Press the SETUP key. The SETUP LED lights up, and the horizontal width of the material is detected and shown on the display. Press the MENUkey once to display WIDTH LENGTH 28920 --- the top menu.
(2) Move the left and right pinch rollers so that they are close to the respective left and right edges of the material. When using a material that is wider than 762 mm (30") , move the middle pinch roller to a position near the center of the left and right pinch rollers. (The PNC1210 has no middle pinch roller.) When doing this, make sure that the grit rollers are under the pinch rollers. Seals showing the positions of the grit rollers are affixed to the areas where the carriage moves.
To Perform Long Cutting When performing cutting over a length of 1.5 m (60") or more, first feed out the required length of material. Then follow the steps below to load the material. 4 1 Pull out the material from the roll and pass it through the unit. Pull out the amount of roll material to be used. Use material that is wider by 50 mm (2") or more than the width of the cutting to be performed. 2 5 25 mm (1") or more 3 Close the front cover.
3-4 Selecting the Interface Use the control panel to select the type of interface. The selected interface type and communication parameters are stored in memory even after the power is switched off. To change the interface type or the communication parameters, configurations must be re-entered. (1) Set the output port for the computer (or software) to “Parallel” for a parallel connection, or to “Serial” or “RS-232C” for a serial connection.
3-5 Cutting Test - Setting Cutting Speed, Blade Force, and Blade Compensation For optimum performance, it is necessary to set cutting conditions that match the material, giving consideration to the material's thickness and type of material. The PNC-1860/1410/1210 has an internal "cutting test" to check the cutting conditions. This “cutting test” allows you to determine settings for the cutting speed, blade force and the amount of offset.
Incorrect cutting conditions may cause symptoms such as those described below. Take care to ensure that the cutting conditions are correct. Cutting takes more time. Some parts of the sheet remain uncut. Corners are rounded. Cutting speed Too slow Too fast Blade force Too small Too large Blade compensation Too small Too large Some parts of the sheet remain uncut. • The sheet is easily torn. • The cutter requires frequency replacement • The blade pierces the sheet.
Continuing Cutting Cutting after changing the material Again carry out the procedure described from “3-3 Loading the Material” to “3-6 Downloading Cutting Data” . * There is no need to perform the procedure described under “3-4 Selecting the Interface.” Also, if a material of the same type is used, there is no need to perform a cutting test. Continuing cutting on the same material Set the origin point for the place where cutting is to be performed next.
3-7 Applying the Completed Cutout • Make sure beforehand that the surface where the work is to be stuck is clean and free of all dust or oily deposits. • When applying the work to a transparent surface, such as a window, you can use a water-based pen (which can be wiped off) after wards to mark guidelines on the reverse side of the glass, to aid in getting the work aligned properly. • If you discover after it is stuck in place that air bubbles were trapped under the work, use a needle to puncture them.
4 CARE AND MAINTENANCE • Always turn off the PNC-1860/1410/1210 before cleaning it. • Never lubricate the mechanisms. • Use a small amount of water or alcohol for cleaning. Never use solvents such as benzene or thinner can smooth out the material so that it sticks securely. Cleaning the body Use water or alcohol to clean, and wipe gently with a clean cloth. Wipe the operation panel and display gently with a clean, soft cloth.
5 ABOUT THE CUTTING AREA Maximum cutting area Acceptable material widths PNC-1860 : 1195 mm (W) x 24998 mm (L) PNC-1410 : 889 mm (W) x 24998 mm (L) PNC-1210 : 585 (W) mm x 24998 mm (L) (47" x 984-1/8") (35" x 984-1/8") (23" x 984-1/8") PNC-1860 : 90—1372 mm (3-1/2"—54" ) PNC-1410 : 90—1067 mm (3-1/2"—42" ) PNC-1210 : 50—762 mm (1-15/16"—30" ) The cutting area along the horizontal plane (the direction in which the tool carriage moves) is determined by the position of the pinch rollers.
+ Power on + Power on Openning message PNC-1860 Roland DG Corp. PNC-1410 Roland DG Corp. After loading a sheet, close the front cover. SELECT SHEET ROLL EDGE PIECE ROLL/EDGE/PIECE or to select. Use Press ENTER 1— 8 1 CUT 0.250mm 0—1.000 (in increments of 0.025 mm) ENGLISH/JAPANESE/ GERMAN/FRENCH/ SPANISH/ITALIAN Use or to select. Press ENTER to enable the setting.
SUBMENU CROPMARK UPDOWN OVER-CUT CALIB UPDOWN OVER CUT UP/DOWN ->ENTER MOVE ->CURSOR Pressing ENTER moves the blade up or down. Pressing , , , or moves the cutter in the +Y, -Y, -X, or +X directions, respectively. OVER CUT OFF OFF/ON CALIB MENU CALIB X CALIB Y 0.00% 0.00% -0.19% 0.19% (in increments of 0.01%.
8 DISPLAY MENU LISTS This chart lists the menus of the PNC-1860/1410/1210 grouped by usage. Menus indicated by an Circle (" ") are explained further in the section at the end of the chart. Please refer to these additional explanations when using such menus. Default Page where explained - 8, 9 1—8 It is possible to set the cutting parameters (plotting parameters) to match the tool and sheet (pen and paper condition), and store them for later use.
Explanation Default Page where explained AREA This moves the sheet by the length to be cut before actual cutting is performed, making it possible to ensure that the sheet will not slip or come loose during cutting. When performing continuous cutting on the same sheet, this can also be used to make sure that there is enough remaining sheet to cut the data that will be sent. 1.0 m 8 AREA UNIT Sets the units used to specify length in display menu “AREA”. Units may be set to either “METRE” or “FEET”.
Default Page where explained TOOL-CNG COMMAND This is normally set to "IGNORE" when performing cutting. When a tool-selection instruction (SP instruction) is sent from the computer while this is set to "EGNORE," the SP instruction is ignored and operation continues without pause. When set to "EFFECT," SP exchange instructions are accepted and operation pauses. If tool change is needed, open the front cover, change the tool, then press the ENTER key.
3 CROPMARK This is used when cutting around pre-printed graphics on a material, such as when making stickers or seals. With the PNC-1860/1410/ 1210, a material is always loaded parallel to the unit. This means that unless the graphics to be cut have been printed parallel to the material, the cutting lines become shifted from the graphics, and it becomes impossible to accurately cut around the graphics (see Figure A below).
9 BLADES AND MATERIALS This section indicates the proper cutting conditions for various types of materials, as well as blade lifespans. Cutting conditions and blade life vary according to the hardness of the material and the usage environment. Making the settings for the conditions described below does not automatically guarantee attractive cutting results in all situations.
10 PLOTTING ON PAPER MEDIA Before cutting, plotting using pen and paper can ensure that your design is correct without wasting materials. This feature can also be used to plot template designs on thick materials that may not be able to be cut. * Since the design of the PNC-1860/1410/1210 differs inherently from that of dedicated plotters, it does not accommodate functions such as high-speed plotting, automatic pen changes, pen dry protection, or the like.
11 WHAT TO DO IF.... 11-1 What to do if.... PNC-1860/1410/1210 troubleshooting Is the power cord connected correctly? Connect the power cord included with the PNC-1860/1410/1210 to the unit, and plug the other end securely into an electrical outlet (see “3-1 Installation and Connections” on page 3). Is the PNC-1860/1410/1210 power on ? Turn on the power. Is the front cover closed? Close the front cover when performing cutting (see “3-3 Loading a Sheet” on page 5).
A message appears on the display Change Pinch Roller Position The location of one or more of the pinch rollers is not correct. If this happens, raise the sheet loading levers and move the pinch rollers to the proper positions above the grit rollers. Reposition the sheet to match this new alignment, then lower the sheet loading levers to hold the sheet in place. CLOSE COVER This is displayed when the front cover is opened during cutting.
The sheet slips away from the pinch rollers during the cutting process If the front edge of the sheet you are working with is at an angle, cut off the odd-shaped part to make it straight, then align it so that it is parallel with the grit roller. Make sure the sheet is parallel with the grit roller. If the sheet is fed for a long distance, the sheet will be less likely to slip out of alignment if the pinch rollers are moved inward slightly (5 to 25 mm).
12 SUPPORTED INSTRUCTION SETS A "CAMM-GL III Programmer's Manual" is available for separate purchase for those wishing to create their own programs for this machine. For further information, please contact the nearest Roland DG Corp. dealer or distributor. : Compatible. : Ignored.
13 CHARACTER SET Automatic backspace 30
SPECIFICATIONS SPECIFICATIONS PNC-1860 PNC-1410 Mechanism Driving method Maximum cutting area Acceptable sheet (paper) widths Digital control servo motor 1195 mm (W) x 24998 mm (L) (47"x 984-1/2") 889 mm (W) x 24998 mm (L) (35" x 984-1/2") 585 mm (W) x 24998 mm (L) (23" x 984-1/8") 90 mm—1372 mm (3-1/2"—54") 90 mm—1067 mm (3-1/2"—42") 50 mm—762 mm (1-15/16"—30") Number of tools Tools Max.
( ) * The following conditions must be satisfied: - Material type: 3M Scotchcal Mastercut Film, ARLON Series 2100 - Special stand (a roll material must be set at the rear and on the inner sheet hanger) - Side margins: 25 mm (1") or more for both the left and right margins - Front margin: 25 mm (1") or more (After loading the material, using the display menu to select “EDGE” as the material type automatically sets a front margin of 25 mm (1").
R9-980506