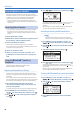
Reference Guide
Contents Panel Descriptions. . . . . . . . . . . . . . . . . . . . . . . . . . . . . . . . . . . . . . . . 3 Controlling the R-07 from a Mobile Device . . . . . . . . . . . . . . . 26 Main Screen. . . . . . . . . . . . . . . . . . . . . . . . . . . . . . . . . . . . . . . . . . . . 5 Installing the App “R-07 Remote” . . . . . . . . . . . . . . . . . . . . . . . . 26 Getting Ready . . . . . . . . . . . . . . . . . . . . . . . . . . . . . . . . . . . . . . . . . . . . 6 Installing the Batteries . . .
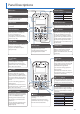
Panel Descriptions Built-in mics Remote indicator This is a stereo mic built into the unit. Display Operation Status Lit Recording Blinking (slow) Record-standby Blinking (fast) This shows various types of information for the R-07. Input overload PEAK indicator [REHEARSAL] button This will light when the input volume is excessive. This button automatically sets the appropriate recording level (p. 18). Bluetooth indicator [A This blinks when pairing with a Bluetooth speaker or headphones (p.
Panel Descriptions MIC/AUX IN jack Use this if you want to connect an external mic, audio device or electronic musical instrument. PHONES jack You can connect headphones here (p. 10). [POWER] switch USB port Slide this switch toward POWER to turn the power on/off (p. 6). With the power turned on, you can set this switch to the right to enable the HOLD function. Use a commercially available USB cable to connect this to your computer.
Panel Descriptions Main Screen Here we’ll explain the principal icons and information shown in the main screen.
Getting Ready Installing the Batteries Turning the Power On/Off 1. Slide the [POWER] switch toward POWER for several Types of batteries that can be used seconds; the power will turn on. 55 Alkaline battery (AA, LR6) 55 Rechargeable Ni-MH battery (AA, HR6) NOTE The R-07 itself is not able to recharge rechargeable Ni-MH batteries. You’ll need to use a battery charger designed for rechargeable Ni-MH batteries. 2.
Getting Ready Remaining battery indication 55 When the remaining battery power runs low, a battery low appears in the upper right of the display. When icon this appears, install fresh batteries as soon as possible. If you continue to use the unit in this state, the display will indicate “Battery Low,” and finally the R-07 will stop functioning entirely.
Getting Ready Preparing a microSD Card 4. Close the microSD cover. Inserting a microSD Card Inserting 1. Make sure that the power is off. If the power is on, turn it off. 2. Open the microSD cover located at the top of the 5. Slide the [POWER] switch toward POWER for several seconds to turn on the power. MEMO If an unformatted microSD card is inserted in the R-07, the screen will indicate “SD Unformatted.” unit. Insert your fingernail into the notch in the microSD cover, and pull it upward.
Getting Ready Formatting a microSD Card “Formatting” is the process of preparing the microSD card for use. If you’re using a microSD card other than the included one, you must first format the microSD card before it can be used with the R-07. NOTE 55 You must format the microSD card on the R-07 itself. A microSD card formatted on a device other than the R-07 might not work correctly in the R-07. 55 When you format a microSD card, all data on the card will be erased. 1.
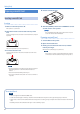
Getting Ready Using Headphones or Speakers 4. Use [ ]/[ ] to choose “Yes,” and then press [ ]. The R-07 has a built-in speaker. You can listen to the playback through this speaker, or you can connect headphones or speakers for listening. You can also connect Bluetooth headphones or speakers to the R-07 and listen wirelessly to the playback. * To prevent malfunction and equipment failure, always turn down the volume, and turn off all the units before making any connections.
Getting Ready Disconnecting a Bluetooth device Use this procedure when you want to switch to a different Bluetooth device. 1. Press [MENU] to access the “Menu” screen, use [ ]/[ ] to select “Bluetooth,” and then press [ ]. 2. Use [ ]/[ ] to select “Disconnect Audio” and then press [ ]. 3. Use [ ]/[ ] to choose “Yes,” and then press [ ]. When disconnection succeeds, the display indicates “Completed.
Recording The display will show the file that was recorded (p. 5). Basic Recording Operation Recall settings for specific purposes Adjusting the Input Level Specify the recording quality MEMO 55 To pause, press [ recording, press [ ]. To disengage pause and resume ] once again. 55 A file name such as R07_0001.WAV will be created automatically. The 0001 portion is assigned as a number that is one greater than the largest number of the existing files.
Recording Recalling Settings for Specific Purposes The R-07 provides settings that are suitable for various recording situations. These settings are called “scenes.” 1. Press [SCENE] to access the “Scene” screen, and use [ Scene Explanation OFF Choose this if you want to make settings manually. Music HiRes ]/[ ] to change the Scene setting.
Recording Specifying the Recording Quality You can specify the audio quality with which the recording will be made. The audio quality setting is a combination of the Sample Rate (sampling rate) and the Rec Mode. The audio quality will affect the size of the file, and will also affect the length of time over which recording can take place with an microSD card. Consider whether audio quality or length of recording are more important for your situation, and choose the quality that’s appropriate for you.
Recording Approximate Recording Times The following table shows the approximate recording times that a microSD card will allow. Recordable time (approximate) microSD card capacity Rec Mode WAV MP3 WAV+MP3 Units: minutes 2 GB 4 GB 8 GB 16 GB 32 GB WAV (24 bit/96 kHz) 55 110 220 450 900 WAV (24 bit/88.2 kHz) 60 120 240 490 980 WAV (24 bit/48 kHz) 110 220 440 900 1800 WAV (24 bit/44.1 kHz) 120 240 480 980 1950 WAV (16 bit/96 kHz) 80 160 320 670 1350 WAV (16 bit/88.
Recording Using Limiter or AGC Cutting the Low-Frequency Range The limiter setting gives you three choices: “ON” to use the limiter, “AGC” to use Auto Gain Control, or “OFF” to use neither. Normally you’ll choose “OFF.” If low cut is set to anything other than “OFF,” the low-frequency range below the specified frequency is cut. Normally you’ll choose “OFF.” The Limiter is a function that compresses the recording level when the input sound becomes too loud, thus preventing distortion.
Recording Adjusting the Input Level The R-07 is designed to let you record a wide range of sounds. By adjusting the input level (volume) appropriately for the source you’re recording, you’ll be able to record with optimal quality. The basic principle when adjusting the level is to get the level as high as possible without allowing distortion to occur. This principle applies whether you’re using the built-in mics, an external mic, or AUX IN.
Recording Using the Rehearsal Function You can use the rehearsal function to automatically set the appropriate recording level based on the audio that is input during the specified length of time. NOTE You can’t use the rehearsal function if Limiter (p. 16) is “AGC.” 1. Press [MENU] to access the “Menu” screen, use [ ]/[ ] to select “Input,” and then press [ ]. 2. Use [ ]/[ ] to move the cursor to Rehearsal Time setting, and use [ ]/[ ] to change the setting.
Recording Recording Instruments or Vocals Using an External Mic Using the Built-in Mics L Stereo mic R A dynamic mic or a condenser mic of the type designed for connection to a computer’s mic jack can be used with the R-07. NOTE 55 To avoid acoustic feedback (a whine or howling sound), do not connect external speakers when you’re recording via a mic.
Recording Plug In Power setting Turn this setting “ON” if you’re using a plug-in powered mic; turn it “OFF” if you’re using a mic that uses a battery or does not require a plug-in power supply. 1. Press [MENU] to access the “Menu” screen, use [ ]/[ ] to select “Input,” and then press [ ]. 2. Use [ ]/[ ] to move the cursor to the Plug In Power setting, and use [ ]/[ ] to choose “ON” or “OFF.
Recording Assigning a Marker During Recording (Default in bold) 64 MB 128 MB You can assign markers in the WAV file during recording. Size at which file will be automatically split Once you’ve assigned markers, you’ll be able to jump to the marked locations by touching [ ] [ ] in the MARK tab during playback. * Markers cannot be assigned to an MP3 file. Split Type Recording level at which file will Level 2 be automatically split (-30 dB) Level 3 (-20 dB) 2.
Playback Basic Playback Operation Play Mode and Repeat Settings You can specify how the files will be played. In addition to playing files consecutively from the first file, you can play just the selected file, or play files in an automatically determined order (shuffle play). Play / Pause Rewind / Move to previous song or beginning of song Fast-forward / Move to next song 1. Press [MENU] to access the “Menu” screen, use ]/[ ] to select “Player,” and then press [ ]. [ 2.
Playback Assigning Markers in a File You can assign markers to the desired locations in a WAV file, and then jump easily to those locations. * Markers cannot be assigned to an MP3 file. Repeatedly Playing a Portion of a File The AB Repeat function lets you repeatedly play a specified portion of a file. You can use this to repeatedly hear a section of interest. 1. Access the main screen. 1. Press [ 2. Use the [ 2. Specify the beginning of the repeat (point A).
Playback Changing the Playback Speed Not available for 88.2 kHz or 96.0 kHz sample rates You can make the playback faster or slower without changing the pitch. 1. Press [MENU] to access the “Menu” screen, use Applying Reverb to the Playback Not available for 88.2 kHz or 96.0 kHz sample rates You can apply reverb when playing back a file on the R-07. The reverb effect simulates the reverberation that is characteristic of a performance in a large hall or other space.
Playback Changing the Reverb Depth Specifies the depth of reverb. 1. Press [MENU] to access the “Menu” screen, use [ ]/[ ] to select “Player,” and then press [ ]. 2. Use [ ]/[ ] to move the cursor to Rev Depth setting, and use [ ]/[ ] to change the setting. Types of Files that Can be Played The R-07 can play back the following types of files. Sampling rate (kHz) Sample size (bits) WAV 16, 24 32.0, 44.1, 48.0, 88.2, 96.0 Sampling rate (kHz) Bit rate MP3 32–320 kbps, VBR 32.0, 44.1, 48.
Controlling the R-07 from a Mobile Device Using Bluetooth® functionality lets you remotely control the R-07 from a mobile device such as a smartphone or tablet. * The app supports iOS and Android. Here we explain how to install the app and make initial settings. Starting the R-07 Remote 1. Place the mobile device that you want to connect nearby this unit. Installing the App “R-07 Remote” 1. From the web browser of your mobile device, access the following URL. http://roland.
Controlling the R-07 from a Mobile Device Synchronizing the time with the mobile device When the “R-07 Remote” app is connected to the R-07, you can automatically synchronize the R-07’s time with the mobile device’s time. Date & Time Adj.
Using the Metronome Using the Metronome by Itself You can listen to the metronome via the preview monitor or through headphones while you practice your instrument. 1. Press [MENU] to access the “Menu” screen, use ]/[ ] to select “Metronome,” and then [ press [ ]. 2. Use [ ]/[ ] to adjust the BPM (tempo), and use [ ]/[ ] to specify the BEAT (the number of beats in each measure).
Using the Tuner Two types of tuners, each having a different type of display, are provided: a tuner that’s convenient for tuning an instrument, and a graphic tuner that’s useful for vocal or brass instrument practice. Both tuners let you choose either Auto, which automatically displays the note name, or Manual, which lets you specify the note name beforehand. The reference pitch can be adjusted in the range of A = 435–445 Hz. You can use either the built-in mic or the MIC/AUX IN input.
Using the Tuner Graphic Tuner This tuner graphically shows the pitch change in real time. It is a convenient way for you to practice singing or playing a wind instrument with a stable pitch. 1. Press [MENU] to access the “Menu” screen, use [ ]/[ ] to select “Graphic Tuner,” and then press [ ]. 2. Use [ and use [ ]/[ ] to specify the type/note of the tuner, ]/[ ] to specify the reference pitch.
Connecting to Your Computer By using a USB cable to connect the R-07 to your computer, you can transfer files from the R-07’s microSD card into your computer and use them in your music software. You can also transfer files from your computer to the R-07 and play them back on the R-07. display will show the “Now connecting” screen. For details, refer to “Types of Files that Can be Played” (p. 25). Transferring Files with a Computer (Mass Storage) Connecting the R-07 to Your Computer 1.
Handling Files and Folders The R-07 stores audio files on the microSD card. The “Finder” screen provides various functions for listing, deleting, or copying these files. You can also create folders and move files between folders to manage your data. Basic Operation Move the cursor up File structure on the R-07’s microSD card / Root R07_0001.WAV R07_0002.WAV R07_0003.WAV R07_0004.WAV Change the value (–) Change the value (+) Move the cursor to the left Move the cursor to the right Folder1 R07_0001.
Handling Files and Folders Operations in the “Finder” screen Selection File Function Result Procedure Select Selects the file and moves to the main screen. p. 33 Information Shows information about the file. Alternatively, protects the file name. p. 33 Delete Deletes the file. p. 34 Rename Renames the file. p. 34 Move Moves the file. p. 34 Copy Copies the file. p. 34 Divide Splits the file. p. 35 Combine Joins the file. p. 35 Trim Deletes the beginning and end of the file. p.
Handling Files and Folders Deleting a File or Folder Moving a File 1. In the “Finder” screen, select a file or folder. 1. In the “Finder” screen, select a file. 2. Choose “Delete.” 2. Choose “Move.” 3. When the confirmation screen appears, press [ ] to 3. Use [ confirm the operation. MEMO If you decide to cancel, press [MENU] before you press [ ]. 4. Press [MENU] twice to return to the main screen. Renaming a File or Folder 1. In the “Finder” screen, select a file or folder. 2.
Handling Files and Folders Dividing a File Combining Files 1. In the “Finder” screen, select a file. 1. In the “Finder” screen, select a file. 2. Choose “Divide.” 2. Choose “Combine.” 3. Use [ 3. Select the file that will be combined with the ]/[ ] and [ ]/[ ] to play, fast-forward, and rewind through the file to find the point at which you want to divide it. When you’ve specified the point at which to divide the file, press [ ]. currently selected file.
Handling Files and Folders Deleting Unwanted Portions of a File (Trim) Creating an MP3 File 1. In the “Finder” screen, select a file. 1. In the “Finder” screen, select the WAV file that you 2. Choose “Trim.” 3. Use [ ]/[ ] and [ ]/[ ] to find the Start Point of the region that you want to keep. When you’ve found the desired Start Point, press [ ]. 4. Use [ ]/[ ] and [ ]/[ ] to find the End Point of the region that you want to keep. When you’ve found the desired End Point, press [ ].
Handling Files and Folders Repairing a File If, during recording, the power is interrupted by disconnecting the USB cable, or the microSD card is removed, the file will be damaged and unplayable. In some cases you may be able to use the Repair function to make the file playable. 1. In the “Finder” screen, select a file. Creating a Folder 1. In the “Finder” screen, select the location at which you want to create a folder. To create a folder at the Root level Use [ ]/[ ] to select Root, and press [ ].
Settings for the R-07 In the “Menu” screen you can make various settings for the R-07 itself, such as settings for recording and playback, and the date and time. 1. Press [MENU] to access the “Menu” screen, use [ ]/[ ] to choose the desired settings category, and then press [ ].
Settings for the R-07 Category: Recorder Menu item Effect Value (default value: bold) Specifies the sampling rate for recording (p. 14). Sampling Rate Rec Mode * If this setting is 88.2 kHz or 96.0 kHz, the only choices for REC Mode are WAV-16 bit and WAV-24 bit. 44.1 kHz, 48.0 kHz, 88.2 kHz, 96.0 kHz Specifies the type of file for recording (p. 14).
Settings for the R-07 Category: Power Manage Menu item Effect Auto Off Specifies the time after which the power will turn off if no operation OFF, 3 min, 5 min, 10 min, 15 min, 30 min, 45 has been performed. min, 60 min Value (default value: bold) Battery Specifies the type of battery that is installed.
Error Messages This section explains the main error messages that may appear in the display. Message Clock Initialized Battery Low Problem Power for the internal clock was lost, so the internal clock has been initialized. Please specify the date and time. The internal batteries have run low. Replace the batteries. Alternatively, supply power via the USB port. Improper Song This file is of a format that the R-07 cannot use. Already Exists An identically named file or folder exists.
Troubleshooting If you experience problems, refer to the information provided here. If this information does not help you solve the problem, please contact a customer service location listed on the leaflet “Read Me First.” Problems with Recording Problem Cause Page If you’re using a mono mic, only the L (left) channel will be recorded. Sound recorded from the mic is heard only from the L (left) channel If you use an external mic, check whether the mic is stereo or mono.
Troubleshooting Problems with Bluetooth Functionality Problem Cause Page Check whether the Bluetooth device is able to connect. If the Bluetooth device is too far away from the R-07, it might be unable to connect. Can’t connect with Bluetooth headphones or Place the Bluetooth device near the R-07. speakers Check the R-07’s “Pairing Audio” to see whether pairing data might be lost. If the data is lost, perform the pairing operation once again.
Troubleshooting 44 Problem Cause Page File name display is slow when selecting a file Even if the file name extension is .MP3 or .WAV, the display when selecting a file will be slower if the file is damaged, if the file is an invalid file or an unsupported type of MP3, or if the file is of a large size. This occurs because the R-07 needs to determine whether it is able to play the file. p.
Main Specifications High Resolution Audio Recorder: R-07 Data Type [For Recording] * Stereo only Recorder Part WAVE: Tracks 2 (stereo) Sampling Rate 44.1/48/88.2/96 kHz Bit Depth 16/24 bits MP3 (MPEG-1 Audio Layer 3): 4 (stereo x2) * WAVx2 recording mode only Signal Processing Sampling Rate 44.1/48 kHz Bit Rates 64/96/128/160/192/224/320 kbps WAV+MP3: AD/DA conversion: 24 bits, 44.1/48/88.2/96 kHz Sampling Rate 44.
Main Specifications Input/Output Other Audio Inputs Display Internal Stereo Microphone MIC/AUX IN jack (Stereo miniature phone type, plug-in powered mic) * The Internal Mic and the MIC/AUX IN can’t be used at the same time; only the MIC/AUX IN jack is effective. Audio Output PHONES jacks (Stereo miniature phone type) Internal Speaker for playback (mono) * The Internal Speaker and the PHONES jack can’t be used at the same time; only the PHONES jack is effective.