SP-555_e.
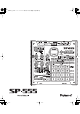
SP-555_e.book 2 ページ 2007年6月25日 月曜日 午前9時9分 Main Features Quick, Easy, and Unique Sampling! Sample easily to the pads, or use LOOP CAPTURE for creative sound-on-sound sampling. Sample Almost Anything! Sample through its Line, or Mic Input with Phantom power. Also sample via USB audio streaming. Perform with Killer Realtime Effects! 37 powerful effects such as Voice Transformer, Delay, and the unique Super Filter and DJFX Looper, now with Effect Memory for instant recall of your effect settings.
SP-555_e.book 3 ページ 2007年6月25日 月曜日 午前9時9分 Thank you, and congratulations on your choice of the Roland SP-555. Before using this unit, carefully read the sections entitled: “USING THE UNIT SAFELY” and “IMPORTANT NOTES” (p. 4; p. 6). These sections provide important information concerning the proper operation of the unit. Additionally, in order to feel assured that you have gained a good grasp of every feature provided by your new unit, Owner’s manual should be read in its entirety.
SP-555_e.book 4 ページ 2007年6月25日 月曜日 午前9時9分 USING THE UNIT SAFELY USING THE UNIT SAFELY Used for instructions intended to alert the user to the risk of death or severe injury should the unit be used improperly. Used for instructions intended to alert the user to the risk of injury or material damage should the unit be used improperly. * Material damage refers to damage or other adverse effects caused with respect to the home and all its furnishings, as well to domestic animals or pets.
SP-555_e.book 5 ページ 2007年6月25日 月曜日 午前9時9分 USING THE UNIT SAFELY • Do not allow any objects (e.g., flammable material, coins, pins); or liquids of any kind (water, soft drinks, etc.) to penetrate the unit. • Try to prevent cords and cables from becoming entangled. Also, all cords and cables should be placed so they are out of the reach of children. ....................................................................................................
SP-555_e.book 6 ページ 2007年6月25日 月曜日 午前9時9分 IMPORTANT NOTES In addition to the items listed under “USING THE UNIT SAFELY” on p. 4, please read and observe the following: Power Supply Repairs and Data • Do not connect this unit to same electrical outlet that is being used by an electrical appliance that is controlled by an inverter (such as a refrigerator, washing machine, microwave oven, or air conditioner), or that contains a motor.
SP-555_e.book 7 ページ 2007年6月25日 月曜日 午前9時9分 IMPORTANT NOTES Before Using Cards • Carefully insert the CompactFlash card all the way in—until it is firmly in place. • Never touch the terminals of the CompactFlash card. Also, avoid getting the terminals dirty. • This unit’s memory card slot accepts CompactFlash memory cards. Microdrive storage media are not compatible. • CompactFlash cards are constructed using precision components; handle the cards carefully, paying particular note to the following.
SP-555_e.book 8 ページ 2007年6月25日 月曜日 午前9時9分 Contents Main Features.................................................. 2 USING THE UNIT SAFELY.................................. 4 IMPORTANT NOTES ......................................... 6 Contents .......................................................... 8 Introducing the SP-555................................... 10 Panel Descriptions .............................10 Signal flow (block diagram) ................14 Playing samples .............................
SP-555_e.book 9 ページ 2007年6月25日 月曜日 午前9時9分 Contents About CompactFlash ...................................... 44 Recommended types of CompactFlash..44 CompactFlash theft prevention.............44 Inserting and removing CompactFlash cards...........................45 Formatting a CompactFlash card (initializing).......................................45 Importing audio files ..........................46 Exporting audio files ..........................47 Saving backup data (backup save) ......
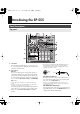
SP-555_e.book 10 ページ 2007年6月25日 月曜日 午前9時9分 Introducing the SP-555 Panel Descriptions Top panel 1 2 3 45 6 7 11 12 13 14 15 16 8 9 17 10 18 1. Internal Mic This is the SP-555’s built-in mic. If you connect your own mic (sold separately) to the MIC jack of the top panel, this internal mic will not function. * This instrument is equipped with balanced (XLR/TRS) type jacks. Wiring diagrams for these jacks are shown below.
SP-555_e.book 11 ページ 2007年6月25日 月曜日 午前9時9分 Introducing the SP-555 PEAK Indicator This indicator helps you adjust the MIC or LINE IN level. Adjust the level so that this indicator lights occasionally. 3. VOLUME Knob This adjusts the volume of the LINE OUT and PHONES output. 4. METRONOME Button LENGTH Button When recording a pattern, this specifies the length of the pattern. QUANTIZE Button This specifies automatic timing adjustments (quantization) when recording a pattern. 8.
SP-555_e.book 12 ページ 2007年6月25日 月曜日 午前9時9分 Introducing the SP-555 PLAY Button This plays the recorded phrase. alternately start or stop playing each time you press the pad. Gate playback will occur if this button is lit, and trigger playback will occur if this button is extinguished. SAVE TO PAD Button This saves a phrase recorded using LOOP CAPTURE to a pad. LOOP Button (➜ p.
SP-555_e.book 13 ページ 2007年6月25日 月曜日 午前9時9分 Introducing the SP-555 18. Pads 1–16 When you press a pad that is lit red, the sample assigned to that pad will sound. The pad will blink while the sample is playing. When [PATTERN SELECT] is lit, you can use the pads to select the pattern that will be played or recorded. Rear panel Front panel 123 4 5 6 7 8 9 10 11 1. Cord Hook Wrap the AC adaptor cord around this to prevent the AC adaptor’s plug from being accidentally unplugged. 1 2 1.
SP-555_e.book 14 ページ 2007年6月25日 月曜日 午前9時9分 Introducing the SP-555 8. PEDAL Jack audio player. You can connect a pedal switch (DP series; sold separately) here and use it to perform loop capture or pattern play/stop operations (p. 68). 9. LINE IN Jacks (L/R) Connect these jacks to the audio source device from which you want to sample, such as a CD player or portable 10. LINE OUT Jacks (L/R) Connect these jacks to your audio system, amp, or mixer. 11. Security Slot ( ) http://www.kensington.
SP-555_e.book 15 ページ 2007年6月25日 月曜日 午前9時9分 Playing samples The SP-555 provides sixteen velocity-sensitive pads, which let you vary the volume according to the force with which you strike the pads. Striking a pad strongly will produce a louder sound, and striking it softly will produce a softer sound. BANK A–BANK J Banks A/B are in internal memory, and the remaining banks are on the CompactFlash card. Press a button to switch to the corresponding bank. Sixteen samples can be assigned to each bank.
SP-555_e.book 16 ページ 2007年6月25日 月曜日 午前9時9分 Playing samples Pad sensitivity You can adjust the relationship between the force used when striking pads and the volume of sample playback. 1. Hold down [CANCEL] and press [FIXED VELOCITY]. 2. While viewing the display, use the CTRL 3 knob to adjust the sensitivity. “-L-”: A loud volume will be produced even if you strike the pads softly. “-M-”: Medium sensitivity. “-H-”: There will be no sound unless you strike the pads strongly. 3.
SP-555_e.book 17 ページ 2007年6月25日 月曜日 午前9時9分 Playing samples You can also change the current pad by holding down [REMAIN] and pressing a pad. 3. Press [GATE] to switch on or off the button’s light. [GATE] lit: Gate playback [GATE] unlit: Trigger playback 4. Make sure that [LOOP] is extinguished. If it is lit, press [LOOP] so its light is turned off.
SP-555_e.book 18 ページ 2007年6月25日 月曜日 午前9時9分 Using effects The SP-555 contains 37 types of effects. However, you can use only one type of effect at a time. You can’t use a multiple number of effects at the same time. By default, the effect will be applied only to the pad you pressed most recently (the “current pad”). You can directly select the five effects SUPER FILTER, VOICE TRANS (voice transformer), DELAY, ISOLATOR, and DJFX LOOPER by pressing a button.
SP-555_e.book 19 ページ 2007年6月25日 月曜日 午前9時9分 Using effects Effect knob control Tips for using effects The SP-555 lets you choose either of the following two methods of operation to specify what will happen to the knob settings when you switch from one type of effect to another. Applying the same effect to more than one pad (EFFECT ASSIGN) 1. While holding down [CANCEL], press [SUPER FILTER].
SP-555_e.book 20 ページ 2007年6月25日 月曜日 午前9時9分 Using effects Applying an effect to all pads Here’s how to apply the effect to all pads of banks A–J. 1. Make sure that [PATTERN SELECT] is extinguished. If it is lit, press [PATTERN SELECT] to turn it off. 2. While holding down [EFFECT ASSIGN], press [SUB PAD]. All bank buttons and all pads will light (the current pad will blink).
SP-555_e.book 21 ページ 2007年6月25日 月曜日 午前9時9分 Sampling (recording) About the available sampling times Remaining sampling time When you press [REMAIN], the display will indicate the remaining time. When using internal memory If you sample to bank A or B, the sample is stored in internal memory. Internal memory can hold up to 32 samples. If you reach 32 samples, you won’t be able to record further samples. Minutes STANDARD stereo (mono) Using internal memory Approx.
SP-555_e.book 22 ページ 2007年6月25日 月曜日 午前9時9分 Sampling (recording) Standby mode * During this procedure, you can cancel the preceding steps by pressing [CANCEL]. 1. Make sure that [PATTERN SELECT] is off (extinguished). 2. Press [SAMPLING]. 3. Press a bank button to specify the bank into which you want to sample. When you press a bank button, the pads within that bank to which you can sample (i.e., pads that do not contain a sample) will blink. 4.
SP-555_e.book 23 ページ 2007年6月25日 月曜日 午前9時9分 Sampling (recording) Sampling with a specified tempo If you specify the BPM (tempo) while you’re still in sampling standby mode, the end point (the timing at which the sound stops playing) will be automatically set after sampling to a beat of the BPM value you specified. 1. Enter sampling standby mode. Using a count-in You can add a count-in (1, 2, 3, 4) when you start sampling.
SP-555_e.book 24 ページ 2007年6月25日 月曜日 午前9時9分 Sampling (recording) 5. Adjust the CTRL 3 (LEVEL) knob so that the display Deleting all samples Here’s how to delete all samples from internal memory or the CompactFlash card. 1. Make sure that [PATTERN SELECT] is extinguished. If it is lit, press [PATTERN SELECT] to turn it off. 2. While holding down [CANCEL], press [DEL]. The display will indicate “dAL,” and [DEL] will light. BANK [A]–[F/J] will blink.
SP-555_e.book 25 ページ 2007年6月25日 月曜日 午前9時9分 Loop Capture The SP-555’s Loop capture function lets you capture the currently playing sound as a loop phrase. LINE OUT / PHONE LINE IN / MIC Using Loop Capture to record from an external device * Here we explain how you can use Loop Capture to record from a playback device connected to LINE IN, such as a CD player or portable audio player. If you want to record from a mic, replace references to LINE IN with MIC in the explanation that follows.
SP-555_e.book 26 ページ 2007年6月25日 月曜日 午前9時9分 Loop Capture Deleting the phrase recorded by Loop Capture 1. Press [DEL]. 2. The display will indicate “dEL” and [PLAY] will blink. If you’ve selected a protected bank, the display will indicate “Prt,” but you’ll still be able to delete the phrase. 3. In the LOOP CAPTURE section, press [PLAY]. 4. If you press [DEL], the phrase will be deleted. When the deletion is complete, [PLAY] will go out. * Never turn off the power before the deletion is complete.
SP-555_e.book 27 ページ 2007年6月25日 月曜日 午前9時9分 Loop Capture Saving a recorded phrase to a pad By using [SAVE TO PAD], a phrase recorded by Loop Capture can easily be sampled to a pad. * If you want to cancel the preceding steps during the following procedure, press [CANCEL]. 1. Press [SAVE TO PAD]. 2. Press a bank button to specify the bank of the savedestination pad. When you press a bank button, the pads in that bank to which sampling is possible (i.e.
SP-555_e.book 28 ページ 2007年6月25日 月曜日 午前9時9分 Editing a sample Setting a sample’s volume Here’s how to adjust the volume of each pad. 1. Make sure that [PATTERN SELECT] is extinguished. If it is lit, press [PATTERN SELECT] to turn it off. 2. Press the pad to which the sample whose volume you want to adjust is assigned. The pad will light, and that sample will play. 3. Press [START/END/LEVEL] so the button is lit. 4.
SP-555_e.book 29 ページ 2007年6月25日 月曜日 午前9時9分 Editing a sample Adjusting both the start point and end point 1. Make sure that [PATTERN SELECT] is extinguished. If it is lit, press [PATTERN SELECT] to turn it off. 2. Press the pad whose playback region you want to adjust, making it sound. Adjusting only the end point 1. Make sure that [PATTERN SELECT] is extinguished. If it is lit, press [PATTERN SELECT] to turn it off. 2.
SP-555_e.book 30 ページ 2007年6月25日 月曜日 午前9時9分 Editing a sample Making fine adjustments to the start point and end point 1. Make sure that [PATTERN SELECT] is extinguished. If it is lit, press [PATTERN SELECT] to turn it off. 2. Play the pad whose playback region you want to Exchanging samples between two pads You can exchange samples between two pads. This lets you bring together the desired samples into a single bank, or move samples from internal memory to a CompactFlash card.
SP-555_e.book 31 ページ 2007年6月25日 月曜日 午前9時9分 Editing a sample Copying a sample to another pad You can copy a sample from one pad to another pad. This lets you create another sample based on an existing sample. If you decide to cancel this operation during the procedure, press [CANCEL]. 1. While holding down [DEL], press [RESAMPLE]. 2. The display will indicate “CPY.
SP-555_e.book 32 ページ 2007年6月25日 月曜日 午前9時9分 Editing a sample Changing a sample’s BPM A sample’s BPM (tempo) is automatically determined by the length between the sample’s start point and end point. However, depending on this length, the calculated BPM value may be half or double the actual BPM. In this case, you can correct the BPM as follows. 1.
SP-555_e.book 33 ページ 2007年6月25日 月曜日 午前9時9分 Playing samples and recording your performance (Pattern Sequencer) The SP-555 provides a Pattern Sequencer, which lets you play samples and record your performance. You can play samples, record your performance as a “pattern,” and then play back the recorded pattern. You can create a song by putting together various phrase samples, or create a rhythm pattern by putting together rhythm samples.
SP-555_e.book 34 ページ 2007年6月25日 月曜日 午前9時9分 Playing samples and recording your performance (Pattern Sequencer) Recording a pattern When you play samples and record your performance as a pattern, recording will occur repeatedly for the number of measures you specify (i.e., “loop recording”), allowing you to continue layering (overdubbing) additional samples onto the pattern. 1. Press [PATTERN SELECT] so the button is lit.
SP-555_e.book 35 ページ 2007年6月25日 月曜日 午前9時9分 Playing samples and recording your performance (Pattern Sequencer) 15. Press the pads at the desired timing. During recording, you can use the pads to play samples. You can also press a bank button to switch sample banks. The samples of the pads you pressed will play, and will be recorded at the timing specified by the selected quantize setting.
SP-555_e.book 36 ページ 2007年6月25日 月曜日 午前9時9分 Playing samples and recording your performance (Pattern Sequencer) Deleting a pattern 1. Press [PATTERN SELECT] so the button is lit. The display will indicate “Ptn” and the pads that have been recorded will blink. 2. Press [DEL] so the button is lit. The display will indicate “dEL.” If the display indicates “EMP,” that bank does not contain any pads to which a pattern is assigned. 3.
SP-555_e.book 37 ページ 2007年6月25日 月曜日 午前9時9分 Playing samples and recording your performance (Pattern Sequencer) Exchanging the patterns of two pads You can change the patterns assigned to each pad by exchanging patterns between two pads. You can also exchange patterns between a pad to which an already-recorded pattern is assigned and a pad to which no pattern is assigned. 1. Press [PATTERN SELECT] so the button is lit. The display will indicate “Ptn.” 2. While holding down [DEL], press [SAMPLING].
SP-555_e.book 38 ページ 2007年6月25日 月曜日 午前9時9分 D Beam controller Monophonic synthesizer (SYNTH) The SP-555 provides a D Beam controller, which lets you modify the sound in various ways by moving your hand above it. You can choose one of three modes: [SYNTH] (monophonic synthesizer), which lets you control the pitch by your hand position; [FILTER], which lets you control the cutoff frequency; and [TRIGGER], which lets you trigger the desired pad.
SP-555_e.book 39 ページ 2007年6月25日 月曜日 午前9時9分 D Beam controller Filter Trigger If you press [FILTER] so the button is lit, you’ll be able to control the cutoff frequency of a filter by moving your hand above the controller. If you press [TRIGGER] so the button is lit, you’ll be able to play the desired pad by moving your hand above the controller. [FILTER] will blink when you’re within the effective range of the D Beam controller. To specify the pad, hold down [TRIGGER] and press the desired pad 1–16.
SP-555_e.book 40 ページ 2007年6月25日 月曜日 午前9時9分 Connecting the SP-555 to your computer The SP-555 provides USB audio/MIDI interface functionality. If you install a dedicated driver in your computer and use a USB cable (sold separately) to connect the SP-555 to your computer, you'll be able to output sound from your computer via the SP-555. By using the included SONAR LE software, you can use your computer to record sound from a guitar or mic connected to the SP-555.
SP-555_e.book 41 ページ 2007年6月25日 月曜日 午前9時9分 Connecting the SP-555 to your computer 5. The installer will start up. Proceed with the installation Windows Vista users * In order to install the driver and the software, you’ll need to log on as a user who has administrative privileges. Installing the driver 1. Start up your computer with all USB cables disconnected (except for a USB keyboard and/or mouse, if used). 2.
SP-555_e.book 42 ページ 2007年6月25日 月曜日 午前9時9分 Connecting the SP-555 to your computer Mac OS X users Installing the driver * If the “Authentication” dialog box appears during the installation, enter the password and click [OK]. 1. Start up your computer with all USB cables disconnected (except for a USB keyboard and/or mouse, if used). 2.
SP-555_e.book 43 ページ 2007年6月25日 月曜日 午前9時9分 Connecting the SP-555 to your computer About SONAR LE (Windows only) SONAR LE is a DAW application for Windows. It allows you to perform a variety of operations ranging from music production using MIDI and audio, all the way to creating master data. About SP-555 Wave Converter SP-555 Wave Converter is a tool that converts samples on a CompactFlash card formatted for the SP-555 to WAV/AIFF files on your computer, and vice versa.
SP-555_e.book 44 ページ 2007年6月25日 月曜日 午前9時9分 About CompactFlash Recommended types of CompactFlash The SP-555 supports CompactFlash cards (type I) having a capacity of from 32 MB up to 2 GB. * You can’t use Type II cards such as Microdrives. As of this date, Roland has verified that the SP-555 will work correctly with the following memory cards.
SP-555_e.book 45 ページ 2007年6月25日 月曜日 午前9時9分 About CompactFlash Inserting and removing CompactFlash cards Never insert or remove a CompactFlash card while this unit’s power is on. Doing so may corrupt the unit’s data or the data on the CompactFlash card. Inserting a CompactFlash card 1. Switch off the SP-555’s power. 2. Remove the memory card cover. 3. Insert the CompactFlash card in the front panel card slot. 4. Attach the memory card cover.
SP-555_e.book 46 ページ 2007年6月25日 月曜日 午前9時9分 About CompactFlash 1. Make sure that [PATTERN SELECT] is extinguished. Importing audio files You can import audio files via CompactFlash card and assign them to pads. Caution when importing audio files (WAV/AIFF) • Use a CompactFlash card that was formatted by the SP-555. • When you use your computer or other device to copy or save audio files (WAV/AIFF) on a CompactFlash card, place the files in the root directory (top level) of the CompactFlash card.
SP-555_e.book 47 ページ 2007年6月25日 月曜日 午前9時9分 About CompactFlash Exporting audio files A sample assigned to a pad can be exported to a CompactFlash card as an audio file. 1. While holding down [RESAMPLE], turn on the power. 2. Turn the CTRL 3 knob to select the format in which you want to export the files. WAV: WAV format AiF: AIFF format 3. Press [SAMPLING] to confirm your choice of file type. This selection is maintained even when you turn off the power. 4.
SP-555_e.book 48 ページ 2007年6月25日 月曜日 午前9時9分 About CompactFlash Saving backup data (backup save) Here’s how to save a set of backup data (containing all of the SP-555’s internal data including sample banks and pattern banks) to a CompactFlash card. Up to sixteen sets of backup data can be saved on a card. Loading backup data (backup load) If you’ve saved numerous samples and patterns on a card, and it doesn’t have much space remaining, you’ll only be able to save a small number of backup sets.
SP-555_e.book 49 ページ 2007年6月25日 月曜日 午前9時9分 About CompactFlash Deleting backup data (backup delete) Here’s how to delete a set of backup data (containing all the SP-555’s settings including sample banks and pattern banks) from the CompactFlash card. 1. While holding down [DEL], press one of the BANK [C/ G]–[F/J] buttons. The display will indicate “bdL,” and the pads to which backup data has been saved will blink. 2. Press a pad to specify the backup data you want to delete.
SP-555_e.book 50 ページ 2007年6月25日 月曜日 午前9時9分 Other settings Restoring the factory settings Here’s how to restore all settings of the SP-555, including the sample and pattern data (banks A and B) and effect memory settings to the factory-set state. This operation will cause all internal memory data to be lost. If necessary, you should make a backup before you proceed. (“Saving backup data (backup save)” (p. 48)) 1. Switch off the SP-555’s power. 2.
SP-555_e.book 51 ページ 2007年6月25日 月曜日 午前9時9分 Other settings Protecting the memory You can protect the memory so that samples and patterns cannot be deleted accidentally. Protecting all samples and patterns 1. While holding down [REMAIN], turn on the power. The display will indicate “P.on,” and the samples and patterns of banks A–J will be protected.
SP-555_e.book 52 ページ 2007年6月25日 月曜日 午前9時9分 About V-LINK What is V-LINK? Turning V-LINK on/off V-LINK ( ) is functionality promoted by Roland that makes it easy to synchronize visual effects with music. By using video equipment that supports the use of VLINK (such as Edirol motion dive .tokyo Performance Package), you can easily produce a variety of visual effects that are linked to the expressive elements of your performance. For example, if you use the SP-555 in conjunction with the motion dive .
SP-555_e.book 53 ページ 2007年6月25日 月曜日 午前9時9分 About V-LINK V-LINK settings You can set or edit the following functions that are related to V-LINK. With the exception of the pad mode, make the setting and then press [SAMPLING] to save the setting. Function Operation Remarks [V-LINK] + [EFFECT MEMORY] Fixed at Clip at power-on. V-LINK Ctrl Ach Value (display indication) Clip/Palette (“CLP”, “PLT”) 1 – 16 (“C. 1”–“C.
SP-555_e.book 54 ページ 2007年6月25日 月曜日 午前9時9分 Appendix Effect list Effects that you can select by directly pressing a button Type SUPER FILTER A filter with an extremely steep slope (sharp attenuation). (-36 dB/octave) CTRL 1 function (display) CUTOFF (CoF) Adjusts the cutoff frequency. CTRL 2 function (display) RESONANCE (rES) ✩ Adjusts the amount of peak at the cutoff frequency. VOICE TRANS Processes a human voice to create a variety of characters.
SP-555_e.book 55 ページ 2007年6月25日 月曜日 午前9時9分 Appendix MFX bank A Number 1 2 3 Type FLANGER Creates modulation reminiscent of a jet airplane taking off and landing. PHASER Creates modulation by adding a phase-shifted sound. WAH Produces a wah effect. CTRL 1 function (display) DEPTH (dPt) Adjusts the depth of modulation. CTRL 2 function (display) RATE (rAt) Adjusts the speed of modulation. DEPTH (dPt)✩ Adjusts the depth of modulation.
SP-555_e.book 56 ページ 2007年6月25日 月曜日 午前9時9分 Appendix Number Type SLICER+FLG Repeatedly cuts the sound. A flanger is added. RING MOD Gives the sound a metallic character. CTRL 1 function (display) TIMING PTN (P01–P16) (*1) The timing at which the sound is cut. FREQUENCY (Frq)✩ Adjusts the pitch of the metallic sound. CTRL 2 function (display) RATE (t32–t1) (*2) Adjusts the length of TIMING PTN. SENS (SEn)✩ Adjusts the depth to which the frequency is modulated. 15 PITCH Changes the pitch.
SP-555_e.book 57 ページ 2007年6月25日 月曜日 午前9時9分 Appendix MFX bank B Number 1 Type COMP Makes the sound more consistent. CTRL 1 function (display) SUSTAIN (SUS) Adjusts the depth of the compressor. 2 EQUALIZER 3 Adjusts the volume of each frequency region. C.CANCELER Cancels the vocal or other sound located in the center. LOW (Lo )✩ Adjusts the low-frequency volume. L-R BALANCE (L-r) Adjusts the point at which maximum cancellation occurs.
SP-555_e.book 58 ページ 2007年6月25日 月曜日 午前9時9分 Appendix Number 15 16 Type BPM LOOPER Loops the input sound over a short period. CTRL 1 function (display) LENGTH (LEn)✩ Adjusts the length of the loop. REVERSE Adds a delayed and reversed version of the input sound. DELAY TIME (t32–t1)*1 Adjusts the length of time that the reversed sound will be repeated.
SP-555_e.
SP-555_e.
SP-555_e.
SP-555_e.
SP-555_e.book 63 ページ 2007年6月25日 月曜日 午前9時9分 Appendix Parameters that can change the start-up state Parameter Fixed Velocity Range (display indication) 16–127 (“ 16”–“127”) Panel operation [FIXED VELOCITY] + CTRL 3 knob Remarks Specifies the velocity value when FIXED VELOCITY (p. 16) is on. After making the setting, press [FIXED VELOCITY] + [SAMPLING] to save it. Specifies the pad sensitivity (p. 16). After making the setting, press [SAMPLING] to save it.
SP-555_e.book 64 ページ 2007年6月25日 月曜日 午前9時9分 Appendix Parameter D Beam Assign Range (display indication) Off, 1–30 (“oFF”, “ 1”–“ 30”) Panel operation [CANCEL] + [V-LINK] ➜ [SYNTH]/[FILTER]/[TRIGGER] ➜ CTRL 3 knob Remarks After making the setting, press [SAMPLING] to save it. Seq Ach Ctrl Pad Bank Off, Bank A–J (“off”, “b. A”–“b. J”) [CANCEL] + [V-LINK] ➜ Bank [D/H] ➜ CTRL 3 knob After making the setting, press [SAMPLING] to save it. Seq Bch Ctrl Pad Bank Off, Bank A–J (“off”, “b. A”–“b.
SP-555_e.book 65 ページ 2007年6月25日 月曜日 午前9時9分 Appendix Troubleshooting This section lists some items to check and actions to take if you experience problems. Refer to the section appropriate for your situation. No sound / Insufficient volume Has the power to the SP-555 and your connected equipment been turned on? Are the SP-555 and your external equipment connected correctly? Check the connections.
SP-555_e.book 66 ページ 2007年6月25日 月曜日 午前9時9分 Appendix Can’t sample Could there be insufficient memory? If there is insufficient memory, the display will indicate “FUL” (Memory Full) when you attempt to sample. Delete unneeded samples to increase the amount of free memory. (p. 23) Is the CompactFlash card inserted correctly? If you’re sampling to sample banks C–J, make sure that the CompactFlash card is inserted correctly. (p.
SP-555_e.book 67 ページ 2007年6月25日 月曜日 午前9時9分 Appendix Data is not saved correctly in the CompactFlash card It is possible that the power was turned off while data was being written into the CompactFlash card (i.e., while the dot was blinking in the display). The lost data cannot be recovered. In this case, it is possible that all data in the CompactFlash card has been destroyed. Additional malfunctions may occur if you attempt to continue using the card. Please format the CompactFlash card. (p. 45).
SP-555_e.book 68 ページ 2007年6月25日 月曜日 午前9時9分 Appendix About the pedal If you connect a pedal switch (DP series; sold separately) to the rear panel PEDAL jack, you’ll be able to perform the following operations by pressing the pedal. Function REC/OVERDUB/PLAY loop capture Action Press the pedal to cycle through the choices, which are: record➜ play➜ overdub➜ play. Rapidly press the pedal twice to stop.
SP-555_e.book 69 ページ 2007年6月25日 月曜日 午前9時9分 Using the SP-555 with other MIDI equipment About MIDI MIDI stands for Musical Instrument Digital Interface, and is a global standard that allows electronic musical instruments and computers to exchange performance data. The SP-555 is compatible with MIDI, and provides two MIDI connectors, MIDI IN and MIDI OUT. By connecting these connectors to other MIDI devices you can create a wide range of setups. “MIDI Implementation” (p.
SP-555_e.book 70 ページ 2007年6月25日 月曜日 午前9時9分 Using the SP-555 with other MIDI equipment Synchronizing the pattern tempo and playback start/stop with an external MIDI sequencer With the factory settings, the SP-555 (whose MIDI synchronization mode will be set to “Aut”) can be connected to your external MIDI sequencer, and the external MIDI sequencer can control the start/stop and tempo of the pattern playback. 1.
SP-555_e.book 71 ページ 2007年6月25日 月曜日 午前9時9分 Using the SP-555 with other MIDI equipment MIDI channel (Pad Base Ch.) and note numbers Use the following MIDI channels and note numbers when playing the SP-555’s samples from an external MIDI device, or when using the SP-555’s pads to play an external MIDI device.
SP-555_e.book 72 ページ 2007年6月25日 月曜日 午前9時9分 MIDI Implementation Model: Date: Version: ■System Realtime Message SP-555 May 01, 2007 1.00 ●Timing Clock 1. Receive data Status F8H ■Channel Voice Messages * This message is received if Sync Mode is AUTO or TEMPO. * For the correspondence between note numbers and pad banks, refer to “MIDI channel (Pad Base Ch.) and note numbers” (p. 71). ●Note Off Status 8nH 9nH 2nd byte kkH kkH 3rd byte vvH 00H n = MIDI channel number: 0H - FH (ch.1 - ch.
SP-555_e.book 73 ページ 2007年6月25日 月曜日 午前9時9分 MIDI Implementation ●Note On Status 9nH ●Active Sensing 2nd byte kkH 3rd byte vvH Status FEH n = MIDI channel number: 0H - FH (ch.1 - ch.16) kk = note number: 23H - 72H (35 - 114) vv = note on velocity: 01H - 7FH (1 - 127) ●Control Change ❍CTRL1 (Controller number 13) Status BnH 2nd byte 0DH 3rd byte vvH n = MIDI channel number: 0H - EH (ch.1 - ch.
SP-555_e.book 74 ページ 2007年6月25日 月曜日 午前9時9分 MIDI Implementation Model SP-555 Date : May 01,2007 MIDI Implementation Chart Transmitted Function...
SP-555_e.book 75 ページ 2007年6月25日 月曜日 午前9時9分 Specifications SP-555: Sampler Signal Processing AD Conversion: 24 bits DA Conversion: 24 bits Maximum Polyphony 12 voices Pads Sampling Frequency 16 with velocity sensitivity 44.1 kHz Controllers Data Format Control Knobs x 3, D Beam Controller SP-555 original format (WAV/AIFF import/export possible) Display 7 segments, 3 characters (LED) Sampling Mode Onboard Mic STANDARD, LO-FI Mono x 1 Maximum Sampling Time (mono, approx.
SP-555_e.book 76 ページ 2007年6月25日 月曜日 午前9時9分 Index A AC adaptor ............................................................................... AIF ........................................................................................... AiF ........................................................................................... Assign Effect ................................................................................. Preloaded samples .............................................................
SP-555_e.book 77 ページ 2007年6月25日 月曜日 午前9時9分 Index P Pad effect ................................................................................. sampling ............................................................................ sensitivity ............................................................................ Pad stand ................................................................................. Pattern backup delete .....................................................................
SP-555_e.
SP-555_e.book 79 ページ 2007年6月25日 月曜日 午前9時9分 For the U.K. IMPORTANT: THE WIRES IN THIS MAINS LEAD ARE COLOURED IN ACCORDANCE WITH THE FOLLOWING CODE. BLUE: NEUTRAL BROWN: LIVE As the colours of the wires in the mains lead of this apparatus may not correspond with the coloured markings identifying the terminals in your plug, proceed as follows: The wire which is coloured BLUE must be connected to the terminal which is marked with the letter N or coloured BLACK.
SP-555_e.book 80 ページ 2007年6月25日 Information AFRICA EGYPT Al Fanny Trading Office 9, EBN Hagar Al Askalany Street, ARD E1 Golf, Heliopolis, Cairo 11341, EGYPT TEL: 20-2-417-1828 REUNION Maison FO - YAM Marcel 25 Rue Jules Hermann, Chaudron - BP79 97 491 Ste Clotilde Cedex, REUNION ISLAND TEL: (0262) 218-429 SOUTH AFRICA T.O.M.S. Sound & Music (Pty)Ltd. 2 ASTRON ROAD DENVER JOHANNESBURG ZA 2195, SOUTH AFRICA TEL: (011)417 3400 Paul Bothner(PTY)Ltd.