
User Manual


7
ENG
JPN
DEU
FRA
ITA
ESL
POR
NLD
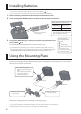
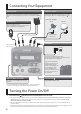
Connecting Pads
Connecting Pads
To make connections, use the cables included with the pad or acoustic drum trigger.
* Subsequently, acoustic drum triggers are called “drum triggers.” We use the term “pads” to include drum triggers.
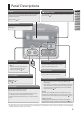
Connecting examples
Example
TRIG IN 1 TRIG IN 2
HEAD RIM HEAD RIM
Use an RT-10K to enhance an acoustic
kick, and add a PD-128S electronic second
snare
—
Add a KD-7 kick trigger, and a BT-1 to start
phrases
— —
* Choke play is not supported.
* 3-way trigger for CY-15R, CY-13R are not supported.
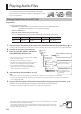
Pad Settings
1.
Hold down the [SHIFT] button and press the [INST] button.
2.
Press the [+] button, and then press the [>] button.
The TRIG SETUP–Type screen will appear.
3.
Press the TRIG IN [1] or [2] button to select the pad for which you want to make settings.
You can also select a pad by striking it.
4.
Use the [-] [+] buttons to select the type of the pad that’s connected.
If you connect a drum trigger, adjust the parameters as appropriate for how it’s attached and how the head is
stretched. p. 16
5.
Press the [INST] button several times to return to the kit screen.
The changes you’ve made will be saved automatically.
RT-10K
PD-128S
KD-7
BT-1
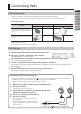
Connecting two pads to one TRIG IN jack
By using a connection cable (1/4” stereo phone plug 1/4” phone plug x 2: sold separately) you can connect two pads to
one TRIG IN jack. This lets you use separate pads to play the head and rim of one TRIG IN jack.
* With this connection, striking the rim of the pad won’t produce sound.
Connection cable
(1/4” stereo phone 1/4” phone x 2: sold separately)
Head Rim
To TRIG IN 1 or 2
1.
Hold down the [SHIFT] button and press the [INST] button.
2.
Press the [+] button.
The TRIG SETUP–Input screen will appear.
3.
Use the TRIG IN [1] [2] buttons to select the TRIG IN jack to
which you connected the two pads.
4.
Use the [-] [+] buttons to select “PADx2.”
5.
Press the [>] button.
Strike the two pads to select them, and specify the
type of each pad.
* Satisfactory operation cannot be obtained if “BT-1” is
selected as the type. When using a BT-1, select “BT-1
SENS” as the type.