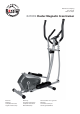
Gebruikersaanwijzing User manual Mode d’ emploi 021092 Cluster Magnetic Crosstrainer Garantie Montage Computerinstructies Algemene fitnesstips Warranty Assembly Instructions Computer Instruction General fitness tips Pour bénéficier de la garantie Montage Console électronique Conseils généraux fitness
Inhoudsopgave Algemene veiligheidsvoorschriften . . . . . . . . . . . . . . . . . . . . . 3 Garantie. . . . . . . . . . . . . . . . . . . . . . . . . . . . . . . . . . . . . . . . . . . . . . . . 5 Overzichtstekening . . . . . . . . . . . . . . . . . . . . . . . . . . . . . . . . . . . . . 6 Onderdelenlijst . . . . . . . . . . . . . . . . . . . . . . . . . . . . . . . . . . . . . . . . . 7 Montagehandleiding . . . . . . . . . . . . . . . . . . . . . . . . . . . . . . . . . . . 8 1.
Algemene veiligheidsvoorschriften Bij het ontwerp en de productie van dit fitnessapparaat is veel aandacht besteed aan veiligheid. U dient echter altijd bepaalde veiligheidsvoorschriften in acht te nemen. Zorg ervoor dat u de gehele handleiding uitvoerig heeft doorgelezen voordat u het apparaat in gebruik neemt. Houd daarbij rekening met onderstaande punten: 1 Dit apparaat is geen speelgoed en dient alleen gebruikt te worden voor doeleinden zoals beschreven in deze gebruiksaanwijzing.
Waarschuwing Raadpleeg uw arts voordat u met oefeningen begint. Een frequent en inspannend trainingsprogramma moet eerst door uw huisarts worden goedgekeurd. Dit is met name belangrijk voor mensen die 35 jaar of ouder zijn of mensen die lichamelijke problemen hebben. Lees de gehele handleiding zorgvuldig door voordat u met de training begint.
77 Bicycle Industry Group (BIG) garandeert de goede werking van het geleverde product met inachtneming van de op dit garantiebewijs vermelde bepalingen. Naam: Aankoopdatum: Adres: Model/type: Postcode / Woonplaats: Gekocht bij: Telefoonnummer: Framenummer*: *indien aanwezig Dit deel samen met de aankoopbon zorgvuldig bewaren. Dit garantie bewijs is alleen geldig als u zich heeft aangemeld via de site www.fietsservicenederland.
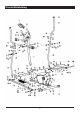
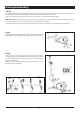
Overzichtstekening -6-
Onderdelenlijst Nr. Omschrijving Aantal Nr. Omschrijving Aantal 1 Hoofdframe 1 33 Inbusbout M10X45 4 2 Computerstang 1 34 Platte ring Ø10X1.5 6 3 Voor stabilisator stang 1 35 Borgmoer M10 6 4 Achter stabilisator stang 1 36 Kapmoer S16 4 5 L/R Pedaal stang (L/R) 1pr. 37 Inbusbout M10X50 2 6 L/R Swingarm(L/R) 1pr. 38 L/R Pedaal/crang bout (L/R) 1pr. 7 L/R Handvat(greep) swingarm (L/R) 1pr. 39 As bus Ø24 X20XØ16.
Montagehandleiding LET OP; De meeste onderdelen zijn afzonderlijk verpakt, maar sommige onderdelen zijn vooraf gemonteerd in de aangegeven montagedelen. Verwijder deze onderdelen en monteer ze opnieuw wanneer dat vereist is. Volg de verschillende stappen voor de montage en noteer alle vooraf gemonteerde onderdelen. VOORBEREIDING: Zorg dat u genoeg ruimte hebt voor de montage en maak gebruik van het aanwezige gereedschap. Controleer voordat u aan de montage begint of alle onderdelen aanwezig zijn.
Stap 3: A: Bevestig de swingarm (6L) op de lange as (27) van het computerstang (2) met Inbusbout (24), veerring (52), platte ring (25) en gegolfde ring (64). B: Bevestig de verbinding met pedaalstang (5L) aan de Crank (22) met behulp van de pedaal/crankbout (38L), golfring ring (62), veerring (41) en borgmoer (42L) zoals afgebeeld. C: Sluit swingarm (6L) met pedaalstang (5L) met behulp van inbusbout (30), platte ring (31) en borgmoer (32). Draai de inbusbout (24) (30) en borgmoer (42L) nu goed vast.
Computerhandleiding SPECIFICATIES: Functies: Tijd 00:00-99:59 M:S Snelheid 0.0-99.9 KM/H or ML/H Afstand 0.00-999.9 KM or ML Totale afstand 0-9999 KM or ML Hartslag 40-240 BPM Calrorieën (CAL) 0-9999 KCAL Batterij type 2 stuks AA type Bedrijfstemperatuur 0˚C ~ +40˚C (32˚F ~ 104˚F) Opslagtemperatuur -10˚C ~ +60˚C (14˚F ~ 140˚F) BELANGRIJKSTE FUNCTIES: MODE: Toets voor het selecteren en vastzetten van een bepaalde functie. GEBRUIKSPROCEDURES: 1.
Onderhoud en probleemoplossing 1. Controleer of alle bouten en moeren goed zijn aangedraaid en of alle draaiende onderdelen vrij kunnen bewegen. 2. Reinig het apparaat met een zachte doek en een oplossing van water en zachte zeep. Gebruik geen oplossingmiddelen. Probleemoplossing Probleem Oorzaak Oplossing Hoofdframe is instabiel. 1. De vloer is niet vlak of er bevindt zich een voorwerp onder een van de stabilisatoren. 2.
Algemene fitnesstips Raadpleeg uw huisarts Voordat u dit fitnessapparaat gaat gebruiken, is het zeer verstandig u eerst uitvoerig te laten onderzoeken door uw eigen huisarts of specialist. Voor regelmatig oefenen met dit apparaat dient u eerst goedkeuring van uw huisarts te hebben gekregen. Indien u tijdens het gebruik van dit apparaat klachten krijgt, dient u direct uw huisarts te raadplegen. Verstandig gebruik c.q. verantwoord gebruik van dit apparaat is van essentieel belang.
Warming-up – Cooling down Een succesvolle oefening begint met een warming-up en wordt afgesloten met een cooling down. Doe alle oefeningen twee tot drie keer per week en neem tussen de oefendagen een rustdag. Binnen enkele maanden kunt u het aantal oefeningen uitbreiden naar 5 tot 6 keer per week. De warming-up is van essentieel belang voordat u met een oefening begint. Je lichaam wordt voorbereid om inspanningen te verrichten.
Tenen aanraken Buig langzaam voorover en probeer met uw handen uw voeten aan te raken. Reik zover mogelijk en herhaal dit 15 keer. Hamstrings oefeningen Ga op de grond zitten en strek uw rechterbeen. Buig uw linkerbeen en zet uw voet tegen uw rechterbovenbeen. Reik met uw rechterarm naar uw rechtervoet. Doe dit 15 keer en herhaal dezelfde oefening met uw linkerbeen. Kuit/achilles oefeningen Zet beide handen tegen de muur en leun met het gehele lichaam op uw handen.
General safety instructions In the design and the production of this fitness equipment, much attention has been paid to safety. Nevertheless, you need at all times to remain conscious of certain safety measures. Make certain that you have carefully read through the whole user manual prior to your use of the equipment. Keep in mind the following points: 1. 2. 3. 4. 5. 6. 7. 8. 9. 10. 11. 12. 13. 14. 15. 16. 17. 18. 19.
Warning Consult with your physician prior to starting your exercises. A frequent and intensive training programme should first be approved by your family physician. This is especially important for individuals above 35 years of age or for those with physical problems. Carefully read through the entire user manual before you start exercising.
77 Bicycle Industry Group (BIG) guarantees that the product supplied will work as intended, according to the conditions given in this warranty. Name: Purchase date: Address: Model/type: Post code / Town: Purchased from: Telephone number: Frame number: Store this section carefully, together with the purchase receipt. This warranty is only valid if you have register on our website, within two weeks of purchase www. fietsservicnederland.nl.
General reference drawing - 18 -
Parts list NO. DESCRIPTION QTY NO. DESCRIPTION QTY 1 Main frame 1 33 Hex bolt M10X45 4 2 Handlebar post 1 34 Flat washer d10X1.5 6 3 Front stabilizer 1 35 Nylon nut M10 6 4 Rear stabilizer 1 36 Nut cap S16 4 5 L/R Pedal support (L/R) 1pr. 37 Hex bolt M10X50 2 6 L/R Swing bar(L/R) 1pr. 38 L/R Pedal locking bolt (L/R) 1pr. 7 L/R Handlebar (L/R) 1pr. 39 4 8 Armrest 1 40 L/R Connecting joint (L/R) 1pr. 9 Computer 1 41 2 10 L/R Pedal (L/R) 1pr.
Assembly Instructions NOTE; Most of the listed assembly hardware has been packaged separately, but some hardware items have been preinstalled in the identified assembly parts. In these instances, simply remove and reinstall the hardware as assembly is required. Please reference the individual assembly steps and make note of all preinstalled hardware.
Step 3: A: Fix the Swing bar (6L) on the long axle of the Handlebar post (2) with Hex bolt (24), Spring washer (52), Flat washer (25), Waveform washer (64) and Long axle (27) as shown. Please do not tighten them this time. B: Attach the connecting joint together with Pedal Support (5L) to the Crank (22) using Pedal support bolt (38L), Waveform washer (62), Spring washer (41) and Nylon nut (42L) as shown. Please do not tighten them this time.
Computer Instruction SPECIFICATIONS: Functions: TIME 00:00-99:59 M:S SPEED 0.0-99.9 KM/H or ML/H DISTANCE 0.00-999.9 KM or ML ODOMETER 0-9999 KM or ML PULSE 40-240 BPM CALORIES (CAL) 0-9999 KCAL Battery type 2 pcs AA type Operating temperature 0˚C ~ +40˚C (32˚F ~ 104˚F) Storage temperature -10˚C ~ +60˚C (14˚F ~ 140˚F) KEY FUNCTIONS: MODE Press it to select functions. Hold it for 3 seconds to reset time, distance and calories. OPERATUION PROCEDURES: 1.
Maintenance and Treatment 1. Verify that all the bolts and nuts are locked properly and the turning parts should be turned freely without damaged parts. 2. Clean the equipment with soap and slightly damp cloth only. Please do not use any solvent to clean the equipment. Malfunctions and treatment Malfunction Base is unstable. Loud noise from the moving parts. Reason Treatment 1. Floor is not flat or there is small object under the front or rear stabilizer. 2.
General fitness tips Consult your physian Before you start using this fitness equipment, it is recommended that you first get a physical examination by your family physician or by a specialist. Before starting regular exercises on this equipment, you must first get your doctor’s approval. When you feel discomfort during your training on the equipment, you need to immediately consult your family physician. Intelligent use, meaning responsible use of this equipment is crucial.
Warming-up – Cooling down A successful exercise starts with a warm-up and is completed with a cool-down. Run through all of the exercises two or three times a week and take a day off in between the exercise days. After a few months you can extend the number of exercises to 5 to 6 times a week. The warm-up is of crucial importance before starting your workout. You will be preparing your body for the effort you are about to exert. In order to prevent muscle problems, you need to cool down after the exercises.
Touching your toes Slowly bend forward and try to reach your feet with your hands. Stretch down as far as possible and repeat this 15 times. Hamstring exercises Sit on the floor and stretch your right leg. Bend your left leg and place your foot against your right upper leg. Reach for your right foot with your right arm. Repeat this 15 times and do the same exercise with your left leg. Calf/achilles exercises Place both hands against a wall and lean the weight of your whole body on your hands.
Consignes de sécurité générales Lors de la conception et la fabrication de cet appareil de remise en forme nous avons prêté beaucoup d’attention à la sécurité. Vous devez cependant toujours respecter certaines consignes de sécurité. Lisez attentivement le manuel entier avant d’utiliser l’appareil. Observez les points suivants : 1 2 3 4 5 6 7 8 9 10 11 12 13 14 15 Cet appareil n’est pas un jouet et ne doit être utilisé qu’à des fins telles que décrites dans cette notice.
Mise en garde Consultez votre médecin avant de commencer les exercices. Un programme d’entraînement fréquent et intensif doit d’abord être approuvé par votre médecin. Ceci est en particulier important pour les personnes âgées de 35 ans ou plus ou pour les personnes avec des problèmes physiques. Lisez attentivement le manuel entier avant de commencer l’entraînement.
77 Bicycle Industry Group (BIG) garantit l’appareil fourni contre tout vice de fonctionnement sous réserve du respect des conditions stipulées sur le présent certificat de garantie. Nom: Date d’ achat: Adresse: Modèle/type: Code postal / Ville: Fournisseur: Numéro de Téléphone: Numéro de cadre: Conservez soigneusement cette partie du certificat de garantie avec le bon d’achat.
Vue explosée - 30 -
Liste des pièces NO. DESCRIPTION QTÉ NO.
Instructions de montage REMARQUE La plupart du matériel de montage a été emballée séparément, mais certains éléments ont été montés au préalable dans les ensembles de montage identifiés. Si tel est le cas et que le montage est nécessaire, il vous suffit de retirer et de monter à nouveau le matériel. Veuillez consulter les étapes de montage individuelles et noter tout le matériel monté au préalable. PRÉPARATION : Avant de procéder au montage, vérifiez que vous disposer d’assez d’espace autour de l’article.
Étape 3 : A : Fixez le bras articulé (6G) sur l’axe long de la tige du guidon (2) à l’aide des boulons hex (24), des rondelles ressort (52), des rondelles plates (25), des rondelles ondulées (64) et de l’axe long (27), comme sur l’illustration. Cette fois, ne les serrez pas à fond.
Utilisation de la console électronique SPÉCIFICATIONS: Functions: Temps 00:00-99:59 M:S Vitesse 0.0-99.9 KM/H or ML/H Distance 0.00-999.9 KM or ML Odomètre 0-9999 KM or ML PULSE 40-240 BPM Fréq. cardiaque (CAL) 0-9999 KCAL Type de batterie 2x AA type Température de fonctionnement 0˚C ~ +40˚C (32˚F ~ 104˚F) Température de stockage -10˚C ~ +60˚C (14˚F ~ 140˚F) FONCTIONS DES TOUCHES : MODE : Cette touche vous permet de sélectionner la fonction de votre choix. PROCÉDURES D’UTILISATION : 1.
Maintenance et dépannage 1. 2. Vérifiez que tous les boulons et écrous sont bien serrés et que les pièces tournantes tournent avec souplesse et ne sont pas endommagées. Nettoyez l’appareil uniquement avec une solution nettoyante douce et un chiffon légèrement humide. N’utilisez aucun solvant pour nettoyer l’appareil. Pannes et remèdes Panne Base non stable Cause Remède 1. Le sol n'est pas plan ou il y un 1. Retirez l'objet petit objet présent sous l'un des stabilisateurs 2. Les bouchons d'extrémité du 2.
Conseils généraux de condition physique Consultez votre médecin de famille Avant d’utiliser ce matériel de remise en forme, il est prudent de vous faire examiner par votre propre médecin généraliste ou spécialiste. Avant de vous entraîner régulièrement avec ce matériel il faut demander la permission de votre médecin de famille. Si vous présentez des symptômes pendant l’utilisation de ce matériel, il faut immédiatement consulter votre médecin de famille.
Echauffement détente Un exercice réussi commence avec l’échauffement et se termine avec la détente. Faites tous les exercices deux ou trois fois par semaine et prenez un jour de repos entre les jours d’entraînement. En l’espace de quelques mois vous pouvez augmenter le nombre de sessions d’entraînement à 5 ou 6 fois par semaine. L’échauffement est très important avant de commencer un exercice. Ainsi votre corps se prépare pour effectuer des efforts.
Toucher les orteils Penchez-vous vers l’avant lentement et essayez de toucher les pieds avec les mains. Penchezvous le plus loin possible et répétez cet exercice 15 fois. Exercices des tendons du jarret Asseyez-vous par terre et étendez la jambe droite. Pliez la jambe gauche et posez le pied contre la cuisse droite. Touchez le pied droit avec le bras droit. Faites l’exercice 15 fois et répétez le même exercice avec la jambe gauche.
- 39 -