Fiery EHP ETA ® Ww Model: PEAT TTR GASKET 5-Burner Gas Grill With Side Burner OWNER'’S MANUAL Series No. : 0522-B EI. os: Intertwine 4007749 and dme Use outdoors only! Do not use It Inside a bulling, garage, or any other enclosed space. Read the instructions before assembling and using the appliance. DO NOT use the grill unless it is completely assembled, and all the parts are securely fastened. This girl will become very hot, do not move it during use. Keep away from children and pets.
Contents Reread mom For Your Safety 2-3 PAILS DISTRAIT -conferees oe armrests Renee oem erst 4 Parts List Hardware List & Preparation Assembly instructions EEE EEE EEE EE nn General Information and instructions EEE ra 13 LP Gas and Cylinder Information eee rise 13 Cylinder Specifications PS 14 LP Cylinder Leak Test «diereses sits 15-16 Operating MONSEIGNEUR rem ores 17 Cleaning and Maimonides mmm nn 18-19 Troubleshooting Guide nnn nnn 20-21 Grilling PIROGI «rrr rrr 22.
For Your Safety Borg 1. DO NOT store or use gasoline, or any flammable vapors and liquids within 8 meters (25 feet) of the grill. 2. When cooking with greasepaint, do not allow the greasepaint to exceed 177 °C (350 °F). DO NOT store extra cooking oil in the vicinity of the grill. 3. The liquid propane (LP) tank {cylinder) not connected for use should be stored at a minimum of 3 meters (10 fest) distance from the grill or any appliance. Never fill the LP gas cylinder beyond 80 percent capacity.
WARNING: 1. This grill is for outdoor use only and should not be used inside a building, garage, or any other enclosed space. 2. The consumption of alcohol, prescription, or non-prescription drugs may impair the operators” ability to properly assemble or safely operate the grill. 3. Always open the grill lid slowly and carefully as heat and steam trapped within the grill can cause severe bums. 4. Always place your grill on a hard and level surface far away from combustibles. 5.
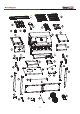
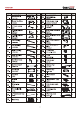
Parts List Roosevelt == ret Ref Description Frustration | QTY | | Ref Description Frustration | QTY 1. | Bottom she SSN noblewoman AD 2 Sari | ER 1a Tem WN 3. LP tank screw Ae 1 21. Side table — 1 4 pans support on 1 2 pda burner decoration <° 1 ACJ53SJPL AHBLNZSJL 5. ete support pe 1 23. Side t table decoration = ‘ ACJ53SJPR AHOTNZSIR o Ime IN Em 7. Left back leg _— 1 25. pats oo support | 1 8. Right from leg mmm SNK © | 10. Cart Side beam BN 2 28. Side | burner Green| 1 [20 Some Sma Resew = | 13.
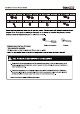
Hardware List & Preparation arrest A M510 | MIPS [B] MBX12 | mere (C] Max | dpe (D| Maxi | ame Filipino | 7pm | F| Pad chloride] 1p H | Washer | spe Before beginning assembly, make sure all parts are present. Compare parts with packaged contents list and diagram above. If any parts are missing or damaged, do not attempt to assemble the products. Contact customer service for replacement parts via telephone or email.
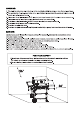
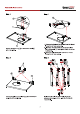
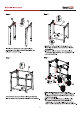
Assembly Instructions Bern at Step 1 Step Unscrew the bolt and the washer from the thread end of the LP tank screw (3). 2. Insert the LP tank screw into the back hole on the bottom shelf (1), and tighten it with the screw Fix the screw bushing (2) to the bottom shelf {1} with 2 bolts (B). bushing (2). 3. Screw the bolt and washer back to the thread end of the LP tank screw.
Assembly Instructions Rene Step 6 1. Attach the bottom shelf to the bolts (A) on the lower | i iis wil Install 2 cart side beams (10) to the bolts (B) wore lags as shown, then tighten the bolts with assembled on the legs in step 4, then tighten the 2. Attach the cart rear beam (11) to the bolts (A) bolts with a screwdriver. on the back legs as shown, then tighten the bolts with a screwdriver. Step 7 1. Snap the leg bases (13) into the right legs. 2.
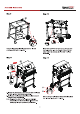
Assembly Instructions ar Step 9 Step 10 Assemble the thermal baffle (16) onto the left cart Insert one end of the LP tank barrier bar (17) into side beam (10) with 2 bolts (B). the hole on the lower cart board (12) and fix the other end to the bottom shelf (1) with 1 bolt (A) as shown. Step 11 Step 12 1. Secure the main body (18) on the cart with 2 bolts (B) on both left and right sides respectively. 2. Half screw 2 bolts (B) on both left and right sides of the main body accordingly.
Assembly Instructions Secure the side table thermal baffle (19) onto the left front panel bracket with 2 bolts (A). 1. Secure the side table assemblies from step 14 with the half-screwed bolts (B) assembled at the main body in step 11. 2. Fix the side table assemblies with the main body with 6 washers (H) and 6 bolts {B) from inside of the main body. 3. Use 2 bolts (A) and 2 bolts (B) respectively to reinforce the side tables and decoration boards with the main body. 10 Roundel == ret 1.
Assembly Instructions i Install the side boomer valve and regulator assembly Insert one end of the side boomer (28) into the valve (released before at step 11) in the position as shown; body through the burner holder; fix the burner by 2 then fix the knob base (26) to the side bummer decoration bolts (C) from the back of the side burner decoration board with 2 bolts (C) and insert the knob (27). board. Step 19 1.
Assembly instructions int Step 21 Step 22 J 1. Place the side bummer grate (33) on the side burner Align the warming rack (35) into the corresponding chassis. holes of the main body. 2. Place the cooking grates (34) on the main body. Step 24 Place the LP tank into the nesting hole located in Take the electrode wire out and then insert it into the the bottom shelf and tighten it with the LP tank electrode port as shown. screw (3) and connect it to the pressure relief valve tightly.
General Information and Instructions Borne a Your new grill has been designed and manufactured to high quality standards. It will provide you with many years of fun grilling time, however, it requires a minimal amount of maintenance. Please keep in mind the following FOR YOUR SAFETY. Operation 1. Your gas grill requires reasonable care during operation. It will be hot during cooking and cleaning. Never leave the grill unattended or move the grill when in use. 2. Children should never use your gas grill.
CYLINDER SPECIFICATIONS: Tank purchased or exchanged for your gas grill must be manufactured and marked in accordance with the specifications for LP Gas cylinder of the U.S. Department of Transportation {DOT) or the National Standard of Canada, CANCAN -B339, Cylinders, Spheres and Tubes for Transportation of Dangerous Goods and Commission, be equipped with a listed over-filing prevention device (OPP, and be equipped with a cylinder connection device compatible with connection for outdoor cooking appliances.
LP CYLINDER LEAK TEST A leak test should be conducted each time a propane tank is refilled or exchanged. Do not smoke or use any type of flammable material in the area during this leak test. Do not use an open flame to check for leaks. 1. Test outside in a well-ventilated area. 2. Use a paintbrush and a solution of liquid dish detergent and water as needed. Do not use cleaning products because they can damage the fuel supply parts. 3.
The regulator must enter the cylinder valve in a straight line. Center the regulator nipple into the cylinder valve. A\ WARNING GCC 1 Type 1 Connector Always keep the gas cylinder in the upright position at all times. WARNING 1. Do not connect this grill to any unregulated sources of propane. 2. Before each use, check the gas hose for excessive abrasion, wear, or cuts. Replace a damaged hose assembly with the one specified in the parts list before using the grill. 3.
Operating Instructions real Each grill boomer is tested and calibrated at the factory prior to shipment; however, variations in the local gas supply may make it necessary to adjust the boomers. Pleads visually check the flames of the boomers. Always visually inspect your grill before lighting. Replace any hose that is frayed or cracked. Look for anything that could block ventilation and remove such a blockage or move the grill.
Cleaning and Maintenance rad WARNING 1. Do not clean any part of your barbecue grill in a self-cleaning oven. 2. Do not use oven cleaners, abrasive kitchen cleaners, cleaners that contain citrus products, or mineral spirits. 3. Clean your grill regularly to prevent grease buildup, grease fires or excessive flare-ups. 4. Always allow the grill to cool down prior to cleaning. A Grease is flammable. Let hot grease cool down before attempting to handle it.
CLEANING THE BURNERS 1. Ensure the gas is turned off at the propane tank. 2. Remove the cooking grates and flame tamers. 3. Lift each boomer up and out. 4. Clean the inside of the burner using a stiff wire. A straightened coat hanger will work. An alternative is to use compressed air. Always wear protective gear for your eyes when using this method. Never enlarge the boomer ports during cleaning. 5. Brush the outer surface of the burner. 6. Ensure all ports (holes) are free of debris. 7.
Troubleshooting Guide Tire Emergencies Possible cause Prevention/ Solution Gas leaking from cracked/cut/ burned hose Damaged hose Tum off gas at LP tank, if hose is cut or cracked, replace hose. Conduct LP tank leak test and check regulator connection to the LP tank. Gas leaking from LP tank Mechanical failure due to aging or mishandling Tum off LP tank valve. Gas leaking from LP tank valve Failure of tank valve due to mishandling or mechanical failure Tum off LP tank valve. Re tum LP tank to gas supplier.
Troubleshooting: Problem Possible cause Prevention/ Solution Burner will not light with matchstick 1. See “gas issues” on previous page. 2. Improper method of lighting using a matchstick 1. See “Pilot Gas Control Ignition” section in use and care. Sudden drop in gas flow or low flame 1. Grease buildup 2. Excessive fat in meat 3. Excessive cooking temperature 1. Clean burners and inside of grill/ firebox 2. Trim fat from meat before grilling.
Grilling Recipes Direct Heat psst © enter BEEF INTERNAL TEMPERATURE CHART with a hint of pink in the center Cooking Degree Internal Cora Internal Description Dimness Temperature Center is bright red, pinkish Rare 125 °F toward the outer portion, Soft to the touch and warm throughout Center is very pink, slightly Medium Rare 130-135 °F brown toward the outer portion | Yields only slightly to the touch and slightly hot Center is light pink, outer Medium 140-145 °F portion is brown and hot Beginning to fim to
STEAK (& ALL MEATS): To grill meats, reals fire grate to high potion (hot) and sear for one minute on each side with the lid open to seal in flavor and juices. Then lower the fire grate to the medium position with lid closed and cook to desired degree. Control heat with dual dampers and adjustable fire grate. Tip: Place grills meat back in the marinade for several minutes before serving and it wil be tastier and juicier.
Warranty and Customer Service RT mat I Thanks for purchasing this Royal Gourmet ® Gas Grill. Royal Gourmet warrants Its products to be free from defects In materials and workmanship under proper assembly, normal residential use and recommended care for 1-Year Full Warranty from the date of original retail purchase. The warranty doss not cover paint finish as it may bum off during normal use. RUST is not considered a manufacturing or materials defect.