Model: GG4302S Stainless Steel 4-Burner Gas Grill with Side Burner service@royalgourmetusa.com www.royalgourmetcorp.
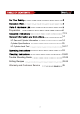
Preparation 6 7-13 14 LP Gas and Cylinder Information 14 Cylinder Specifications 15 16-17 LP Cylinder Leak Test 18 19-20 Trouble Shooting Guide 21-22 Grilling Recipes 23-24 Warranty and Customer Service 25
at serious hotline. or hot.
AT ALL TIMES .
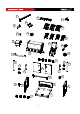
27 21 22 26 25 20 24 23 19 14 15 18 16 13 12 17 11 10 10 11 8 9 9 5 7 6 4 3 3 2 1 4
1. Caster W-52930001 4 15. Side burner shelf ZH-A4SB2002 1 2. Bottom shelf H-A3B24007 1 16. Knob base W-20120007 1 3. Side shelf Z-A3B23028 2 17. Knob W-20120005 5 4. Rear shelf Z-A3B24031 1 18. Side burner W-A4BS2008 1 5. Left firebox brace Z-A3B23033 1 19. Flame tamer W-A3B23005 4 6. Right firebox brace Z-A3B23034 1 20. Cooking grate W-A3B23003 3 7. Cart front beam H-A3B25008 1 21. Warming rack W-A3B24002 1 Grease cup W-20130025 1 8. Door ZH-A3B2406 2 22. 9.
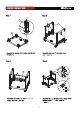
D 1 A 3 2 D 3 A 6 C 4 A 5 A 4 shelves and right shelf 7 3 C.
C C 7 6 A A left shelf 3 2 6 and 4 A and 6 C C.
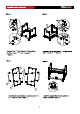
11 F F 11 ,i 24 23 13 12 A 17 A main body 13 4 lid handle 12 to lid with 2 bolts (A) 24 and the nut (23) 17
13 14 14 A 15 D D A control panel 4 14 and 3 side burner shelf 15 and control panel and 3 4 and D 15 D 16 A 17 C 16 Make the valve insert through the hole of side burner shelf decoration. Install the knob base (16) to the side burner shelf decoration with 2 bolts (C). 17 . Fasten the side table and side burner shelf to the main body with 8 bolts (A) as shown.
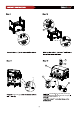
17 18 18 C 18 19 20 20 19 Place the cooking grates (20) onto the main body. Place the flame tamers (19) onto the main body.
21 22 21 25 A Place the warming rack (21) onto the main body .
25 26 27 27 .
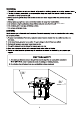
It will provide you with many years of enjoyment but a minimal amount of maintenance needed. Never leave the grill unattended or move the grill when in use. when the burners go out in cooking when air vent Do not obstruct the flow of air for combustion and ventilation. reconstructive Your new gas grill operates on LP (Liquid Petroleum)Gas.It is odorless,colorless,and non-toxic when produced. You can smell LP gas as it has been given an odor similar to rotten cabbage for your safety.
15
cleaning products Production of bubbles indicates a gas leak.
regulator er regulator at all times.
18
GREASE TRAY / CUP The grease tray should be emptied and wiped down in a mild detergent and warm water solution. A small amount of sand or cat litter may be placed in bottom of grease tray to absorb the grease.
20
Trouble Shooting Guide Emergencies Possible cause Prevention/ Solution Gas leaking from cracked/cut/ burned hose Damaged hose Turn off gas at LP tank, if hoes is cut or cracked, replace hose.See LP tank lead test and connection regulator to the LP Gas leaking from LP tank Mechanical failure due to resting or mishandling Turn off LP tank valve Gas leaking from LP tank valve Failure or tank valve from mishandling or mechanical failure Turn off LP tank valve.
Troubleshooting: Problem Possible cause Prevention/ Solution Burner will not match light See ”gas issues;” on previous page. 2. Improper method of match-lighting 1. See “Pilot Gas Control Ignition” section of use and care. Sudden drop in gas flow or low flame 1. Grease buildup. 2. Excessive fat in meat. 3. Excessive cooking temperature 1. Clean burners and inside of grill/ firebox 2. Trim fat from meat before grilling. Flames blow out High or gusting winds. Low on LP gas.
GRILLING RECIPES Direct Heat 23
STEAK (& ALL MEATS): KABOBS: • Cook food on the charcoal side of the unit, directly above coals/heat. • To grill meats, raise fire grate to high position (hot) and sear for one minute on each side with the lid open to seal in flavor and juices.Then lower • Alternating on skewers any combination of meat, onions, tomatoes, green peppers, mushrooms,zucchini, circular slice of corn-on-the-cob, or pineapple. Meat could consist of shrimp, scallops, lobster, chicken, sausage, pork, beef, etc.
Gas prior to obtain Corp service@royalgourmetusa.