Owner's Manual Residential Factory Built Fireplace Operation • Maintenance • Installation The OPEL AP Keep these instructions for future use.
Page 2 OPEL AP Dear Customer, The OPEL AP incorporates technology with elegance to give you a beautiful view of the fire without compromising on heating efficiency or environmental quality. We have designed your new OPEL AP to be easy to install, operate and maintain. It is in your best interest to become familiar with it. Study your manual to be sure that the installation is correct, then follow the guidelines for operation and maintenance.
Page 3 OPEL AP SAFETY FIRST CREOSOTE: Formation and removal DO’S AND DON’TS When wood is burned slowly, it produces tar and other organic vapours which combine with expelled moisture to form creosote. The creosote vapours condense in the relatively cool chimney flue of a slow burning fire. When ignited, this creosote makes an extremely hot fire. The chimney should be inspected periodically during the heating season to see if a creosote build-up has occurred.
Page 4 OPEL AP ash pan is full, open the bottom louvers of the fireplace. The louvers can be easily opened by pulling the right hand side of the louvers. It is held in place by a magnet. Remove ash pan and dispose of ashes properly. Replace ash pan and louvers. Replace plug in hole, making sure it is properly placed before starting a fire. Do not remove the ashes from the firebox while they are still hot. The ash pan is not built to resist hot ashes or embers.
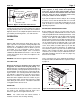
Page 5 OPEL AP The doors should be opened slowly, moving both doors together, to keep smoke from spilling into your room. If you do have smoke spillage, check to see that all kitchen and bathroom fans have been shut off. They can cause a vacuum in the house, which pulls smoke out of the fireplace. Fireplace face Thick facing Pull hook Rod extension bypass eye Set screw Handle Decorative collar Figure 1a: Bypass control with extension rod catalyst at a sufficient operating temperature.
Page 6 OPEL AP MAINTENANCE CLEANING Adjust here The high-heat paint and gold plating can be cleaned with a soft moist cloth. Use a mild detergent and water. Do not use abrasive cleaners! Loosen DISPOSAL OF ASHES Tighten Clean the ashes before they become too deep, i.e., before you have a spillage problem when opening the doors. When removed from the ash pan, ashes should be placed in a metal container with a tight fitting lid.
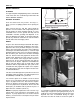
Page 7 OPEL AP Picture 3 word of caution: although heat will not break the glass, a good blow can. Be careful not to hit the glass. Picture 4 Picture 5 CHIMNEY CLEANING WARNING: Never clean this glass with an abrasive cleaner. Use only a cleaner recommended by your dealer. Never clean the glass while it is hot, a serious burn can result. There are a number of excellent wood stove glass cleaners available.
Page 8 OPEL AP It is important to periodically monitor the operation of the catalyst to ensure that it is functioning properly and to determine when it needs to be replaced. A non-functioning catalyst will result in a loss of heating efficiency, and an increase in creosote and emissions. Catalysts should be visually inspected at least three times during the heating season to determine if physical degradation has occurred.
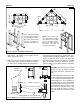
Page 9 OPEL AP Rain cap - See the manual for flue height requirements. Storm collar - The central heat blower may be installed on the left side. Roof flashing - Gravity vent may be installed on the left, right or both sides.
Page 10 OPEL AP 18” 58” Block 24” 38 1/2” 8 3/4” min. to side wall 38 1/2” 82” These framing dimensions are larger than required for ease of installation. The fireplace has a minimum clearance of 0” to standoff (see unit dimensions Figure 13). 49” 38 1/2” NOTE: When framing with 2x6’s and installing the gravity vent option, be sure to allow for the 2” minimum clearance between the header and the B-vent pipe. (see Figure 13) for gravity vent locations.
Page 11 OPEL AP Outside air control The Opel AP is designed to use outside air for combustion but you may choose to use inside air for combustion air instead. To do so, open the sliding door on the bottom inside right of the fireplace (behind the bottom louvers). Note that the fireplace uses outside air when the handle is closer to the back of the fireplace and inside air when it’s closer to the front. We recommend the use of outside air for combustion.
Page 12 OPEL AP space clearance at all points around the chimney from floor to roof flashing. If the chimney is enclosed in drywall, openings will probably be required in order to verify clearances at all points. Rain cap 2’ min. 10’ min. NOTE: openings must be framed to adequately support any chimney supports and roof assemblies Storm collar 3’ min. Flashing 2” min.
Page 13 OPEL AP Existing chimney installation: If it is difficult to install rigid stainless on an existing chimney, a listed stainless steel flex liner can be used. Special care is to be taken when installing the flexible liner. A positive connection is assured with the masonry adaptor (FDM) available from your dealer. The stainless steel flex liner connects to the masonry adaptor with a flexible/rigid adaptor (LAF) and is secured with the 3 stainless steel rivets provided.
Page 14 OPEL AP NOTE: In USA if the chase is enclosed or flashed to the roof as shown in (Figure 9), then the flashing must be vented. FRAMING IN If required by local codes, make certain that the walls have been properly insulated, vapor sealed and sheathed with a fire rated gypsum board (see Figure 9). The enclosure walls can be framed with any suitable materials (2x4 or 2x6 studs, plywood, gypsum board, etc.).
Page 15 OPEL AP a “Z” shaped spark guard must be installed. The height of the Z-shaped spark guard must equal the distance between the floor and the base of the unit. The minimum depth the spark guard must extend beneath the Opel AP is 2 1/2 inches. The spark guard must run the full length of the fireplace. (Z-SHAPED GUARD NOT SUPPLIED.) 8” max. Mantel MANTEL A masonry or other non-combustible mantel may be placed directly above the top louvers.
Page 16 OPEL AP 23 1/2” min. to combustible top facing (49 3/4” from the base of the fireplace) Combustible top facing may protrude 1” max. from the face of the fireplace 28” min. to mantel (54” from the base of the fireplace) automatically controls the amount of combustion air to the fire, leaving your home at an even preset temperature.
Page 17 OPEL AP 3. BEFORE fastening the controls with the 2 screws provided, thread the supplied chain through the spare keyhole in the draft control and attach a pendant to the end, just like the chain that is beside it. Let the chain down on the same side of the heat shield as the existing chain, and attach it to the lever on the damper motor with another pendant. Push the pendant snug into the hole in the lever. Then mount the controls to the bracket. 4.
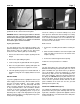
Page 18 OPEL AP Preparation of the fireplace 1. Remove doors and all refractory liners. 2. Lay unit on its back for easier access. 3. Remove the screen above the door opening by removing the 4 screws in behind (Picture1). If the unit has been fired already, oil the screws before removing them or they may break. 4. Remove secondary air tube by removing the screw on the left side (Picture 2). 5. Remove the baffle. (See instructions on page 8, baffle removal section.) 6.
Page 19 OPEL AP 10. You can now stand up the Opel AP again, then put back the refractory liners and the doors. After the facing is installed 1. Attach the control eye to the bypass rod by tightening the setscrew with a 1/8” Allen wrench (Picture 13). 2. If the bypass rod is too short due to thick brick facing, attach the extension. Measure the required length from the threaded end and cut off excess before installing the control eye. 3. Insert the handle into the control eye.
Page 20 OPEL AP Gypsum board is NOT an acceptable facing material. Follow these steps: WARNING: DO NOT restrict airflow through the inlet and outlet louvers of the stove. If two (2) gravity vent kits are installed with the dampers removed, only then may the upper louver area be blocked. NOTE: Remove the fireplace doors and louvers, and store them in a safe place until the masonry work is finished. Acid from the cleaning operation will permanently damage the gold plating.
Page 21 OPEL AP 2. Install the metal edging on each side of the doors, making sure that the edges fit nicely with the arch edge above. There are right and left side expanded metal pieces. The expanded metal is correctly installed when the expanded metal is facing upwards, to catch the mortar. A wider steel lintel bar may be required for heavy rock. 3. Cover the rest of the area with wire mesh, or metal lath, flush with the heavy expanded metal.
Page 22 OPEL AP Stones, tile or brick Mortar WARNING: If you are blocking off the upper louvers of the Opel AP, do not install the shut-off dampers. Optional masonry retainer kit 7. Install the B-vent pipe between the B-vent starter and the grill adapter. Fasten each joint with 3 screws (if the B-vent pipe manufacturer allows this in its instruction manual). Insert the B-vent pipe in the grill adapter and fasten it with three screws.
Page 23 OPEL AP From the louver opening bend out two of the lower tabs to prevent the damper from being pulled out. Grill adapter 4. Before proceeding with the installation of the blower, make sure that the electrical service to the blower is in the OFF position. All wiring should be in accordance with local ordinances and the National Electric Code.
Page 24 OPEL AP Thermostat Central heat control kit (FDHC6) Thermal switch Figure 24: Central heating kit (FDHC6) Blower speed control Mounting bracket Back draft damper (FDHC6-1) eters. Houses vary in size and layout, so duct systems must be specifically designed for each home. The diagrams on this sheet are examples only. The cross sectional area of the distribution system must total at least 50 square inches.
Page 25 OPEL AP a) If you would like the blower to turn on when the thermostat calls for heat, first locate the thermostat in the principal room heated by the duct system. Do not install it in the room where the fireplace is installed. There are yellow black and red wires coming out of the relay as shown in the wiring diagram. Connect the wire from #4 of the terminal block to the black wire and put the wire connector on the red wire for protection. (See Figures 36 and 37 for schematic wiring diagrams.
Page 26 OPEL AP 10. If the blower fails to operate, check the following: a) Consult the wiring diagram to assure proper connections. b) To assure proper contact, check the motor lead wiring, incoming supply wiring and capacitor connections. c) If possible, use a meter to test for continuity between the fan leads. Please note that the capacitor will show no reading if it is tested with a meter. 11.
Page 27 OPEL AP Black White Ground (bare) Red Yellow To thermostat To speed control Speed Thermocontrol stat Option1: warning thermostat (see schematic wiring diagram Figure 36) Blower control detail To blower To terminal Blower control Terminal bloc Option 2: cooling thermostat (see schematic wiring diagram Figure 36) 110 V Terminal detail BWG Figure 30: Central heat system wiring diagram Blower Zone damper Figure 31: Zone heating - example 3 zone Blower control centre Zone control box Fig
Page 28 OPEL AP Draft damper thermostat Draft damper motor Terminal block 24V Transformer black white ground (bare) Figure 34: Wiring for the thermostat 110V Thermal switch bypass (optional) Internal blower Thermal switch Terminal block black white ground (bare) 110V Figure 35: Wiring for the circulating blower Blower speed control
Page 29 OPEL AP Blower control thermostat Thermal switch Central blower speed switch Terminal block 18 ga LVT External central heat blower black white black white yellow white black Relay *For a warming thermostat, 1 should be the red wire and 2 should be the black wire 2* ground (bare) *For a cooling thermostat, 1 should be the black wire and 2 should be the red wire 1* 110V Figure 36: Wiring for the central heat system Draft damper thermostat Draft damper motor Thermal switch Internal bl
Page 30 OPEL AP Blower control Fuse Jumper Zone thermostat (Heat Only) Thermal switch Zone valves (8”NC) Zone dampers zone 1 zone 1 zone 2 black zone 2 zone 3 Draft damper motor zone 3 Draft damper thermostat Internal blower Thermal switch Internal blower speed control External blower control Terminal switch 18ga LVT black white black 110V Figure 38: Wiring for all systems with a zone heat system yellow ground (bare) 24V relay white black white External central heat blower
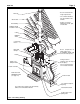
Page 31 OPEL AP 1 1 Removable top louvers 2 Primary air tube 3 Secondary air tube 4 Air wash grid 5 High heat refractory lining 6 Ceramic glass 7 Convection chamber 8 Adjustable hinge pins 9 Andiron 2 3 7 5 6 8 4 10 Adjustable latch 11 Removable bottom louvers 12 Combustion air control knob 13 210 CFM blower, included rheostat (option) 10 9 13 12 11 OPEL AP cut-away view FIREPLACE OPTIONS FDCCO FDFS FDGRK2 FDHB5-N FDHB6 FDHC4 Opel catalytic kit Firescreen Gasket replaceme
REPLACEMENT PARTS NOT AVAILABLE PART OF ASSEMBLY N/A P/A DESCRIPTION NEW CODE OLD CODE PRICE Ash pan plug 1.5.3.NPT 15,00 Ash pan 1.5.2.P 50,00 Floor shield assembly 1.5.6.P N/A Top louver fin (black) 10.1.NPR A959 10,00 Top louver fin (gold) 10.11.NPR 30,00 Top louver fin (pewter) 10.21.NPR 30,00 Top louver hardware assembly 99.10.03.P 15,00 Nut 1/4-20 Hex 14.3.52 R1415 P/A Louver rod 14.9.1 R6416 P/A Spacer 1/4" X 1 3/8" 14.8.5 R6149 P/A Retention spring for louvers 14.5.
NOT AVAILABLE PART OF ASSEMBLY OLD CODE N/A P/A PRICE 15,00 50,00 N/A A959 10,00 30,00 30,00 15,00 R1415 P/A R6416 P/A R6149 P/A R6309 P/A 10,00 30,00 30,00 45,00 R6416 P/A R6149 P/A R1227 P/A P/A R1416 P/A 4,00 10,00 400,00 800,00 800,00 A990 5,00 A975 4,00 25,00 R7005 P/A R7009 P/A 15,00 A970A 10,00 R6012 5,00 R1321P P/A R1324 P/A 20,00 A971A 10,00 R6426 P/A A1283 5,00 R6012 5,00 R1321P P/A R1324 P/A 10,00 R6271 3,00 550,00 950,00 950,00 P/A 14.7.2 A974/R6257/9-9.8.P 150,00 14.10.2 R7002 10,00 11.6.
Page 34 OPEL AP We recommend that our products be installed and serviced by professionals who are certified in the U.S. by NFI (National Fireplace Institute) or in Canada by WETT (Wood Energy Technical Training).
Page 35 OPEL AP OPEL AP - Limited Warranty 30 Year Limited Warranty All RSF Woodburning Fireplaces models are warranted against defects in material and workmanship for a period of 30 years, subject to the following conditions: During the first year RSF Woodburning Fireplaces will repair or replace, at our option, any parts which upon examination by an authorized RSF Woodburning Fireplaces representative are found to be defective, except the parts listed in the EXCLUSIONS portion of this warranty.