
Owner`s manual

SAFETY FIRST
3 Do’s and Don’ts
3 Creosote Formation and Need for Removal
GENERAL SPECIFICATIONS
3 Combustion Control System
3 Ash Pan
4 Firescreen
4 Thermostat
4 Internal Circulating Blower
4 Gravity Vent System
4 Central Heat System
4 Catalytic Combustor
OPERATION
5 Lighting
5 First Fire
5 Refueling
5 Refractory Bricks Installation
MAINTENANCE
6 Cleaning
6 Disposal of Ashes
6 Doors
6 Glass
7 Gold Plating
7 Chimney Cleaning
7 Paint
7 Catalytic Combustor
INSTALLATION
8 Location
8 Ceiling Clearance
8 Outside Air Duct
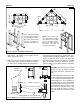
9 General Assembly Illustration
11 Chimney
11 Chimney Installation
12 Masonry Chimney
13 Chase Enclosure
14 Radiation Shield
14 Offset Chimney
14 Framing In
14 Spark Guard
15 Mantel
15 Hearth Extension
15 Beneath Heath Extension
OPTIONS
16 Wall Thermostat
17 Circulating Blower
17 Catalytic Combustor
19 Gold / Pewter Louvers
19 Rock Retainer Kit
21 Remote Venting
21 Gravity Vent System
22 Central Heat System
26 Zone Heating
SCHEMATIC WIRING DIAGRAMS
28 Thermostat
28 Circulating Blower
29 Central Heat System
29 All Systems
30 Zone Heating
FIREPLACE OPTIONS
31 Fireplace Options
REPLACEMENT PARTS
32 Fireplace
33 Assemblies
LABEL
34 Label
WARRANTY
35 Warranty
Page 2
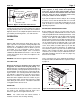
Dear Customer,
The OPEL AP incorporates technology with elegance to give you a beautiful view of the fire with-
out compromising on heating efficiency or environmental quality.
We have designed your new OPEL AP to be easy to install, operate and maintain. It is in your best
interest to become familiar with it. Study your manual to be sure that the installation is correct, then
follow the guidelines for operation and maintenance.
We, at RSF Woodburning Fireplaces, congratulate you on your choice of the OPEL AP, and are
confident that you have purchased a fireplace that is simply, the best.
Sincerely,
The RSF Woodburning Fireplaces Team
April 2003
TABLE OF CONTENTS
OPEL AP