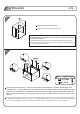
ASSEMBLY INSTRUCTIONS MODEL RTA - 2202 Thanks for purchasing one of our products. Please read carefully the assembly instructions before the installation. Please save this manual for future reference.
MODELO RTA - 2202 Gracias por comprar uno de nuestros productos. Por favor lea cuidadosamente las instrucciones de ensamblaje antes de instalar la unidad. Por favor guarde este manual para referencias futuras.
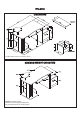
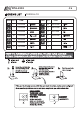
RTA-2202 DIMENSIONS Product Size: 60"W x 23 1/2"D x 35"H MAXIMUM WEIGHT CAPACITIES DO NOT exceed this limit Please use care and good judgement when placing objects on wood surface
RTA-2202 PARTS LIST P.
RTA-2202 P.5 13 14 15 16 x2 ea. x1 set Inside Vertical Panel Panel vertical interno Protector Tube Tubo protector de CPU 17 x1 set 18 21 Left Back Panel Panel posterior izquierdo Vertical Tubes Tubos Verticales 19 20 x2 ea.
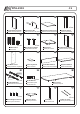
RTA-2202 SCREWS LIST PART QTY. ITEM P.6 TORNILLOS PART QTY.
RTA-2202 30mm
RTA-2202
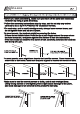
RTA-2202 STEPS P.9 PASOS 1 Assemble with the tool the Cam Bolts (D) to the back face of the Drawer Front Panel (1). Then place over the bolts the Drawer Left panel (2) and the Drawer Right Panel (3), and turn the cam locks. 3 Ensamble con la herramienta los Pernos (D) en el reverso del Panel Frontal de Gaveta (1). Luego coloque sobre los pernos el Panel Lateral Izquierdo de gaveta (2) y el panel lateral Derecho de gaveta (3), y gire los cerrajes.
RTA-2202 4 P.10 31 5 Insert the Tubes for Files (31). Inserte los Tubos Porta Carpeta (31). WARNING: Do not overtighten the tubes as they may perforate and damage the front panel. Such damage is not covered by the product's warranty. ADVERTENCIA: No apriete los tubos demasiado porque pueden perforar y dañar el panel frontal. Este tipo de daño no está cubierto por la garantía del producto.
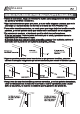
RTA-2202 P.11 6 6 1 Using Screws (F) and from the inside of the Drawer install the handle (6). Presente la manija (6) y f í jela con tornillos (F) desde el interior de la gaveta. SCREWS TORNILLOS F 4X20 MM 2PCS 7 Use screws (G) to assemble the flat Sliders (7) to the Right Vertical Panel (10) and the Inside Vertical Panel (13). The wheels will be facing towards the front of the panels.
RTA-2202 P.12 9 10 11 Use Bolts (D) to assemble the Right Back Panel (11) with the Right Vertical Panel (10) Con pernos ( D) ensamble el panel de fondo derecho (11) con el panel vertical derecho (10). SCREWS TORNILLOS D 6X40 MM 2PCS 10 10 9 8 SCREWS Use Bolts (D) to assemble parts 8-9-10-11 as shown in the drawing. Utilice pernos (D) para ensamblar las partes 8-9-10 y 11 como indica el gr á fico.
RTA-2202 P.13 12 Use Bolts (D) to Fix the Inside Vertical Panel (13). Fije el panel vertical interno (13) utilizando pernos (D). 13 12 SCREWS TORNILLOS D 6X40 MM 9 7PCS 8 13 Use Screws (H) to fix the Big Support tubes (18) to the back face of the Right Horizontal Panel (15). 18 Con tornillos (H) fije los Soportes grandes (18) en el reverso del panel Horizontal derecho (15).
RTA-2202 P.14 15 Use Screws (B) to fix the Auxiliary Panel (22) to the Left Vertical Panel (20). 20 Use tornillos (B) para ensamblar el Panel Auxiliar (22) al Panel Vertical Izquierdo (20). SCREWS 22 TORNILLOS B 6X50 MM 2PCS 16 Use Screws (B&D) to assemble the Left Back Panel (21) to the Left Vertical Panel (20) and Auxiliary Panel (22). Use tornillos (B&D) para ensamblar el Panel Posterior Izquierdo (21) al Panel Vertical Izquierdo (20) y al Panel Auxiliar (22).
RTA-2202 P.15 18 Insert Bolts (D) in the CPU Panel (19) and then place the unit of panels 20&21 over the Bolts. En los agujeros dispuestos para ello en el panel para CPU (19) coloque pernos (D) y sobre ellos inserte la unidad conformada por los paneles 20-21. 21 20 SCREWS 19 TORNILLOS D 6X40 MM 4PCS 19 16 30 Front Side 16 16 Side View 19 Make sure to assemble Part 16 as illustrated. Aseg ú rese de ensamblar la parte 16 como se muestra en la ilustraci ó n.
RTA-2202 P.16 20 23 13 20 Use Bolts (D) to assemble the Center Back Panel (23) between the Left Vertical Panel (20) and the Inside Vertical Panel (13). Con pernos (D) ensamble el Panel central de fondo (23) entre el panel vertical izquierdo (20) y el panel vertical interno (13). . SCREWS TORNILLOS D 6X40 MM 4PCS 21 26 X4 27 Use Screws (I) to fix the Slider Bases (26) to the back face of the Main Panel (27).
RTA-2202 P.17 22 26 X4 25 25 Left Right Use Screws (J) to assemble the fixed part of the Keyboard Sliders (25) to the Slider Bases (26). Ensamble la parte fija de los deslizadores de teclado (25) a las escuadras para teclado (26) con tornillos (J). SCREWS TORNILLOS J 4X4 MM 4PCS 23 28 28 28 29 Use (C) to fix the Small Support Tubes (28) to the Monitor Panel (29). Por medio de tornillos esp á rragos (C) se unen los tubos porta monitor (28) al panel para monitor (29).
RTA-2202 P.18 24 27 23 21 13 20 SCREWS TORNILLOS D 6X40 MM 11PCS 30 Insert Bolts (D) to the back face of the Main Panel (27), then place the Main Panel (27) on top of the structure matching the Bolts (D) with the holes on the structure, finally tight every corresponding cam locks in the holes of the structure.
RTA-2202 P.19 26 24 25 25 Right Left Use Screws (H) to assemble the moving part of the Keyboard Sliders (25) to the back face of the Keyboard Panel (24). SCREWS TORNILLOS H 4X14 MM Fije la parte m ó vil de los deslizadores de teclado (25) en el reverso del panel de teclado (24) utilizando tornillos (H). 4PCS 27 28 X3 27 SCREWS Place washers (L) between the Small Support Tubes (28) and the Main Panel (27) and assemble with Screws (A).
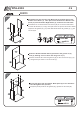
RTA-2202 P.20 28 17 X3 1 Insert the Cd Holders (17) making them engage into the grooves in the middle, not the front. Insert the drawers and tighten all the screws. Coloque los porta CD (17) asegur á ndose que entren en las ranuras del medio, no las del frente. Coloque las gavetas y apriete todos los tornillos.
CARE AND MAINTENANCE English - DO NOT EXPOSE THE SURFACES TO DIRECT SUNLIGHT, OR EXTREME ENVIRONMENTAL CONDITIONS. EXPOSURE WILL DAMAGE THE PRODUCT, WHICH IS NOT COVERED BY THE WARRANTY. - DO NOT USE SOLVENTS OVER SURFACES OR STRUCTURAL TUBES. SURFACES MUST BE CLEANED WITH A SOLUTION OF A SMOOTH SOAP AND WATER, THEN CLEARED WITH A DRY TOWEL. - PRODUCTS THAT ARE HEAVY SHOULD BE LIFTED OR MOVED BY AT LEAST 2 PERSONS, AND ALL OBJECTS SHOULD BE REMOVED FROM THE PRODUCT.
PRODUCT WARRANTY TECHNI MOBILI DESK WARRANTY LIMITED 5-YEAR WARRANTY RTA Products, LLC warrants to the Original Purchaser who acquired a new product from RTA Products or its authorized resellers that this product will be free from defects in its workmanship and materials, under normal use and service conditions, as described herein. "Defects" as used in this warranty imperfections that impair the use of the furniture or product.