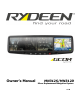
Owner’s Manual MN312S/MN312D Mirror Replacement Navigation System v1.
Welcome Statement & Warnings [THIS PAGE IS INTENTIONALLY LEFT BLANK] 1
Welcome Statement & Warnings Contents 1. Welcome Statement & Warnings 4 2. What’s in the Box 6 3. Product Overview 7 4. Installation 10 Getting Started (Navigation) 13 5. Configuration Wizard ........................................................................................................................ 13 Main Map .......................................................................................................................................... 14 6.
Welcome Statement & Warnings 16. Technical Support Contact Info 49 17. One Year Limited Warranty 49 18. To Obtain Warranty Service 50 19. FCC Compliance Statement 51 20. Copyright 51 21.
Welcome Statement & Warnings 1. Welcome Statement & Warnings Congratulations and thank you for purchasing the RYDEEN MN312S/MN312D Mirror Car Navigation Unit. We hope you will enjoy using this exciting product and trust that it will make your driving experience more comfortable and hassle-free. The MN312S/MN312D provides an easy-to-use touch screen user interface, clear, easy-to-understand spoken instructions, and innovative functionality in a stylish housing that replaces the factory mirror.
Welcome Statement & Warnings airbag units. Position the unit in a location that does not obstruct the driver’s view of the road, instruments or vehicle controls. Position the unit so the screen can be viewed with just a quick glance. Glance at the unit screen or manipulate the in-route touch screen controls ONLY WHEN VEHICLE IS COMPLETELY STOPPED AND IT IS SAFE to do so. Be sure the MN312S/MN312D unit is securely attached to the windshield of your vehicle with the supplied bracket.
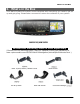
What’s in the Box 2. What’s in the Box Your MN312S/MN312D system comes complete with everything you need to get set up and get going. Please take a moment to review the contents of your system. MN312S/MN312D Windshield Mounting Stem is Sold Separately.. (Choose from the following types. Check for updated mount type availability at www.rydeenmobile.com/GPS%20Car%20Navigation/VehicleSpecificMounts.
Product Overview 3.
Product Overview FRONT Description 1 Mirror Reflective Area for Rear Viewing 2 Photo Sensor / Bluetooth Microphone Opening for Photo Sensor for Auto-dimming Function (MN312D only) and Microphone for Bluetooth Function 3 Mute/Volume Button SHORT PRESS – Mutes Sound LONG PRESS – Opens Volume / Music Control Main Screen Bluetooth Button SHORT PRESS – Answer / Hung Up Bluetooth Connected Phone LONG PRESS – Opens Bluetooth Main Menu 4 5 POWER MN312S – Power ON/OFF with LONG PRESS MN312D – Power
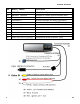
Product Overview NO. BACK / CABLE Description 11 SPEAKER 2.
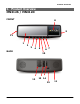
Installation Connector PIN Descriptions: Connector A Pin 1 2* 3 4 Color Red Black Yellow Yellow 5* 6** 7** Blue White Green Description Ignition 12v + (ACC) Ground 12 DC Constant (car battery) Camera In + Guidepoint On-Call Negative Trigger output (-) Temp sensor Send Temp sensor Receive Terminal Bare Bare Bare RCA 4* pin connector Bare Bare Pin 8 9 Color Red White Description Audio Line Out + Right Audio Line Out + Left Terminal RCA Male RCA Male 10 11 12 13 14 Black N/A N/A N/A N/A Audio Line
Installation 1) Remove the existing mirror and unplug a connector if exist. (Note: All vehicles use different mounting solutions. If necessary, consult your local automotive dealer or installation professional for specific instructions.) 2) Attach the vehicle-specific mounting stem (sold separately) to the back of the mirror using the supplied washers and screws, starting with the holes nearest the top of mirror housing. 3) Mount the MN312S/MN312D using supplied screw.
Installation Note Please refer to Guidepoint installation manual for the Guidepoint GPS Vehicle Tracking Box installation. Guidepoint GPS Tracking Box is sold separately and service activation is necessary. Contact Guidepoint Systems Inc. for more information (Toll-Free 1-877-477-3463). Note Cables connected to PIN 6 & 7 are for temperature sensor connections. Please contact Rydeen Tech Support (Toll-Free 1-877-777-8811) for more details.
Getting Started (Navigation) 5. Getting Started (Navigation) Configuration Wizard This wizard, which automatically starts at the first time you use RYDEEN GPS, lets you easily configure the system settings by providing a step-by-step setup process. You can also configure these system settings by going to the system options from the Settings menu. Language Settings - Set text and voice language preferences. EULA – Confirm the terms and conditions of using the software. Select “I Agree” and proceed.
Getting Started (Navigation) Main Map You can use the icons displayed on this screen to plan and view your route. 1 6 2 7 8 3 9 4 5 10 Figure 2 - Map Screen Main Map Icons 1, 6 Zoom in or out of the map to view a larger less detailed area or a smaller area in greater detail 2 Tap the compass to change the map view display as follows: 2D map view with the forward direction at the top. 3D map view with the forward direction at the top. 2D N map view with North at the top.
Getting Started (Navigation) 7 Speed limits are visible only when the Speed Warning prompt is selected. When you are exceeding the speed limit, RYDEEN GPS displays the following icons: 8 These icons display your power source. 9 Tap this icon to set your QuickNav location. When set, you can tap this button to automatically calculate a route to this location. 10 Tap this icon to display the Main Menu.
Select Location and Generate Route 6. Select Location and Generate Route Go to an Address From the Main Menu, tap the Go! button. Then Where Do You Want To Go? Screen appears, allowing you to choose from New Address, POI (Point of Interest), Recent Place or Favorites. Figure 4 - Search by POI Name Tap the Address button to enter address information. Then follow the steps below. Select Select City City First. First. Enter a Tap to City then tap OK. Select or enter a State you enter new want to go.
Select Location and Generate Route Tap one of the Enter Address Screen Buttons to display the first address screen. Figure 6 - Selecting a State When entering an address, you can use the keyboard to enter the characters. The characters appear in the Address field. Rydeen GPS automatically searches the Address list for the first occurrence of the characters entered. After you have selected a town or city, Rydeen GPS displays the next address field, such as street and address number.
Select Location and Generate Route Keyboard Command Keys The following buttons are available to enhance your search process. 1 2 4 3 Select from list Figure 7 - Search and Keyboard Buttons 1 Lets you move back a character that you have entered. 2 Lets you scroll up or down the list of town/city or street names. 3 Lets you extend the address list by hiding the keyboard. 4 Lets you change the keyboard for address number input.
Select Location and Generate Route Selecting a Destination and Options The following screen appears when a destination address input is complete and ready to navigate. Go - When you tap the Go button, Rydeen GPS calculates the route to your selected destination. When you tap this button, Rydeen GPS returns to the previous screen. Figure 8 –Route Selection Confirmation Screen Options Tap the one of Option button to: To save an Entry - Tap Save to add an address to your list of favorite locations.
Select Location and Generate Route Navigate to an Address Tapping the street name changes the screen to Manage Route From the Manage Your Route menu, tap this button to display a complete turn-by-turn list of directions from your current location to the selected destination. Rydeen GPS continuously updates the Turn-by-Turn screen to display the most current instructions as you navigate the route.
Select Location and Generate Route Road Type When Road Type is select, Rydeen GPS provides the following routing options: Quickest - This option selects the route that takes the least amount of time. Quickest is the default setting. Shortest - This option selects the route that is shorter in distance. Note: The shorter route may not always be the quickest.
Select Location and Generate Route Route Overview When Route Overview is select, Rydeen GPS display your entire route, plus the travel distance and the Estimated Travel Time Remaining (ETR). Figure 12 – Route Overview Create a Detour When Create Detour is selected, Rydeen GPS let you create a detour to avoid a road event, such as an accident. Detour option let you generate a detour routing for the distance specified.
Select Location and Generate Route Points of Interest (POI) The Points of Interest (POI) list is a collection of millions of interesting or useful places organized by easy-to-find categories. For example, you can use Rydeen GPS to guide you to a shopping center, hotel, restaurant or gas station. Many categories have subcategories to provide for an even greater list of choices. For example, gas station, may have many subcategories each representing a particular brand name. The same is also true for hotels.
Select Location and Generate Route Search for a POI Category When My Current Location, My Destination or Along the Route button is select, the most common POI categories are displayed. Tap Tap Figure 15 - Most Common POI Categories Tap the right top corner button to display the All POI Categories, where you can search through the entire list of POI categories.
Select Location and Generate Route POI Preview Screen After POI search completes, a list of POI result shows as following. Tap Show on Map then you will see POI preview screen that allows you to see your destination options at a glance. POI info includes address and phone number Tap Figure 17 - Showing a POI Preview Tap to view detail info of other locations Show or Hide POI Symbol on Map You can select or clear the ticks next to a POI entry to show or hide the POI symbols on the Main Map screen.
Select Location and Generate Route QuickNav You can set a QuickNav destination so that every time you tap the icon on the Main Map screen, Rydeen GPS automatically calculates the route to this destination for you. When you tap the QuickNav button for the first time, you must select a predefined address or a POI category. Tap Figure 19 - Setting the Quick Nav Location You can change the QuickNav settings by tapping the QuickNav button located on the Settings menu.
Select Location and Generate Route Favorite Locations (Address Book) An Address Book (Favorite) is a destination that you have stored for easy retrieval. Save favorite destinations to your “favorites groups” and later you can easily travel to these destinations. Note: You can also add a favorite destination from the Address, POI and Recent Locations screens. Save a Favorite Location From the Traveling To screen, tap Save button. The My Favorites folder is the default folder where all favorites are stored.
Select Location and Generate Route Creating a Favorite Group From the “Favorites” screen, Tap “Edit” button to Add Group”, Edit or Delete location. Enter a name and select a group. Figure 23 - Adding a Favorites Group To add favorite destinations to your favorite groups, see "Save a Favorite Location" on page 28.
Additional Rydeen GPS Features 7. Additional Rydeen GPS Features Map Browsing Tap Figure 24 - Explore the Map Browse the map without a GPS signal. Tap the “Free Map Browsing” button. You can use tap & hold to scroll the map. When you have located the street destination, you can tap to that point of the map. A pop-up menu appears, Tap “Go There” to navigate to the selected point. You can reestablish a GPS connection by tapping the bottom toggle bar.
Rydeen GPS Configurations 8. Rydeen GPS Configurations Settings Menu Tap the “Settings” button to configure Rydeen GPS system settings to utilize travel playback and demonstration features. Tap Figure 26 – Enter Settings Automatic Day & Night Adjustments Auto Day-Night Adjustment - When this option is selected, Rydeen GPS automatically switches between day and night view according to the GPS time and date information provided.
Rydeen GPS Configurations Prompts Figure 28 – Prompt Button Tap Tap the “Prompts” button to select the types of notifications that you would like to use or her while driving. Turn ON or OFF by tapping checkbox. Road Prompts Speed Warning Warns you when your car exceeds the speed limit. This prompt is selected as default. Route Recalculation Notifies you when Rydeen GPS recalculates your route. For example, when you miss a turn. This prompt is not active by default.
Rydeen GPS Configurations Language Settings From the Settings menu, Tap the “Language” button to display the Language Settings screen. You can select from: Figure 29 - Language Settings Display Language - Address and map information, and screen and menu labels Voice Language – Select from English, Spanish or French. Tap Look & Feel Settings From the Settings menu, Tap the “Look & Feel” button to select from a list of preinstalled skins.
Rydeen GPS Configurations GPS Settings From the Settings menu, Tap the “GPS Signal” button to display GPS information and to configure the GPS connection settings. Figure 31 – GPS Setting Tap Rydeen GPS receives data from a built-in GPS receiver or an external GPS receiver, connected to your Navigation device, to pinpoint your location. Your vehicle's location and position are constantly updated unless you are working in the Free Browse Map mode or you tap the GPS Off button.
Rydeen GPS Configurations Units of Measure From the Settings menu, Tap “Units of Measure” button to specify the measurement system you would like to use. You can select: Tap Miles, Yards Miles, 10th of a Mile Kilometres, Metres Figure 32 – Units of Measure Time Settings From the Settings menu, Tap “Time Settings” button to display time settings.
Rydeen GPS Configurations Start Demo From the Settings menu, Tap “Start Demo” button to display a simulated route. Many of the Rydeen GPS navigation features are disabled when the Demo is running. You can end the Demo by tapping the “Stop Demo” button. About From the Settings menu, Tap “About” button to display version and Copyright information. Help From the Settings menu, Tap “HELP” button to display technical support information.
Device System Settings 9. Device System Settings Tap Quit button to go to the Main Menu screen Starts Rydeen Navigation Opens the mirror Settings screen.
Device System Settings Brightness (Backlight) Settings Figure 29 - Backlight Settings This screen lets you determine the brightness of the screen. Date-Time Settings Figure 30 - Date-Time Settings This screen lets you select your time zone and set the date and time.
Device System Settings Language Settings Figure 31 - Language Settings This screen lets you select the language to be used for system screen displays. System & Touch Screen Calibration From the main menu screen, select the System icon to see the system info as below. Figure 32 - System Information This screen displays information about the device. Calibration optimizes the touch screen LCD for accurate finger or stylus pointing.
Device System Settings Software Launch Path Selection Tap here to go to next screen Tap here to enter the Software Launch Path setting screen Tap here to go to software file menu screen then select the executable file of your choice then select X Select this box to start the navigation software automatically after the unit is powered on (default). Tap here to confirm the executable file and return to the main menu screen.
Music and Volume Settings 10. Music and Volume Settings Press the MUTE Button (located on the bottom of the mirror) for less than 1 sec. to mute the mirror. To resume with sound, press MUTE button again. Press the MUTEM Button (located on the bottom of the mirror) for more than 3 seconds, the Sound Control Main Screen shows as following. Follow the procedures below to operate your Music Player. Create a folder your Navigation System. on your microSD card.
Music and Volume Settings Stop music Play next Song Random Play Play & Pause Repeat music Previous Song Figure 34 – Music Player screen Return to previous screen After selecting a music to play, press the MUTE Button for less than 1 sec, will bring the screen to Navigation View. Press the MUTE Button more than 3 sec. again to go back to Sound Control Main Screen. To select more sound control options, please follow below steps. Select Select “Tap Sound” to able/disable the “click” sound.
Handsfree Bluetooth Operation Select a proper LINEOUT LEVEL for optimum sound quality from your car speakers using +/- adjustment icons. 11. Handsfree Bluetooth Operation Your MN312S/MN312D is equipped with a Bluetooth-enabled handsfree function to enable you to make and receive cellular phone calls in safety while driving. The process of creating a secure connection between your cellular phone and the mirror unit is called pairing.
Handsfree Bluetooth Operation 4. After the ‘Search Device” process completes, you will then see a list of devices those are ready to be connected. Choose the one you would like to connect and tap the ‘LINK’ icon. 5. Occasionally the screen may show ‘Connection Failed’, because the Bluetooth module try to connect to the previously connected device (Auto-Reconnect Feature). Tap the ‘LINK’ icon again and the new device will be connected. 6. Tap “Search Device” to show Bluetooth Device you want to connect.
Handsfree Bluetooth Operation 4. Use the Redial feature on the mirror unit to initiate a call. From the Bluetooth menu, press the ‘Keypad’ icon. Simply press the ‘Phone’ icon to immediately redial the last number called. Phonebook button for select phones Call Log button to show call history & memory dial Dial and Redial button Receiving and Ending Calls Answer & Hang-up call can be operated by using the hard key button located on the bottom of the mirror.
Handsfree Bluetooth Operation Go back to Navigation screen and still able to use Bluetooth End the call Viewing or Changing the Pairing Code 1. Press ‘Setting’ from the Bluetooth menu. Then press ‘Properties”. In the ‘PIN Code’ field is the current pairing code. 2. To change it, press the ‘PIN Code’ field then a keypad will show. Enter a new code. 3. Press the ENTER key to complete your change.
Temperatures Display Button Function 12. Temperatures Display Button Function Please follow Page 13 for the installation instructions of temperature sensor. Press the Temperature Display Button (located on the bottom of the mirror) for more than 3 sec. to go to ‘Select Temp Unit’ screen as seen below. If temperature sensor probe is not installed, then the display will show N/A as following. You may select from 2 temperature unit readings (Fahrenheit & Celsius).
Store Demo Video Playback 13. Store Demo Video Playback To play Rydeen product promotional video, please follow the following steps. Tap this to go to the next screen. Tap this icon to play the promotional video. Touch the bottom of the screen to show the video control.
Specifications 14.
Maintaining Your GPS 15. Maintaining Your GPS Cleaning the Unit: 1. Use a soft, dry cloth to wipe away dirt. 2. If the dirt cannot be wiped away, dampen the cloth with water to clean the unit. NOTE: Do not wash the unit with running water as this unit is not water proof. 3. Use a dry cloth to wipe away residual moisture when done. NOTE: Do not use solvent, car cleaner or organic cleaners to clean the unit. These substances may damage the GPS unit. Cleaning the LCD Display: 1.
To Obtain Warranty Service 3. Any product(s) which are purchased from an unauthorized retailer (in store or online). 4. Any products in which the serial number label or the model number label are removed, torn, modified or replicated. 5. Any damage defects or malfunctions resulting from any of following: a) When defect occurs during shipment of product (freight carrier's responsibility). b) Installation or removal of product.
FCC Compliance Statement 19. FCC Compliance Statement This device complies with Part 15 of the FCC interference limits for Class B digital devices for home or office use. These limits are designed to provide more reasonable protection against harmful interference in a residential installation and are more stringent than “outdoor” requirements. Operation of this device is subject to the following conditions: 1. This device may not cause harmful interference, and 2.
Mounting Stem • 6 Music & Volume Setting • 40, 41 Index A Add to My Favourites • 28 Additonal Rydeen GPS Features • 29 Automatic Day & Night Adjustments • 30 B Backlight Settings • 37 Buttons • 8 C Connectors • 9, 10 Contents • 2,3 Configuration Wizard • 13 Copyright • 51 Create a Detour • 22 D Date-Time Settings • 37 Demo • 35 Device System Sttings •36-39 Disclaimer • 52 F Favorite Locations • 27, 28 FCC Compliance Statement • 52 G Go to an Address • 16-20 Go to Another Country • 19 Going to a Favori
Rydeen North America Inc. dba Rydeen Mobile Electronics 2701 Plaza Del Amo, Suite 705, Torrance, California 90503 USA Phone: 1-877-777-8811 Fax: 1-310-943-3778 Copyright © 2012 Rydeen North America Inc. All Rights Reserved. RYDEEN ® is a registered trademark of Rydeen North America Inc. These materials are protected by copyright law and international treaties.