410r 2-Cycle Garden Cultivator OPERATOR’S MANUAL FOR QUESTIONS, CALL 1-800-345-8746 in U.S. or 1-800-668-1238 in CANADA www.RyobiOutdoor.
INTRODUCTION TABLE OF CONTENTS THANK YOU I. Thank you for buying this quality product. This modern outdoor power tool will provide many hours of useful service. You will find it to be a great labor-saving device. This operator’s manual provides you with easy-tounderstand operating instructions. Read the whole manual and follow all the instructions to keep your new outdoor power tool in top operating condition. II. Rules for Safe Operation . . . . . . . . . . . . . . . . . . . 3-7 A.
CALIFORNIA PROPOSITION 65 WARNING WARNING THE ENGINE EXHAUST FROM THIS PRODUCT CONTAINS CHEMICALS KNOWN TO THE STATE OF CALIFORNIA TO CAUSE CANCER, BIRTH DEFECTS OR OTHER REPRODUCTIVE HARM. SPARK ARRESTOR NOTE: For users on U.S. Forest Land and in the states of California, Maine, Oregon and Washington. All U.S.
RULES FOR SAFE OPERATION • IMPORTANT SAFETY INFORMATION • READ ALL INSTRUCTIONS WARNING: When using the unit, you must follow the safety rules. For your own safety and that of bystanders, please read these instructions before operating the unit. Please keep the instructions for later use. • Add fuel in a clean, well-ventilated outdoor area where there are no sparks or flames. Slowly remove the fuel cap only after stopping engine. Do not smoke while fueling.
RULES FOR SAFE OPERATION • Always hold the unit with both hands when operating. Keep a firm grip on the handlebar grips. • Keep hands, face and feet at a distance from all moving parts. Do not touch or try to stop the tines when they are rotating. Do not operate without guards in place. • Do not touch the engine, muffler or gearbox. These parts get extremely hot from operation. When turned off they remain hot for a short time. • Do not operate the engine faster than the speed needed to do the job.
RULES FOR SAFE OPERATION SAFETY AND INTERNATIONAL SYMBOLS This operator's manual describes safety and international symbols and pictographs that may appear on this product. Read the operator's manual for complete safety, assembly, operating and maintenance and repair information. SYMBOL MEANING • SAFETY ALERT SYMBOL Indicates danger, warning or caution. May be used in conjunction with other symbols or pictographs.
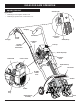
RULES FOR SAFE OPERATION KNOW YOUR UNIT STOP/OFF (O) Application • Cultivating sod and light to medium soil • Cultivating in garden areas, around trees, etc.
ASSEMBLY INSTRUCTIONS ASSEMBLING THE UNIT Before operating, position the unit’s handlebars. NOTE: You may also need to reposition the wheel height before using the cultivator. Refer to the Adjusting Tine Depth section. INSTALLING THE WHEEL BRACKET ASSEMBLY If the wheel bracket assembly is not installed, or if you ever need to remove or reinstall it, follow the ensuing instructions. WARNING: To avoid injury from the tines, wear heavy gloves and a long sleeve shirt when installing the wheel bracket assembly.
OIL AND FUEL INFORMATION OIL AND FUEL MIXING INSTRUCTIONS Old and/or improperly mixed fuel are the main reasons for the unit not running properly. Be sure to use fresh, clean unleaded fuel. Follow the instructions carefully for the proper fuel/oil mixture. Definition of Blended Fuels Today's fuels are often a blend of gasoline and oxygenates such as ethanol, methanol, or MTBE (ether). Alcohol-blended fuel absorbs water. As little as 1% water in the fuel can make fuel and oil separate.
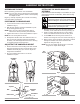
STARTING/STOPPING INSTRUCTIONS STARTING INSTRUCTIONS STOP (O) WARNING: Operate this unit only in a well- ventilated outdoor area. Carbon monoxide exhaust fumes can be lethal in a confined area. WARNING: Avoid accidental starting. Make sure you are in the starting position when pulling the starter rope (Fig. 8). To avoid serious injury, the operator and unit must be in a stable position while starting. START (I) Throttle Control Start / Stop Control Fig. 6 1. Mix gas with oil.
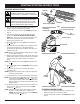
OPERATING INSTRUCTIONS OPERATING TIPS ADJUSTING TINE DEPTH WARNING: Always wear eye, hearing, foot and body protection to reduce the risk of injury when operating this unit. 1. Move the cultivator to the work area prior to starting the engine. Transport the cultivator by pushing it on its wheels. WARNING: To prevent serious personal injury, never pick-up or carry the unit while the engine is running. 2. Start the unit as described in the Starting Instructions. 3.
MAINTENANCE AND REPAIR INSTRUCTIONS MAINTENANCE SCHEDULE Perform these required maintenance procedures at the frequency stated in the table. These procedures should also be a part of any seasonal tune-up. NOTE: Some maintenance procedures may require special tools or skills. If you are unsure about these procedures take your unit to any non-road engine repair establishment, individual or authorized service dealer. WARNING: To prevent serious injury, never perform maintenance or repairs with unit running.
MAINTENANCE AND REPAIR INSTRUCTIONS AIR FILTER MAINTENANCE WARNING: To avoid serious personal injury, always turn your unit off and allow it to cool before you clean or service it. Removing the Air Filter/Muffler Cover 1. Place the choke control in the PARTIAL choke position (B). NOTE: The choke control must be in the PARTIAL choke position (B) (Fig. 13) to remove the air filter/ muffler cover. 2. Remove the four (4) screws securing the air filter/muffler cover (Fig. 13).
MAINTENANCE AND REPAIR INSTRUCTIONS 8. Place the muffler (with the exhaust gasket in place and bolts inserted), against the engine, aligning the bolt holes. Tighten the bolts to secure the muffler to the engine. If using a torque wrench, torque to: 80-90 in.•lb. (9-10.2 N•m) 9. Reinstall the air filter/muffler cover. WARNING: If the muffler is not tightened securely, it could fall off causing damage to the unit and possible serious personal injury.
MAINTENANCE AND REPAIR INSTRUCTIONS TRANSPORTING 0.020 in. (0.5 mm) Fig. 19 4. Install a correctly gapped spark plug in the cylinder head. Tighten by turning the 5/8 in. socket clockwise until snug. If using a torque wrench torque to: 110-120 in.•lb. (12.3-13.5 N•m) Do not over tighten. • Allow the engine to cool before transporting. • Secure the unit while transporting. • Drain the fuel tank before transporting. • Tighten fuel cap before transporting. MOVING THE UNIT 1.
TROUBLESHOOTING ENGINE WILL NOT START CAUSE ACTION Empty fuel tank Fill fuel tank with properly mixed fuel Primer bulb wasn't pressed enough Press primer bulb fully and slowly 10 times Engine is flooded Squeeze the trigger and pull the starter rope Old or improperly mixed fuel Drain gas tank and add fresh fuel mixture Fouled spark plug Replace or clean the spark plug Plugged spark arrestor Clean or replace spark arrestor ENGINE WILL NOT IDLE CAUSE Air filter is plugged Old or improperly mixed
SPECIFICATIONS ENGINE* Engine Type........................................................................................................................................... Air-Cooled, 2-Cycle Displacement .............................................................................................................................................................. 31 cc Idle Speed RPM .............................................................................................................................
NOTES 18
EPA Emission Control Warranty Statement Your Warranty Rights and Obligations The Environmental Protection Agency and MTD LLC (MTD) are pleased to explain the emission control system warranty on your 2002 and later small off-road engine. New small off-road engines must be designed, built and equipped to meet stringent anti-smog standards.
MANUFACTURER’S LIMITED WARRANTY FOR: The limited warranty set forth below is given by MTD LLC (“MTD”) with respect with new merchandise purchased and used in the United States, its possessions and territories. MTD warrants this product against defects in material and workmanship for a period of two (2) years commencing on the date of original purchase and will, at its option, repair or replace, free of charge, any part found to be defective in material or workmanship.
410r Cultivateur de jardin à 2-temps MANUEL DE L'UTILISATEUR SI VOUS AVEZ DES QUESTIONS, APPELEZ LE 1-800-345-8746 aux ÉTATS-UNIS, ou le 1-800-668-1238 au CANADA www.RyobiOutdoor.
INTRODUCTION TABLE DES MATIÈRES TOUS NOS REMERCIEMENTS I. Avertissement de la Proposition 65 de Californie . . .F3 Nous vous remercions d'avoir acheté ce produit de qualité. Cet outil mécanique de plein air moderne est conçu pour vous rendre service pendant longtemps. Il vous sauvera beaucoup de temps comme vous pourrez vous en rendre compte. Ce manuel de l'utilisateur comporte un mode d'emploi facile à comprendre.
PROPOSITION 65 DE CALIFORNIE AVERTISSEMENT LES GAZ D'ÉCHAPPEMENT DU MOTEUR DE CET APPAREIL CONTIENNENT DES PRODUITS CHIMIQUES CONSIDÉRÉS PAR L'ÉTAT DE CALIFORNIE COMME POUVANT CAUSER LE CANCER, DES MALFORMATIONS CONGÉNITALES OU D'AUTRES EFFETS NOCIFS SUR L'APPAREIL DE REPRODUCTION PARE-ÉTINCELLES NOTE : À l'intention des utilisateurs opérant dans les terres forestières des États-Unis et dans les états de Californie, du Maine, de l'Orégon et de Washington.
CONSIGNES DE SÉCURITÉ • IMPORTANTES CONSIGNES DE SÉCURITÉ • LIRE TOUTES LES INSTRUCTIONS AVANT UTILISATION • Veuillez lire les instructions avec soin. Familiarisez-vous avec les commandes et l'utilisation correcte de cet appareil. • N'utilisez pas l'appareil si vous êtes fatigué, malade ou sous l'effet de l'alcool, de drogues ou de médicaments. • Les enfants et adolescents de moins de 15 ans ne doivent pas utiliser l'appareil exceptés les adolescents assistés d'un adulte.
CONSIGNES DE SÉCURITÉ • Ne vous étirez pas. Tenez-vous toujours bien sur vos pieds en position d'équilibre. • Ne forcez pas l’appareil. Il posera moins de risques de blessures et fonctionnera mieux à la vitesse pour laquelle il a été conçu. • Soyez très prudent lorsque vous faites marche arrière ou que vous tirez l’appareil vers vous. • Ne vous étirez pas et faites très attention sur des pentes abruptes. Tenez-vous toujours en équilibre. • Tenez toujours l'appareil des deux mains lorsqu’il est en marche.
CONSIGNES DE SÉCURITÉ SYMBOLES DE SÉCURITÉ ET INTERNATIONAUX Ce manuel de l'utilisateur décrit les symboles et pictogrammes de sécurité et internationaux pouvant apparaître sur ce produit. Consultez le manuel de l'utilisateur pour les informations concernant la sécurité, le montage, le fonctionnement, l'entretien et les réparations. SYMBOLE SIGNIFICATION SIGNIFICATION • SYMBOLE ALERTE DE SÉCURITÉ Indique un danger, un avertissement ou une mise en garde.
CONSIGNES DE SÉCURITÉ FAMILIARISEZ-VOUS AVEC L’APPAREIL STOP/ARRÊT (O) Usage Cet appareil sert à travailler le sol avant de le gazonner ainsi que des sols à texture légère ou moyenne. Il peut aussi être utilisé pour cultiver dans les jardins, autour des arbres, etc.
INSTRUCTIONS DE MONTAGE MONTAGE DE L’APPAREIL INSTALLATION DU SUPPORT DE ROUE Votre cultivateur de jardin est entièrement monté. Le guidon doit être positionné correctement avant d'utiliser l'appareil. REMARQUE : Vous devrez ajuster la hauteur de la roue avant toute utilisation. Voir Réglage de la profondeur des dents. Déballez soigneusement le contenu et assurez-vous que rien n’est endommagé.
INFORMATIONS SUR L'HUILE ET LE CARBURANT MÉLANGE D'HUILE ET DE CARBURANT En général, si l'appareil ne fonctionne pas correctement, c'est que le carburant est vieux ou mal mélangé. Prenez soin d'utiliser de l’essence sans plomb fraîche et propre. Suivez à la lettre les instructions de mélange de carburant et d'huile. Définition des carburants mélangés Les carburants d'aujourd'hui sont souvent un mélange d'essence et d'oxygénés comme l'éthanol, le méthanol ou l'éther MTBE.
INSTRUCTIONS DE DÉMARRAGE ET ARRÊT INSTRUCTIONS DE DÉMARRAGE AVERTISSEMENT : faites uniquement marcher l'appareil dans un lieu extérieur bien aéré. Les fumées d'échappement d'oxyde de carbone peuvent être fatales dans un lieu confiné. STOP/ ARRÊT (O) AVERTISSEMENT : évitez tout démarrage accidentel. Tenez-vous en position de démarrage lorsque vous tirez sur la corde de démarrage (Fig. 8). L'opérateur et l'appareil doivent tous deux être en position stable pour éviter des blessures graves. 1.
MODE D'EMPLOI CONSEILS D'UTILISATION AVERTISSEMENT : Portez des vêtements appropriés pour diminuer les risques de blessures durant l'utilisation de l'appareil. 1. Déplacez le cultivateur vers le lieu de travail avant de démarrer le moteur. Vous pouvez le transporter sur ses roues. AVERTISSEMENT : Pour éviter des blessures graves, ne soulevez et ne transportez jamais l'appareil lorsque le moteur est en marche. 2. Démarrez l’appareil conformément aux instructions de démarrage. 3.
ENTRETIEN ET RÉPARATIONS REMARQUE : certaines procédures d'entretien nécessitent des compétences ou des outils particuliers. Si vous n'êtes pas sûr de pouvoir les entreprendre, emmenez votre appareil dans un atelier, chez un technicien ou un concessionnaire agréé spécialisé dans les réparations de moteurs d’outils mécaniques de plein air. PROGRAMME D'ENTRETIEN L'entretien doit respecter la fréquence indiquée dans le tableau ci-dessous. Il doit également faire partie de toute mise au point saisonnière.
ENTRETIEN ET RÉPARATIONS RETRAIT ET INSTALLATION DU FILTRE À AIR/COUVERCLE DU SILENCIEUX AVERTISSEMENT: pour éviter des blessures graves, éteignez toujours l'appareil et laissezle refroidir avant tout nettoyage ou entretien. Retrait du filtre à air/couvercle du silencieux Filtre à air 1. Mettez le levier d'étrangleur en position d'étranglement PARTIEL (B). REMARQUE : pour enlever le filtre à air/couvercle du silencieux, le levier d'étrangleur doit être en position d'étranglement PARTIEL (B) (Fig. 13).
ENTRETIEN ET RÉPARATIONS 6. Replacez le pare-étincelles en l'enfonçant dans son trou à l'arrière du silencieux. Assurez-vous qu'il est bien fixé contre le silencieux et qu'il n'est pas soulevé. 7. Placez le joint d'échappement contre l'arrière du silencieux. Alignez les trous de boulon du joint d'échappement avec les trous de boulon du silencieux. Tout en maintenant le joint d'échappement en place, insérez les boulons sur le devant du silencieux (Fig. 16). 8.
ENTRETIEN ET RÉPARATIONS NETTOYAGE DE L’APPAREIL AVERTISSEMENT : Pour éviter des blessures graves, éteignez toujours l’appareil et laissez-le refroidir avant tout nettoyage ou entretien. • • Vis de réglage de ralenti Fig. 18 REMPLACEMENT DE LA BOUGIE Utilisez une bougie Champion RDJ7Y (ou modèle équivalent). L'écartement correct est de 0,5 mm (0,020 po). Retirez la bougie après 50 heures de fonctionnement et vérifiez son état. 1. Arrêtez le moteur et laissez-le refroidir.
ENTRETIEN ET RÉPARATIONS TRANSPORT • Laissez le moteur refroidir avant le transport. • Attachez bien l'appareil lors du transport. Prise du tube de l'arbre • Videz tout le carburant du réservoir avant le transport. • Serrez le bouchon du réservoir avant le transport. DÉPLACEMENT DE L’APPAREIL 1. Laissez l’appareil refroidir avant de le déplacer. 2. Desserrez les boutons du guidon. 3. Pliez les poignées comme indiqué (Fig. 20). 4.
DÉPANNAGE LE MOTEUR REFUSE DE DÉMARRER CAUSE Réservoir de carburant vide La poire d'amorçage n'a pas été pressée assez fort Moteur noyé Carburant vieux ou mal mélangé Bougie encrassée Pare-étincelles colmaté SOLUTION Remplissez-le de carburant bien mélangé.
CARACTÉRISTIQUES MOTEUR* Type de moteur............................................................................................................................. Refroidi par air, 2-temps Cylindrée ..................................................................................................................................................................... 31 cc Régime ralenti ............................................................................................................................
Garantie portant sur les normes antipollution de l'EPA Vos droits et obligations en vertu de cette garantie La Environmental Protection Agency et MTD LLC (MTD) ont le plaisir de présenter la garantie du dispositif antipollution des petits moteurs à usage tout-terrain datant de 2002 et au-delà. Les nouveaux petits moteurs à usage tout-terrain doivent être conçus, construits et équipés pour être conformes aux strictes normes anti-smog.
GARANTIE LIMITÉE DU FABRICANT POUR: La garantie limitée énoncée ci-après est accordée par MTD LLC. ("MTD") et concerne les marchandises neuves achetées et utilisés aux Etats-Unis, ainsi que dans leurs possessions et territoires. MTD garantit ce produit contre tout vice de matière ou de façon pendant une période de deux (2) ans à compter de la date d’achat initiale et elle se réserve le choix de réparer ou de remplacer, à titre gratuit, toute pièce présentant un vice de matière ou de façon.
0r Cultivador para Jardines de 2 ciclos MANUAL DEL OPERADOR SI TIENE PREGUNTAS, LLAME AL 1-800-345-8746 en EE.UU. o al 1-800-668-1238 en CANADA www.RyobiOutdoor.
INTRODUCCION MUCHAS GRACIAS Gracias por haber adquirido este gran producto. Esta moderna herramienta motriz de exteriores está diseñada para brindarle muchas horas de servicio útil. Usted comprobará que es un artefacto que le ahorrará mucho trabajo. Este manual del operador le brinda instrucciones de operación de fácil comprensión. Lea todo el manual y siga todas las instrucciones para mantener su nueva herramienta motriz de exteriores en las mejores condiciones de funcionamiento.
ADVERTENCIA DE LA PROPOSICIÓN 65 DE CALIFORNIA ADVERTENCIA LAS EMISIONES DEL MOTOR DE ESTE PRODUCTO CONTIENEN SUBSTANCIAS QUIMICAS QUE EL ESTADO DE CALIFORNIA CONOCE COMO CAUSANTES DE CANCER, DEFECTOS DE NACIMIENTO U OTROS DAÑOS REPRODUCTIVOS. AMORTIGUADOR DE CHISPAS NOTA: Para los usuarios en tierras forestales de los EE.UU. y en los estados de California, Maine, Oregon y Washington. Toda la tierra forestal de EE.UU.
NORMAS PARA UNA OPERACION SEGURA • IMPORTANTE INFORMACION DE SEGURIDAD • LEA TODAS LAS INSTRUCCIONES ANTES DE LA OPERACION • Lea todas las instrucciones con cuidado. Conozca bien los controles y el uso correcto de la unidad. • No opere esta unidad si está cansado, enfermo, o bajo los efectos del alcohol, drogas o medicamentos. • Los niños y los adolescentes menores de 15 años no deben operar las unidades, excepto por los adolescentes guiados por un adulto.
NORMAS PARA UNA OPERACION SEGURA • Use la herramienta adecuada. No use esta unidad para ninguna tarea para la cual no ha sido diseñada. • No fuerce la unidad. Realizará una mejor tarea y con menor posibilidad de causar lesiones si se usa a la velocidad para la que ha sido diseñada. • Tenga mucho cuidado cuando invierta o mueva la unidad hacia usted. • No se extienda demasiado, tenga mucho cuidado cuando trabaje en pendientes marcadas o inclinadas. Mantenga siempre una posición y equilibro adecuados.
NORMAS PARA UNA OPERACION SEGURA SIMBOLOS DE SEGURIDAD E INTERNACIONALES Este manual del operador describe los símbolos y figuras de seguridad e internacionales que pueden aparecer en este producto. Lea el manual del operador para obtener información completa acerca de la seguridad, ensamble, operación y mantenimiento y reparación. SIMBOLO SIGNIFICADO • SIMBOLO DE ALERTA DE SEGURIDAD IIndica peligro, advertencia o precaución. Puede ser utilizado junto con otros símbolos o figuras.
NORMAS PARA UNA OPERACION SEGURA CONOZCA SU UNIDAD PARADO/APAGADO (O) Aplicacion Use esta unidad para cultivar tierra herbosa y tierra negra ligera a mediana. También se utiliza para cultivar áreas de jardines, alrededor de árboles, etc.
INSTRUCCIONES DE ENSAMBLE ENSAMBLE DE LA UNIDAD Su cultivador para jardines ha sido completamente ensamblado. El manubrio deberá colocarse en la posición adecuada antes de la operación. NOTA: Antes de su operación, es posible que deba cambiar la posición de la altura de la rueda. Lea Ajuste de la Profundidad de las Púas. Desembale con cuidado el contenido y verifique que no haya piezas dañadas. COLOCACION DEL MANUBRIO 1. Afloje las dos perillas del lado interior del manubrio (Fig. 1). 2.
INFORMACION DEL ACEITE Y DEL COMBUSTIBLE INSTRUCCIONES PARA MEZCLAR EL ACEITE Y EL COMBUSTIBLE El combustible viejo o mal mezclado son los motivos principales del mal funcionamiento de la unidad. Asegúrese de usar combustible nuevo, limpio y sin plomo. Siga las instrucciones en detalle para mezclar correctamente el aceite y el combustible.
INSTRUCCIONES DE ARRANQUE Y APAGADO INSTRUCCIONES DE ARRANQUE PARADO/APAGADO (O) ADVERTENCIA: Use esta unidad sólo en un área exterior bien ventilada. Los gases de escape de monóxido de carbono pueden ser letales en un área cerrada. ADVERTENCIA: Evite los arranques accidentales. Colóquese en posición de inicio cuando tire de la cuerda de arranque (Fig. 8). El operador y la unidad deben estar en una posición estable al arrancar la unidad para evitar graves lesiones personales. 1.
INSTRUCCIONES DE OPERACION CONSEJOS PARA LA OPERACION ADVERTENCIA: Vista en forma adecuada para reducir el riesgo de lesiones cuando opere esta unidad. No use ropa holgada ni alhajas. Use protección ocular y auditiva. 1. Transporte el cultivador hacia el área de trabajo antes de arrancar el motor. Puede transportar el cultivador empujándolo sobre ruedas. ADVERTENCIA: Para evitar graves lesiones personales, nunca levante ni transporte la unidad con el motor en marcha. 2.
INSTRUCCIONES DE MANTENIMIENTO Y REPARACION NOTA: Algunos procedimientos de mantenimiento pueden requerir el uso de herramientas o habilidades especiales. Si no está seguro acerca de estos procedimientos, lleve su unidad a un establecimiento de reparación, persona o distribuidor de servicio autorizado que arregle motores para uso fuera de la carretera. PROGRAMA DE MANTENIMIENTO Estos procedimientos requeridos para el mantenimiento deben ser realizados con la frecuencia indicada en la tabla.
INSTRUCCIONES DE MANTENIMIENTO Y REPARACION MANTENIMIENTO DEL FILTRO DE AIRE ADVERTENCIA: Para evitar graves lesiones personales, apague siempre su recortador y espere que se enfríe antes de limpiarlo o realizar todo tipo de mantenimiento. Remoción de la cubierta del silenciador / filtro de aire 1. Coloque la palanca del obturador en posición de obturación PARCIAL (B). NOTA: La palanca del obturador debe estar en posición de obturación PARCIAL (B) (Fig.
INSTRUCCIONES DE MANTENIMIENTO Y REPARACION MANTENIMIENTO DEL PARACHISPAS 1. Quite el filtro de aire / tapa del silenciador. Ver Remoción de la Tapa del Filtro / Silenciador. Parachispas Pernos Junta de escape 2. Ubique el frente del silenciador y los dos (2) pernos que lo sujetan al motor (Fig. 16). Quite los dos (2) pernos con un destornillador de punta plana, una llave de tubo de 5/16 o destornillador para tuercas. Hale el silenciador del motor. 3.
INSTRUCCIONES DE MANTENIMIENTO Y REPARACION AJUSTE DEL CARBURADOR La velocidad lenta del motor puede ser ajustada por la cubierta del silenciador / filtro de aire (Fig. 18). NOTA: Los ajustes realizados sin cuidado pueden dañar seriamente su unidad. Los ajustes del carburador deben ser realizados por un proveedor de servicio autorizado.
INSTRUCCIONES DE MANTENIMIENTO Y REPARACION LIMPIEZA DE LA UNIDAD ADVERTENCIA: Para evitar graves lesiones personales, apague siempre su unidad y espere que se enfríe antes de limpiarla o realizar cualquier tipo de mantenimiento. TRANSPORTE DE LA UNIDAD 1. Deje que la unidad se enfríe antes de transportarla. 2. Afloje las perillas del manubrio. 3. Pliegue el manubrio hacia abajo según se ilustra (Fig. 20).
RESOLUCION DE PROBLEMAS EL MOTOR NO ARRANCA CAUSA El tanque de combustible está vacío La bombilla de cebado no fue oprimida lo suficiente El motor está inundado El combustible es viejo o está mal mezclado La bujía de encendido está arruinada Parachispas obstruido ACCIÓN Llene el tanque con combustible bien mezclado Oprima la bombilla de cebado total de 10 veces Use el procedimiento de arranque Drene el tanque de gasolina / Agregue mezcla de combustible nueva Cambie o limpie la bujía de encendido Limpie o c
ESPECIFICACIONES MOTOR* Tipo de motor......................................................................................................................... Enfriado por aire, de 2 ciclos Desplazamiento ........................................................................................................................................ 31 cm3 (1,9 pulg3) R.P.M. de velocidad mínima ................................................................................................................ 2.800 - 3.
NOTAS E19
NOTAS E20
Declaración de Garantía de Control de Emisiones de la EPA Sus Derechos y Obligaciones de la Garantía La Agencia de Protección Ambiental y MTD LLC (MTD) se complacen en explicar la garantía del sistema de control de emisiones para su pequeño motor para uso fuera de la carretera del 2002 y posterior. Los nuevos motores pequeños para uso fuera de la carretera tienen que diseñarse, construirse y equiparse para cumplir las normas contra smog más estrictas.
PARTS LIST ENGINE PARTS - RYOBI 410r 2-CYCLE GAS CULTIVATOR 3 40 18 4 5 6 PPN - 21EK410G034 17 7 16 11 36 37 38 3 13 20 8 39 9 10 1 2 51 21 12 19 14 22 15 49 47 40 25 50 26 31 27 29 48 41 30 32 23 42 28 46 45 33 44 52 Item Part No.
PARTS LIST BOOM & CULTIVATOR PARTS - RYOBI 410r 2-CYCLE GAS CULTIVATOR PPN - 21EK410G034 4 1 3 2 4 3 1 10 11 14 6 5 8 18 7 6 17 13 20 16 21 12 15 Item 1 2 3 4 5 6 7 8 9 10 11 12 13 14 15 16 17 18 19 20 21 22 23 24 25 26 27 28 29 18 9 Part No.
GARANTÍA LIMITADA DEL FABRICANTE PARA: A continuación MTD expone una garantía limitada MTD LLC ("MTD") en relación con su nueva mercadería adquirida y utilizada en los Estados Unidos, sus posesiones y territorios.